 MC AFK
 user guide
Connect one bot, then learn the tool you need. Every section has a real screen, numbered steps and troubleshooting.
Android: Java through 26.3 / Bedrock through 1.26.51. Windows 0.1.9: Java 1.8.8–26.1 only.
Connect your first botAndroid images were captured from packages 1.2.3 / 51 and 5.10 / 105 in an isolated local test session. Screens show English UI; replace sample addresses, players and values with your own. Tap an image to open it full size.
Contents
- Connect your first bot
- Add a server
- Account, edition and avatar
- Panel and bot status
- Automatic /login and /register
- Transfer from lobby to game server
- Chat and quick tools
- Inventory and server GUI
- Maps, sidebar and Bedrock forms
- Movement and camera direction
- Choose, save and run a task
- Chest deposits and safety
- Crafting, furnace, harvest and villager trading
- What happens when inventory is full?
- Settings, textures and notifications
- Background operation and disconnects
- Shared time pool for extra bots
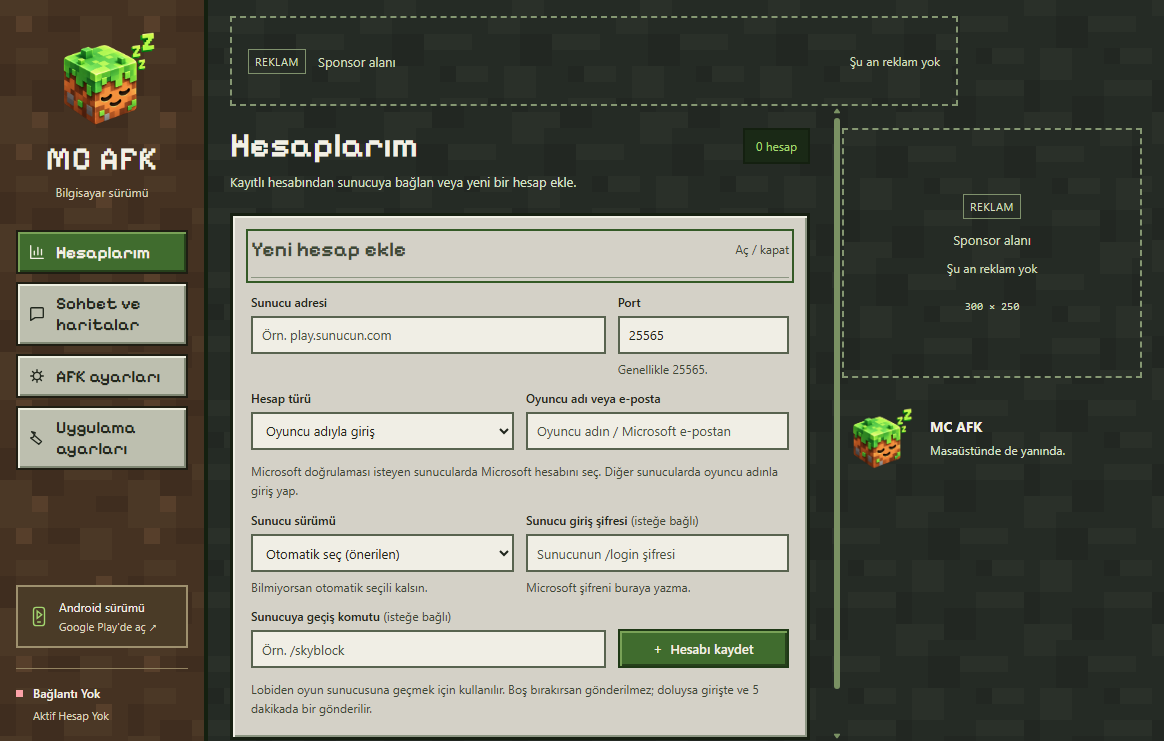
- Get started with Windows 0.1.9
Connect your first bot
Android · Java or Bedrock
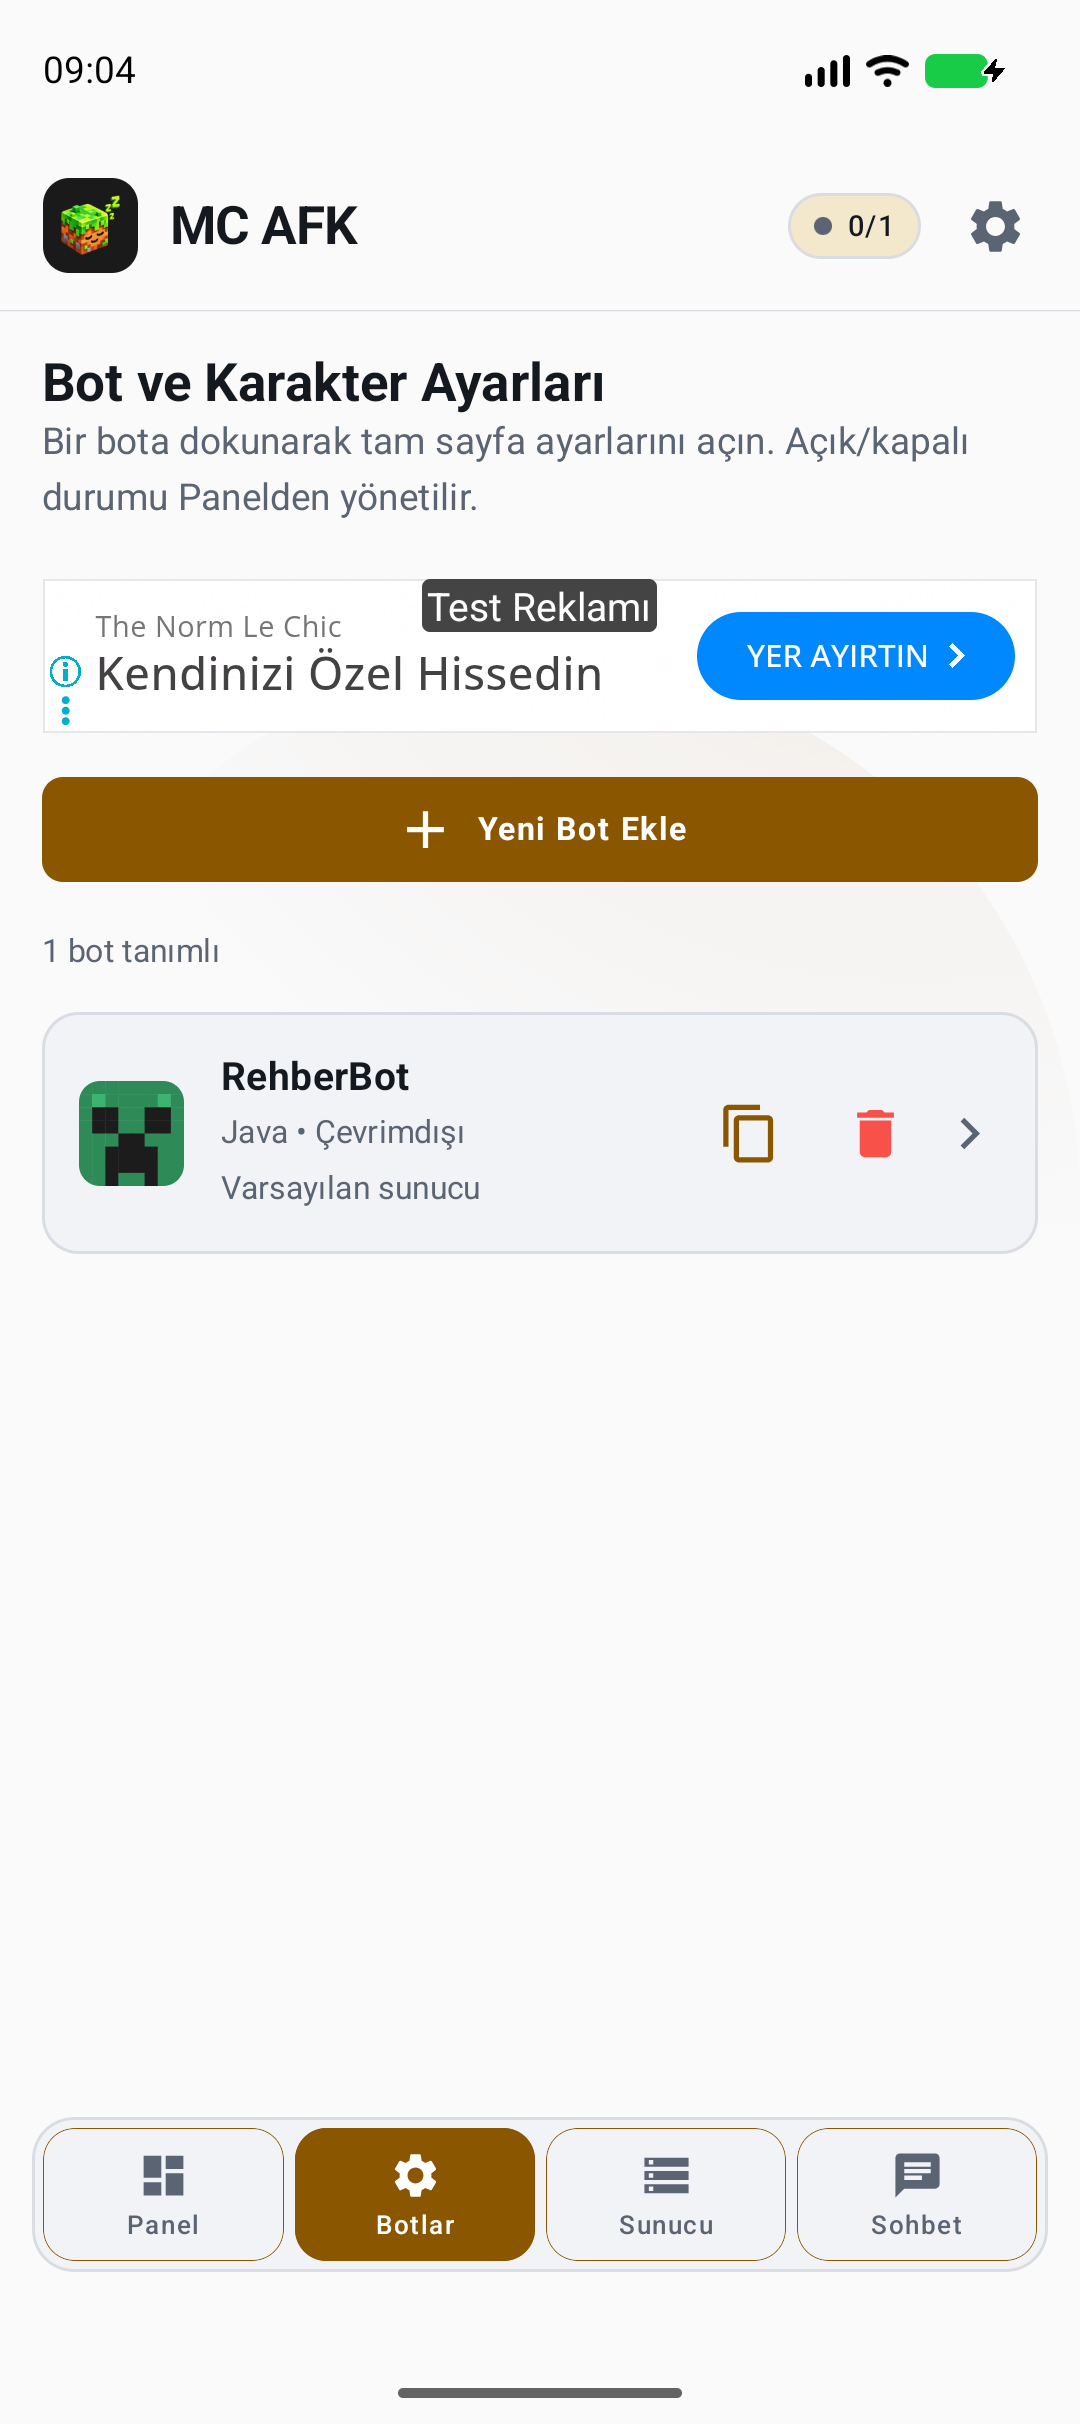
Follow Server → Bots → Panel → Chat to make your first connection. RehberBot and 10.0.2.2 in the screenshots are local capture data only; use your own server address.
- Install the Android app from the download page. For Windows, use the separate Windows section below.
- Save the address in Server; use Bots → Add First Bot to select your account and edition.
- In Panel, enable the top service switch and the bot’s switch. Check for “Bot connected” in Chat.
The connected-bot count increases; chat and tools appropriate to the connection become available.
If it will not connect, check the address/port, the bot’s actual edition and Microsoft requirements first. Avoid rapid repeated connection attempts.
Add a server
Android · Java through 26.3 / Bedrock through 1.26.51
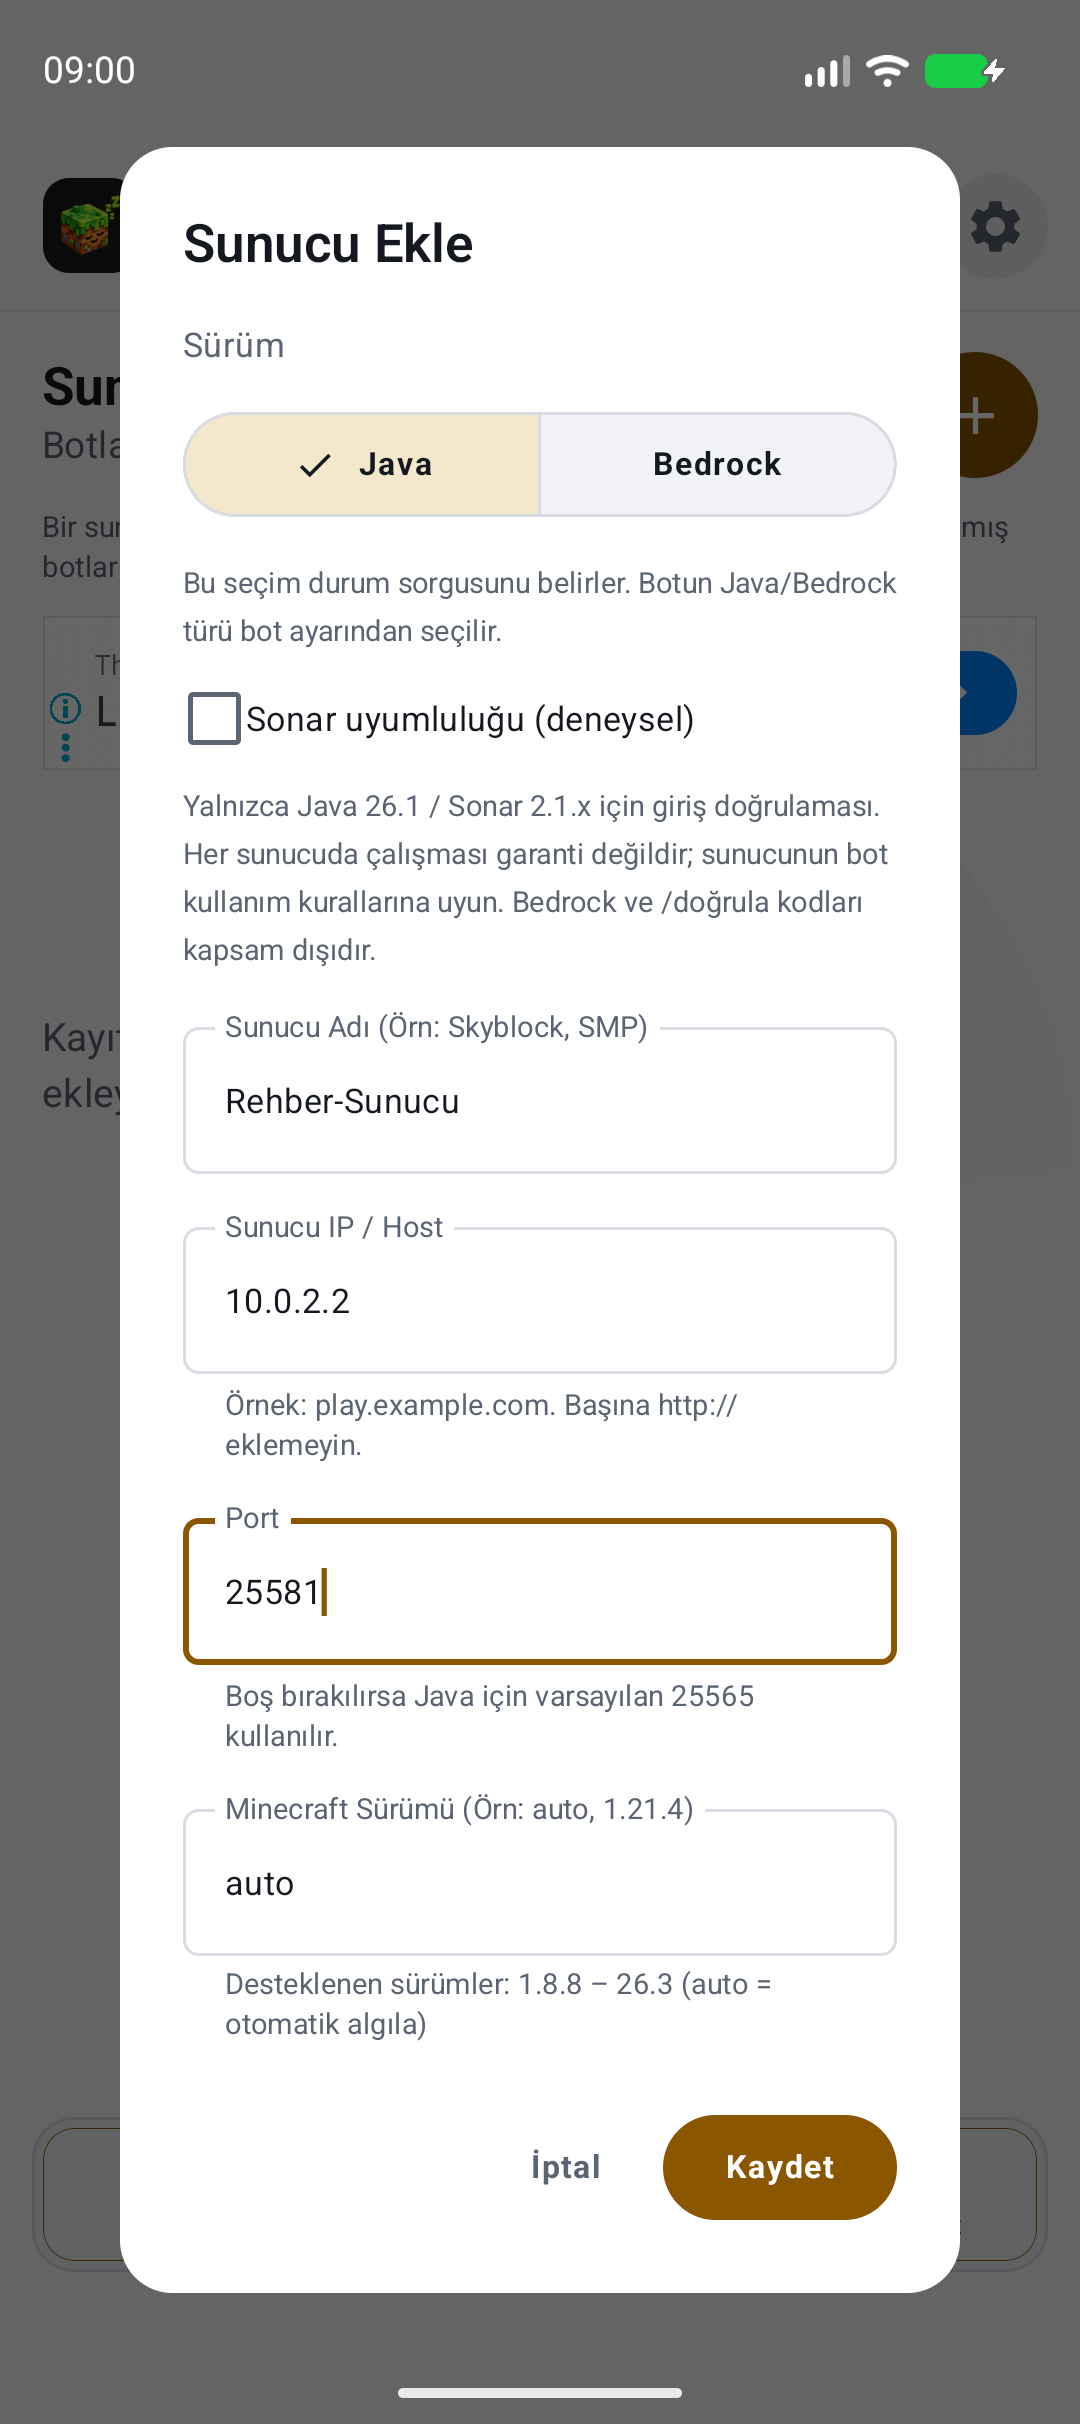
A server profile saves its address and version selection. Java/Bedrock in the Server screen controls status queries; select the connecting bot’s edition separately in Bots.
- Server → Add Server at the top right. Give the profile a recognizable name.
- Enter only a domain or IP in Server IP / Host, without http:// or https://. Use the server’s port; otherwise follow the edition-specific field help.
- Auto is recommended for Minecraft Version. Save and select the default server from the list. A bot with a custom address does not use this default.
The address appears in Panel; connections and status queries use the selected profile.
Changing the version number does not solve every connection issue. The supported server version and the bot’s Java/Bedrock edition must match.
Account, edition and avatar
Android · Microsoft, or offline accounts on compatible Java servers
Microsoft authentication and a server’s /login password are different. Bedrock uses Microsoft. Offline Java accounts only work on servers allowing player-name sign-in.
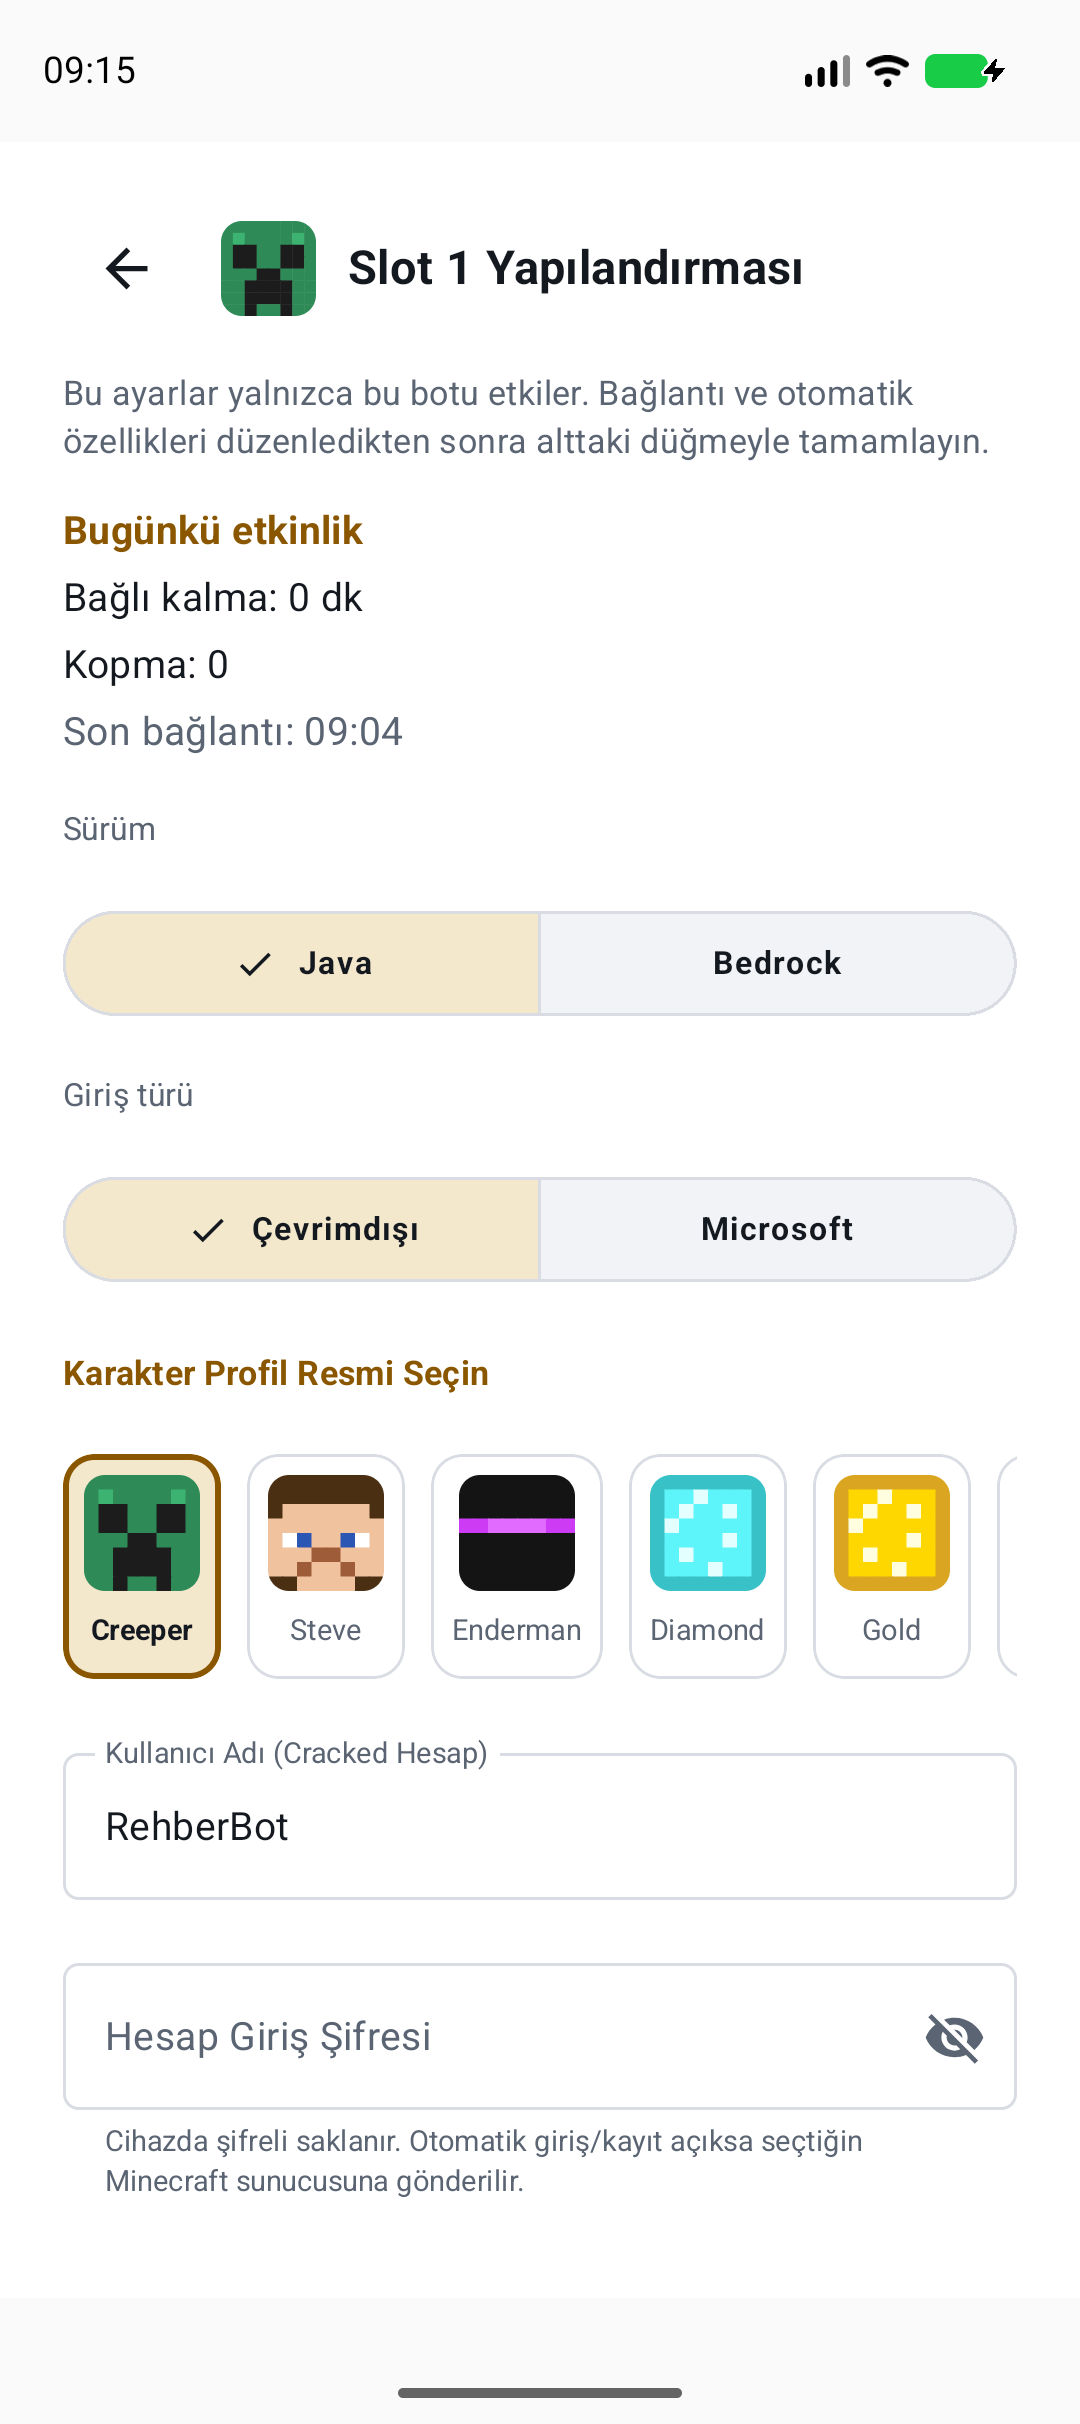
- Bots → Add New Bot, or select an existing bot → Edition: Java / Bedrock. Do not skip this because of the server profile’s edition.
- For Java, choose the appropriate Sign-in Type. If Microsoft is required, complete the official flow opened by “Sign in to Microsoft account”. Never enter your Microsoft password in Account Login Password.
- Choose an avatar and enter the player name for an offline account. Scroll to the bottom and finish using Create Character or the save action.
The bot appears in Bots with its edition and account. Changing its avatar does not change its edition.
Complete Microsoft authentication first if unfinished. Using the same account in another client may disconnect it under the server’s session rules.
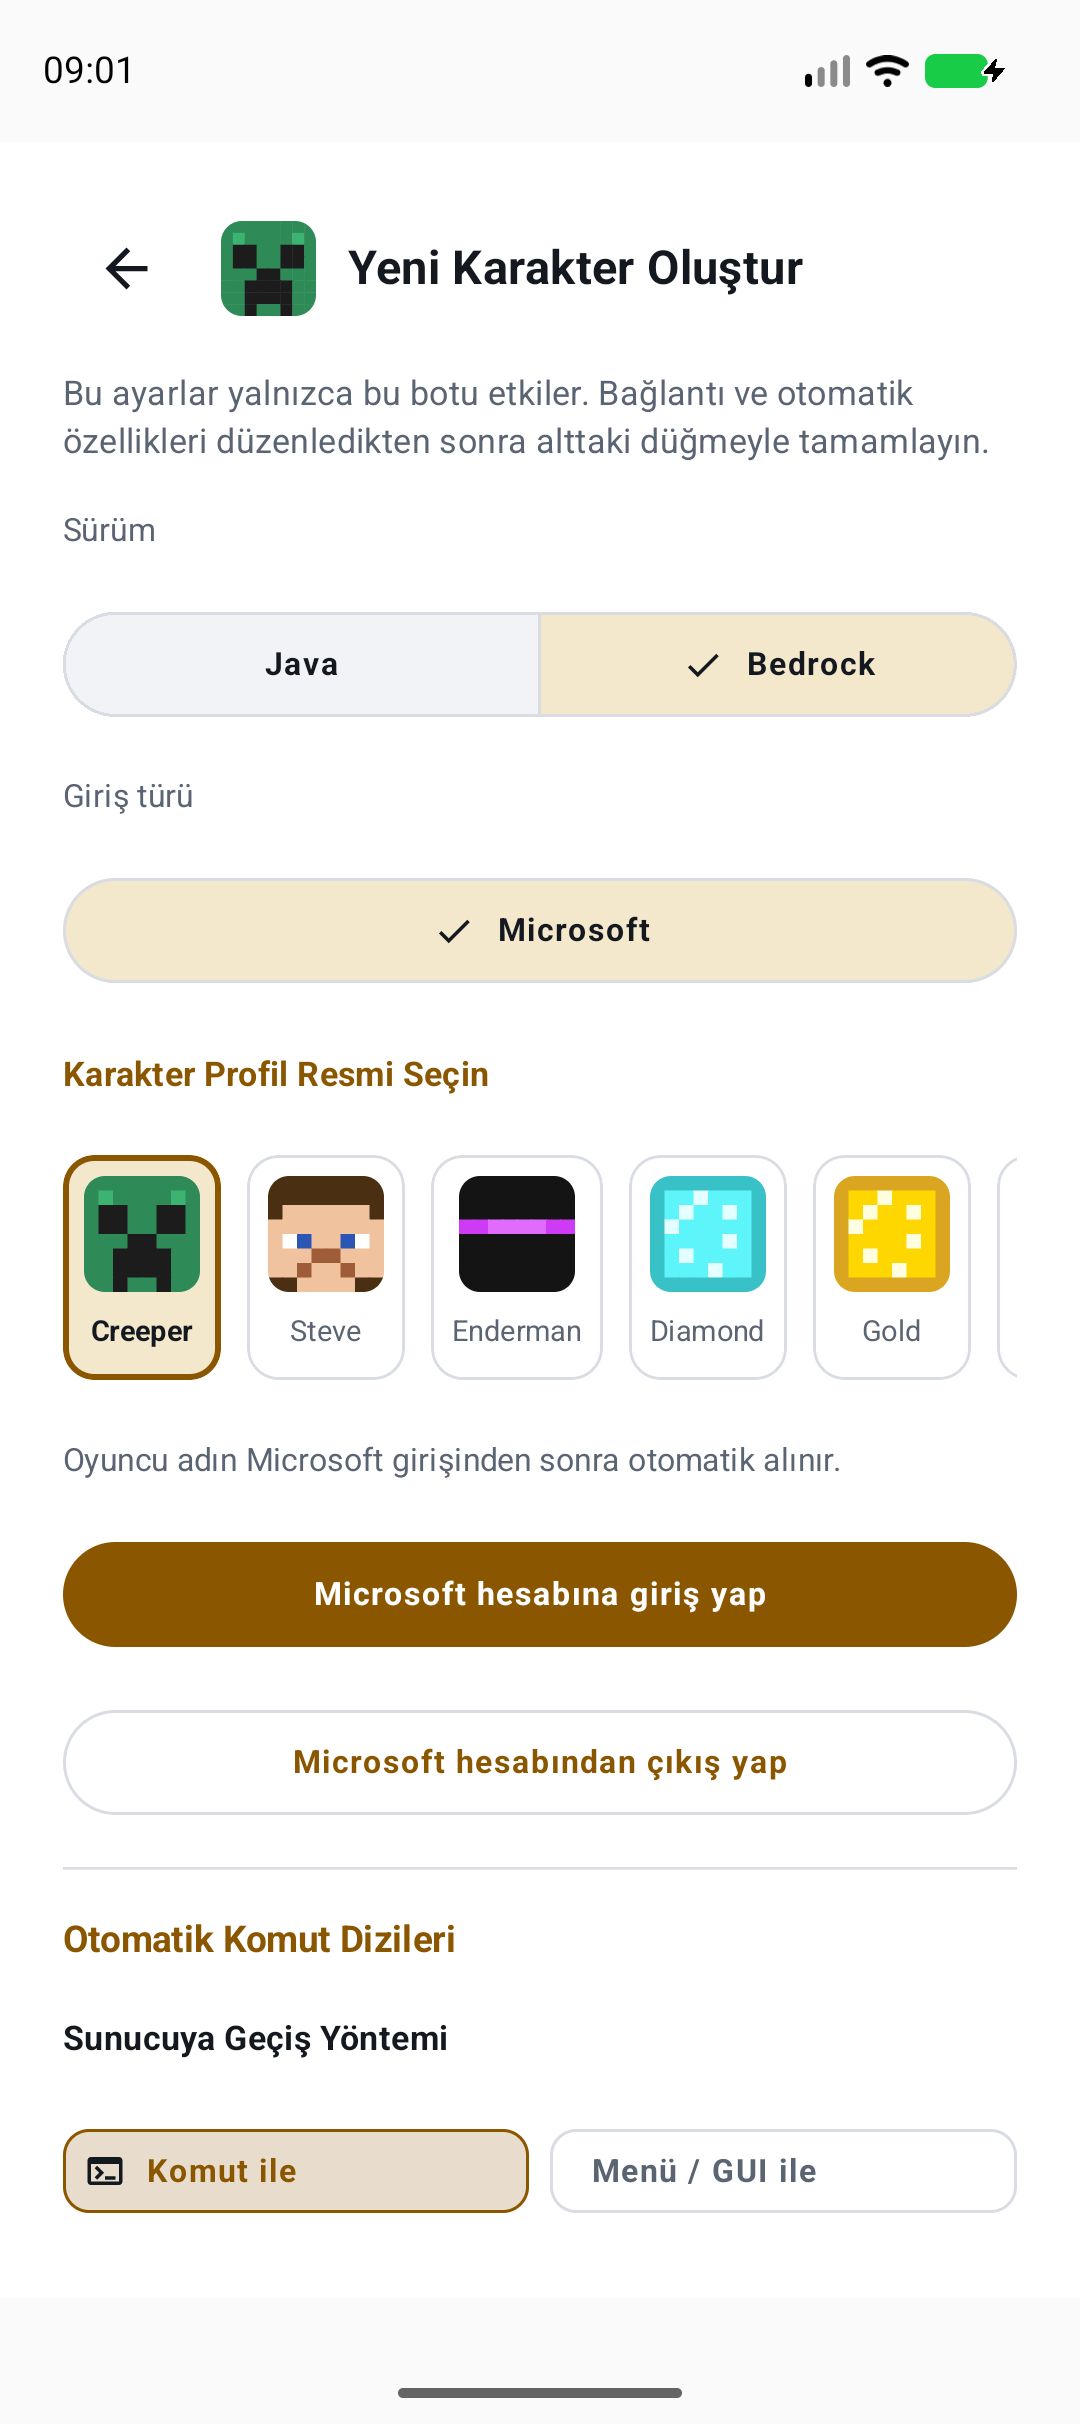
Select a Bedrock account
- Select Bedrock in bot settings and confirm Microsoft sign-in.
- Use Sign in to Microsoft Account and authenticate an account with access to the game through the official flow. Save at the bottom.
A bot may remain Bedrock even if the server profile says Java. Bot settings determine the connection edition.
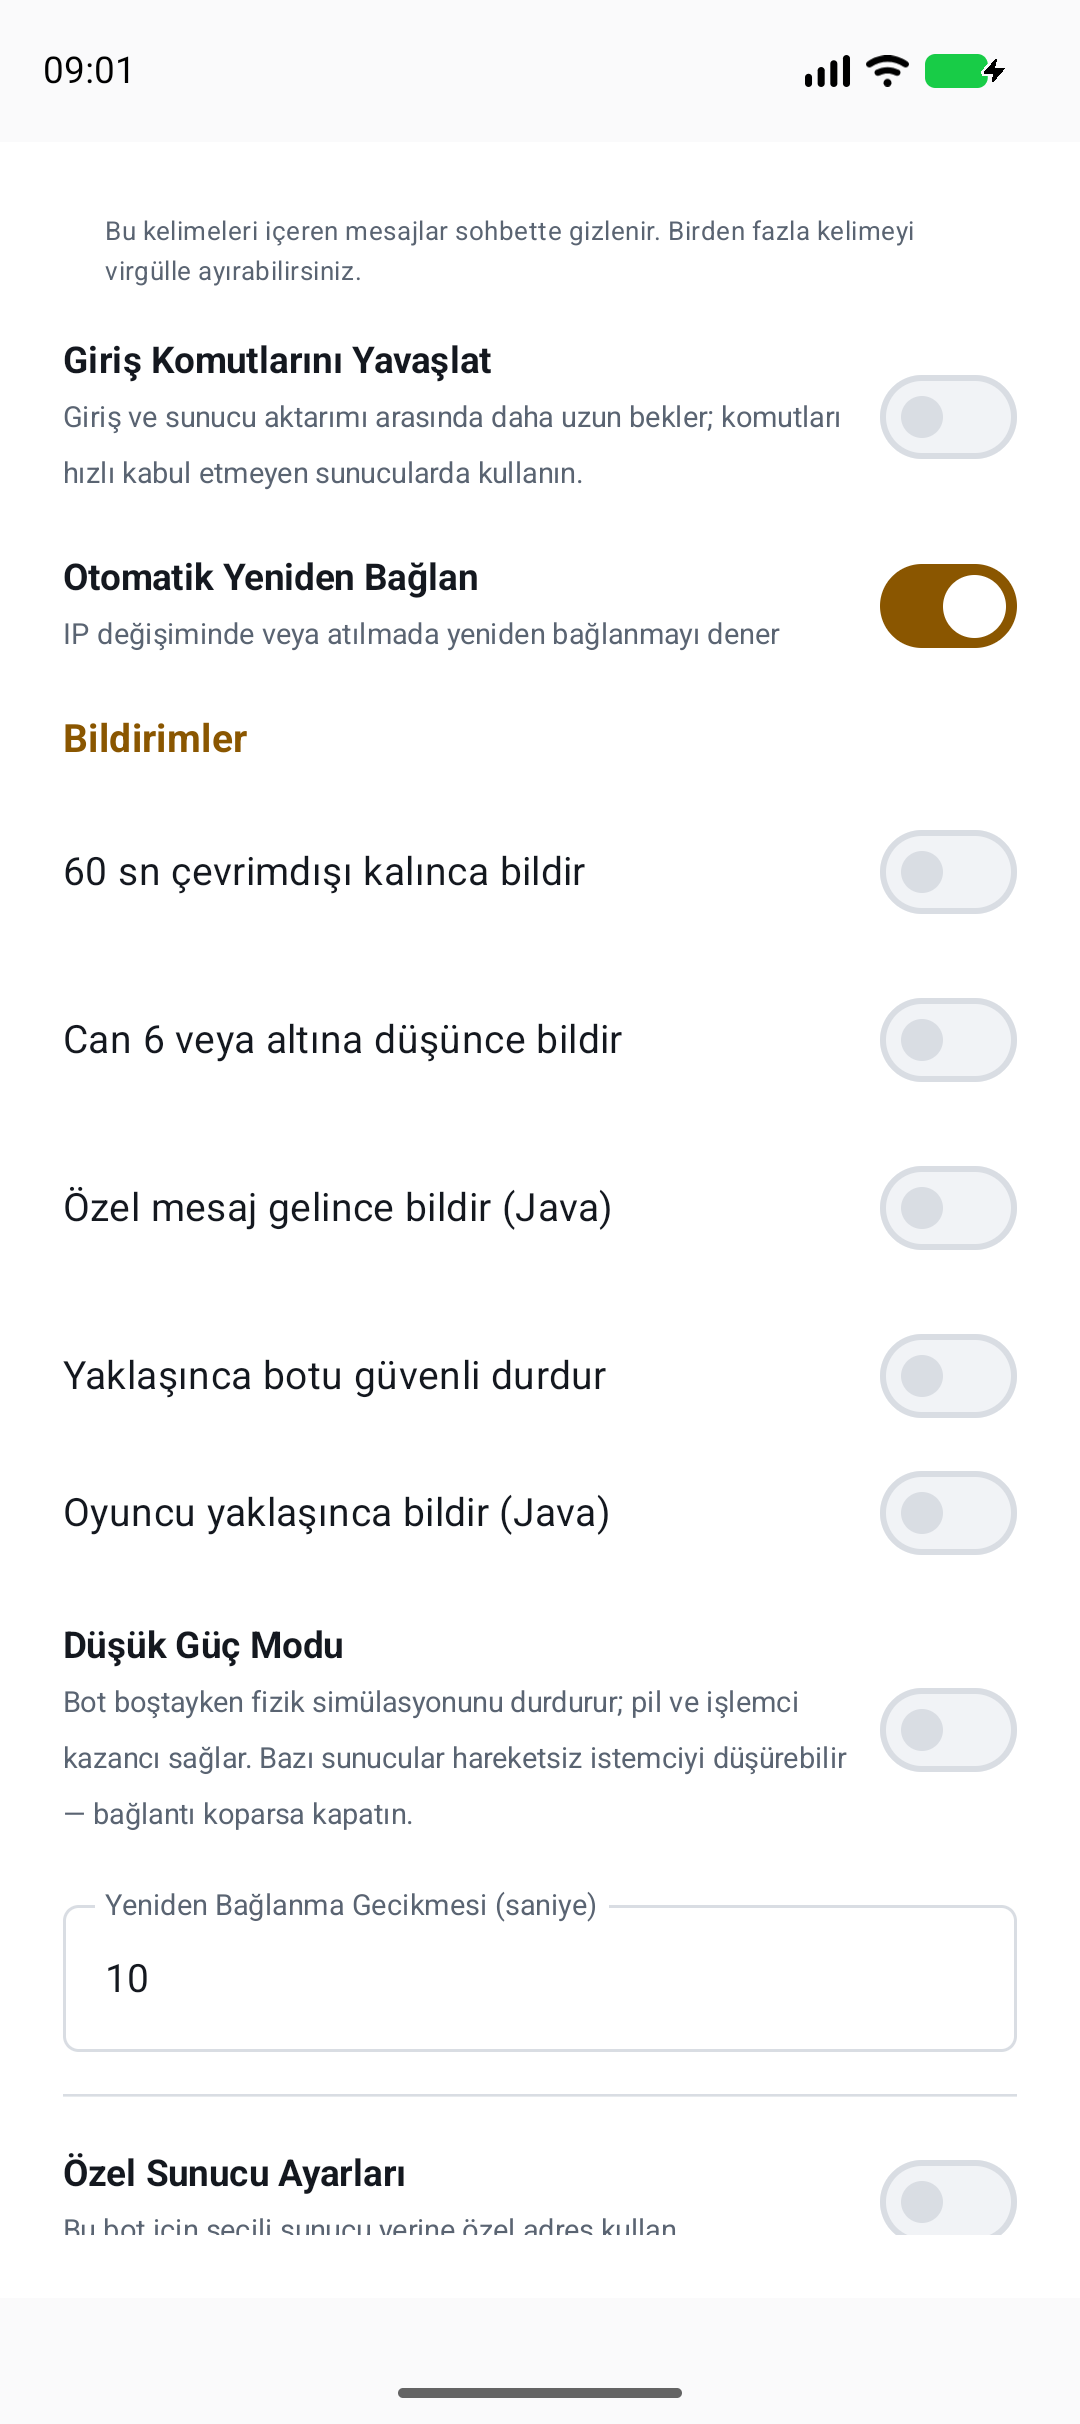
AFK modules and custom connections
- Scroll down the bot form. Custom Server Settings connects this bot to a different server from the default. Use SOCKS5 proxy only with valid proxy details.
- Configure Auto Movement (Anti-AFK), Auto Eat and Auto Command as needed. Eating requires suitable food; commands require a valid list/interval.
- Auto Clicker clicks at an interval; it is not a mining task. Use the task tab for continuous mining. Save changes using the bottom form action.
AFK movement does not override server rules. Evaluate low-power, repeat-command and movement options separately for your server.
Panel and bot status
Android · A saved server and bot are required
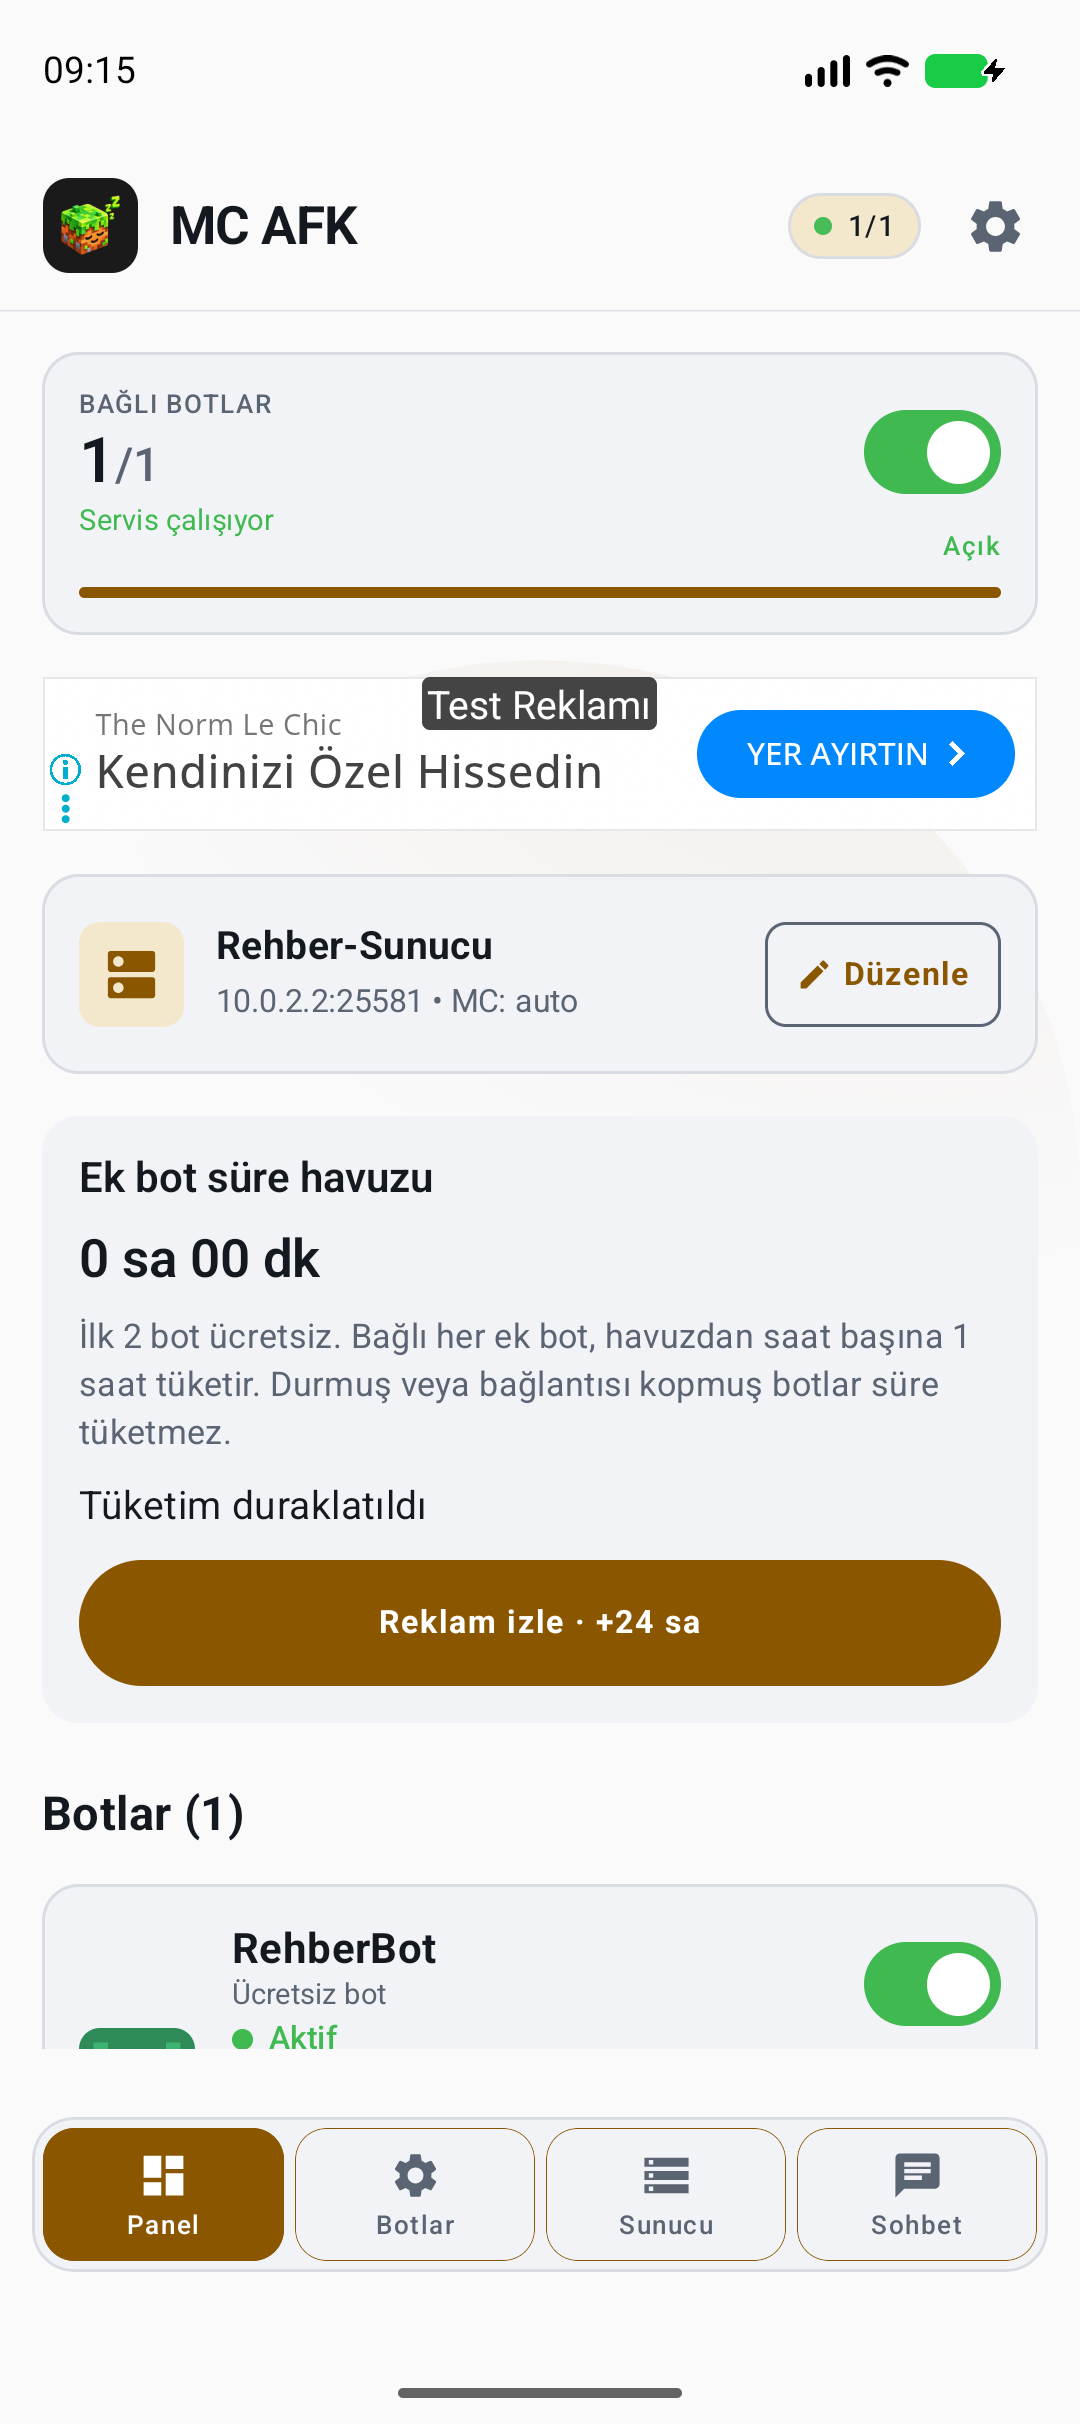
Panel combines the service, individual bot switches and the extra-bot time pool. An enabled switch requests a connection; confirm the actual connection in Chat.
- Enable the top service switch in Panel, then enable each bot you want to run.
- Read connected, connecting or error status on the bot card. Use Chat to view that bot’s messages.
- Open bot settings from Bots; configure Auto Reconnect and its delay if needed, then save. Disable the bot switch to stop one bot or the service switch to stop them all.
The Panel counter reports bots actually connected. Daily connection time and disconnect counts are in bot settings.
Read the last chat message instead of repeatedly toggling a failed connection. Disable Low Power Mode in bot settings if it causes disconnects on that server.
Automatic /login and /register
Android · When the server uses a login plugin
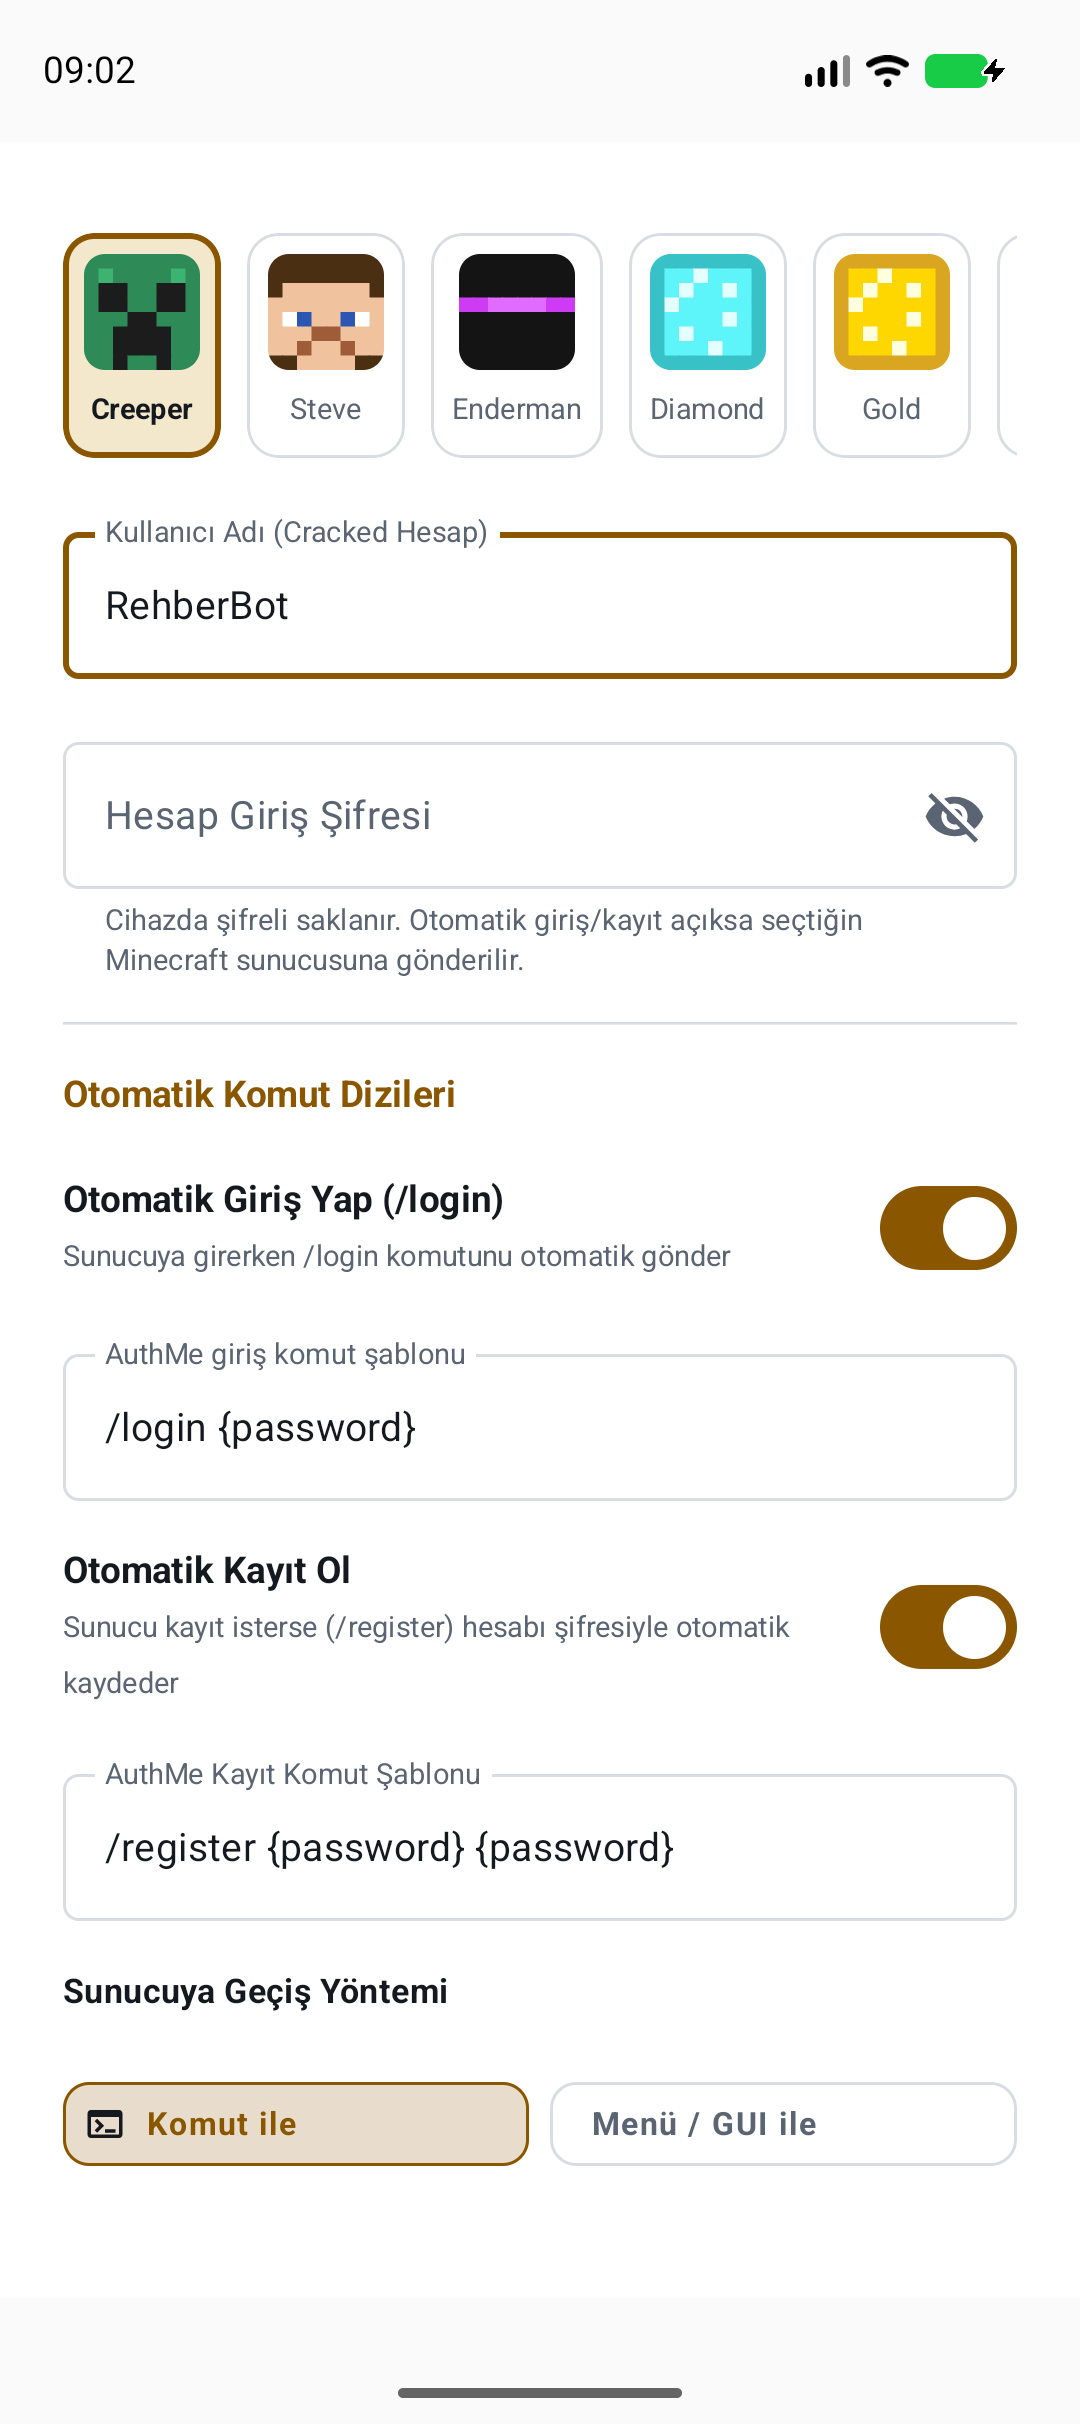
This sends the Minecraft server’s own login/register commands. Do not use your Microsoft password here. The {password} placeholder is filled from this bot’s Account Login Password.
- Bots → bot → enter only the password for this server in Account Login Password.
- Enable Automatic Login (/login) and keep the template in the format required by the server: /login {password}. If registration is required, check Automatic Register and /register {password} {password}.
- Save at the bottom; after reconnecting, read the login result in Chat. Use Slow Login Commands on slower servers.
The appropriate command is sent when the server requests authentication; transfer can proceed after successful login.
Sonar compatibility is experimental and limited to Java 26.1 / Sonar 2.1.x; it is not a general solution for Java 26.3 or Bedrock. Complete CAPTCHA and /verify codes yourself. Never share your password in a support screenshot.
Transfer from lobby to game server
Android · Second-menu automation is Java-only
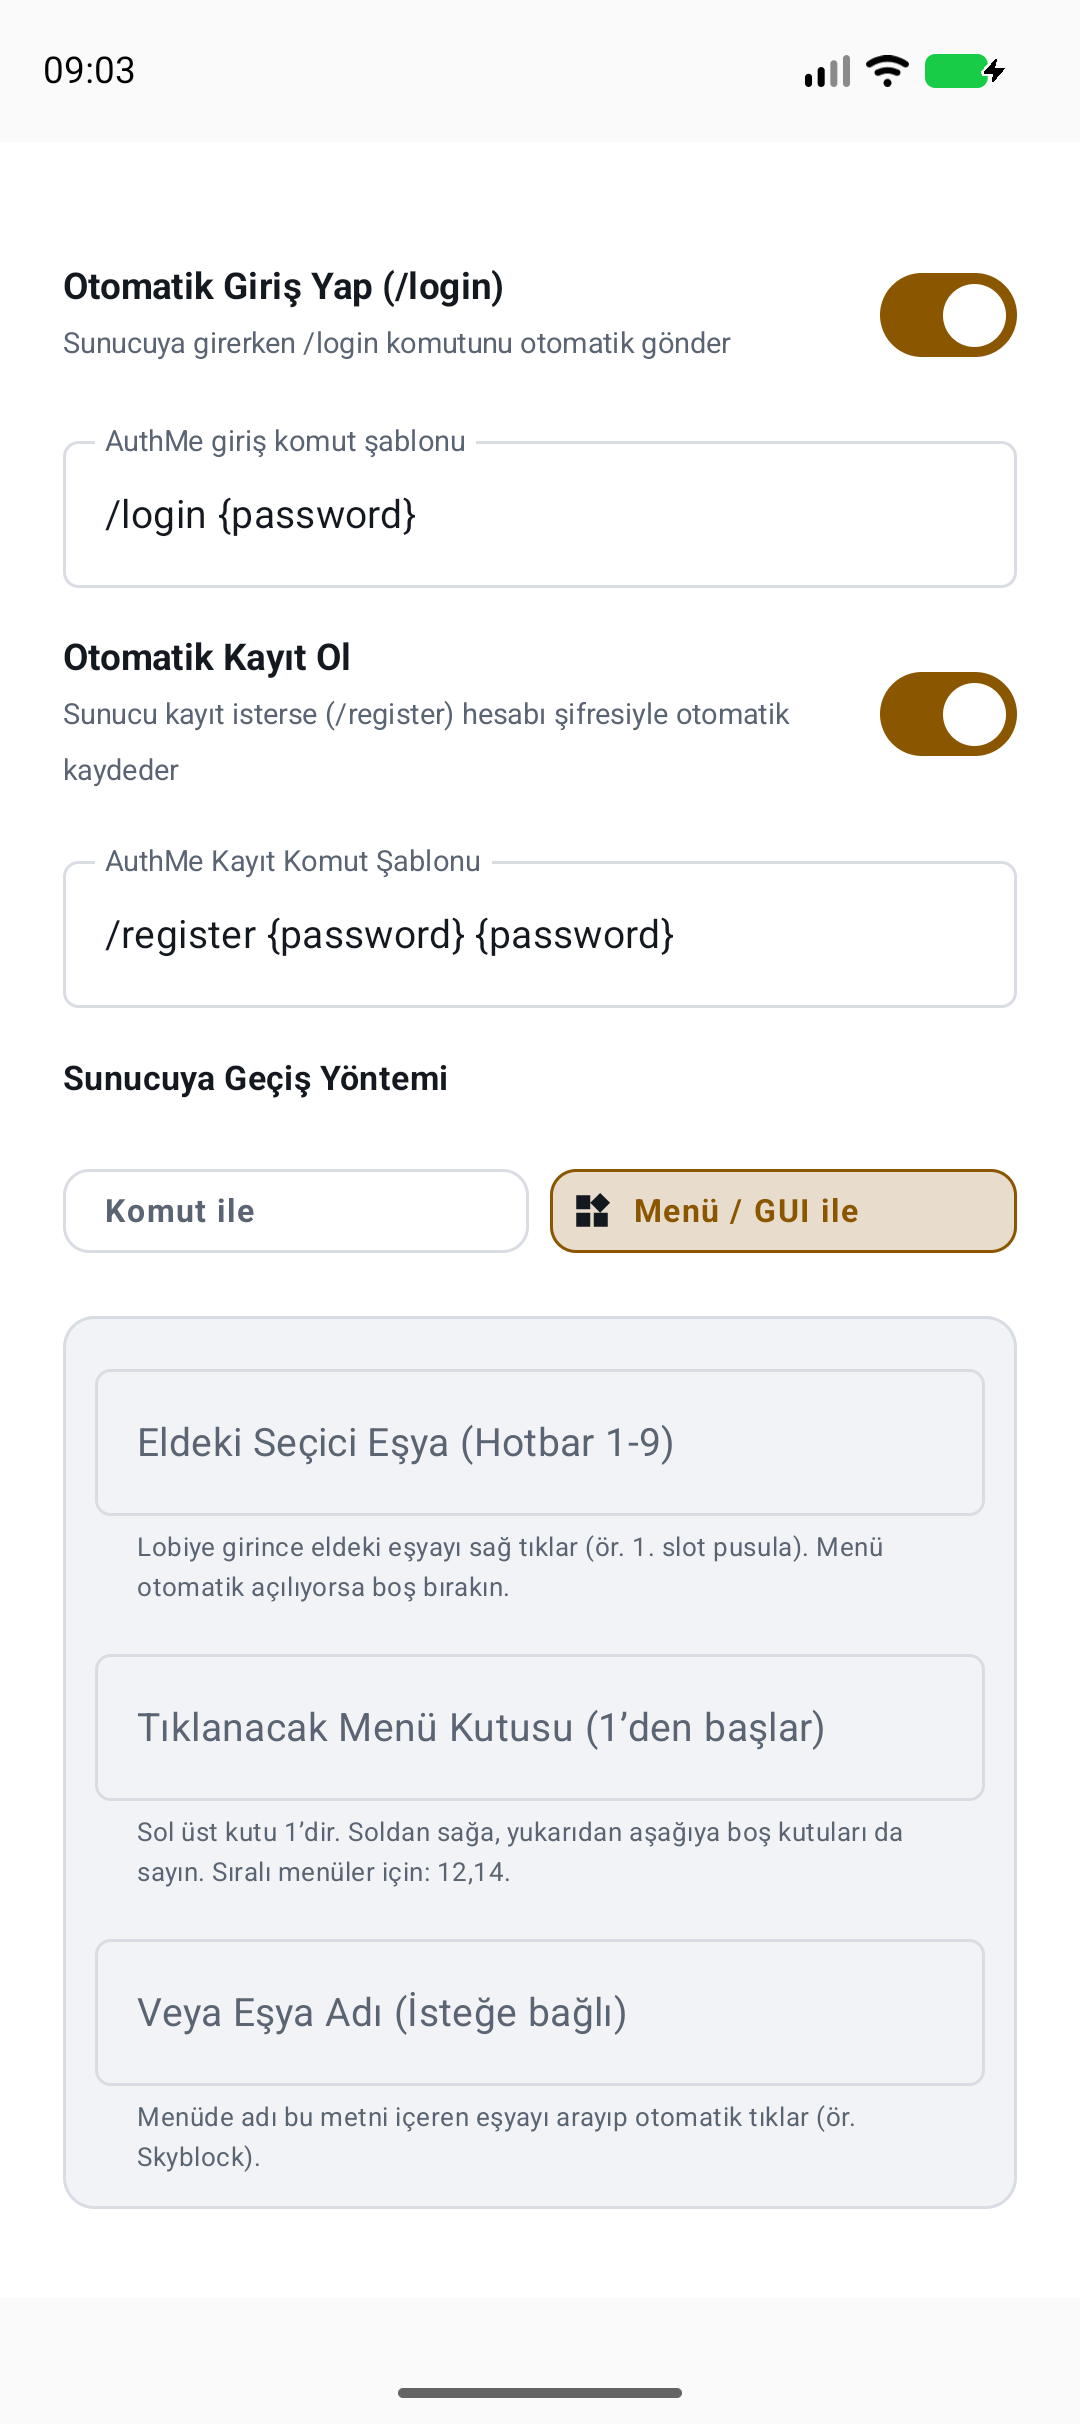
Authentication must finish first. Transfer Method uses a command or the server’s GUI. Check server-specific commands, items and menu layout in the normal game client.
- Command: enter the server’s transfer command, for example /skyblock only if that server supports it. An empty field sends no command.
- Menu / GUI: set Held Selector Item (Hotbar 1–9) to the item that opens the menu. Use 1 for a compass in the first hotbar slot, or leave it blank if the menu opens automatically.
- Target Menu Slot counts from 1 at the top left, including empty slots. In nine columns, 12 is row two, column three. It is not a hotbar number. For successive menus use 12,14 or an appropriate item-name filter.
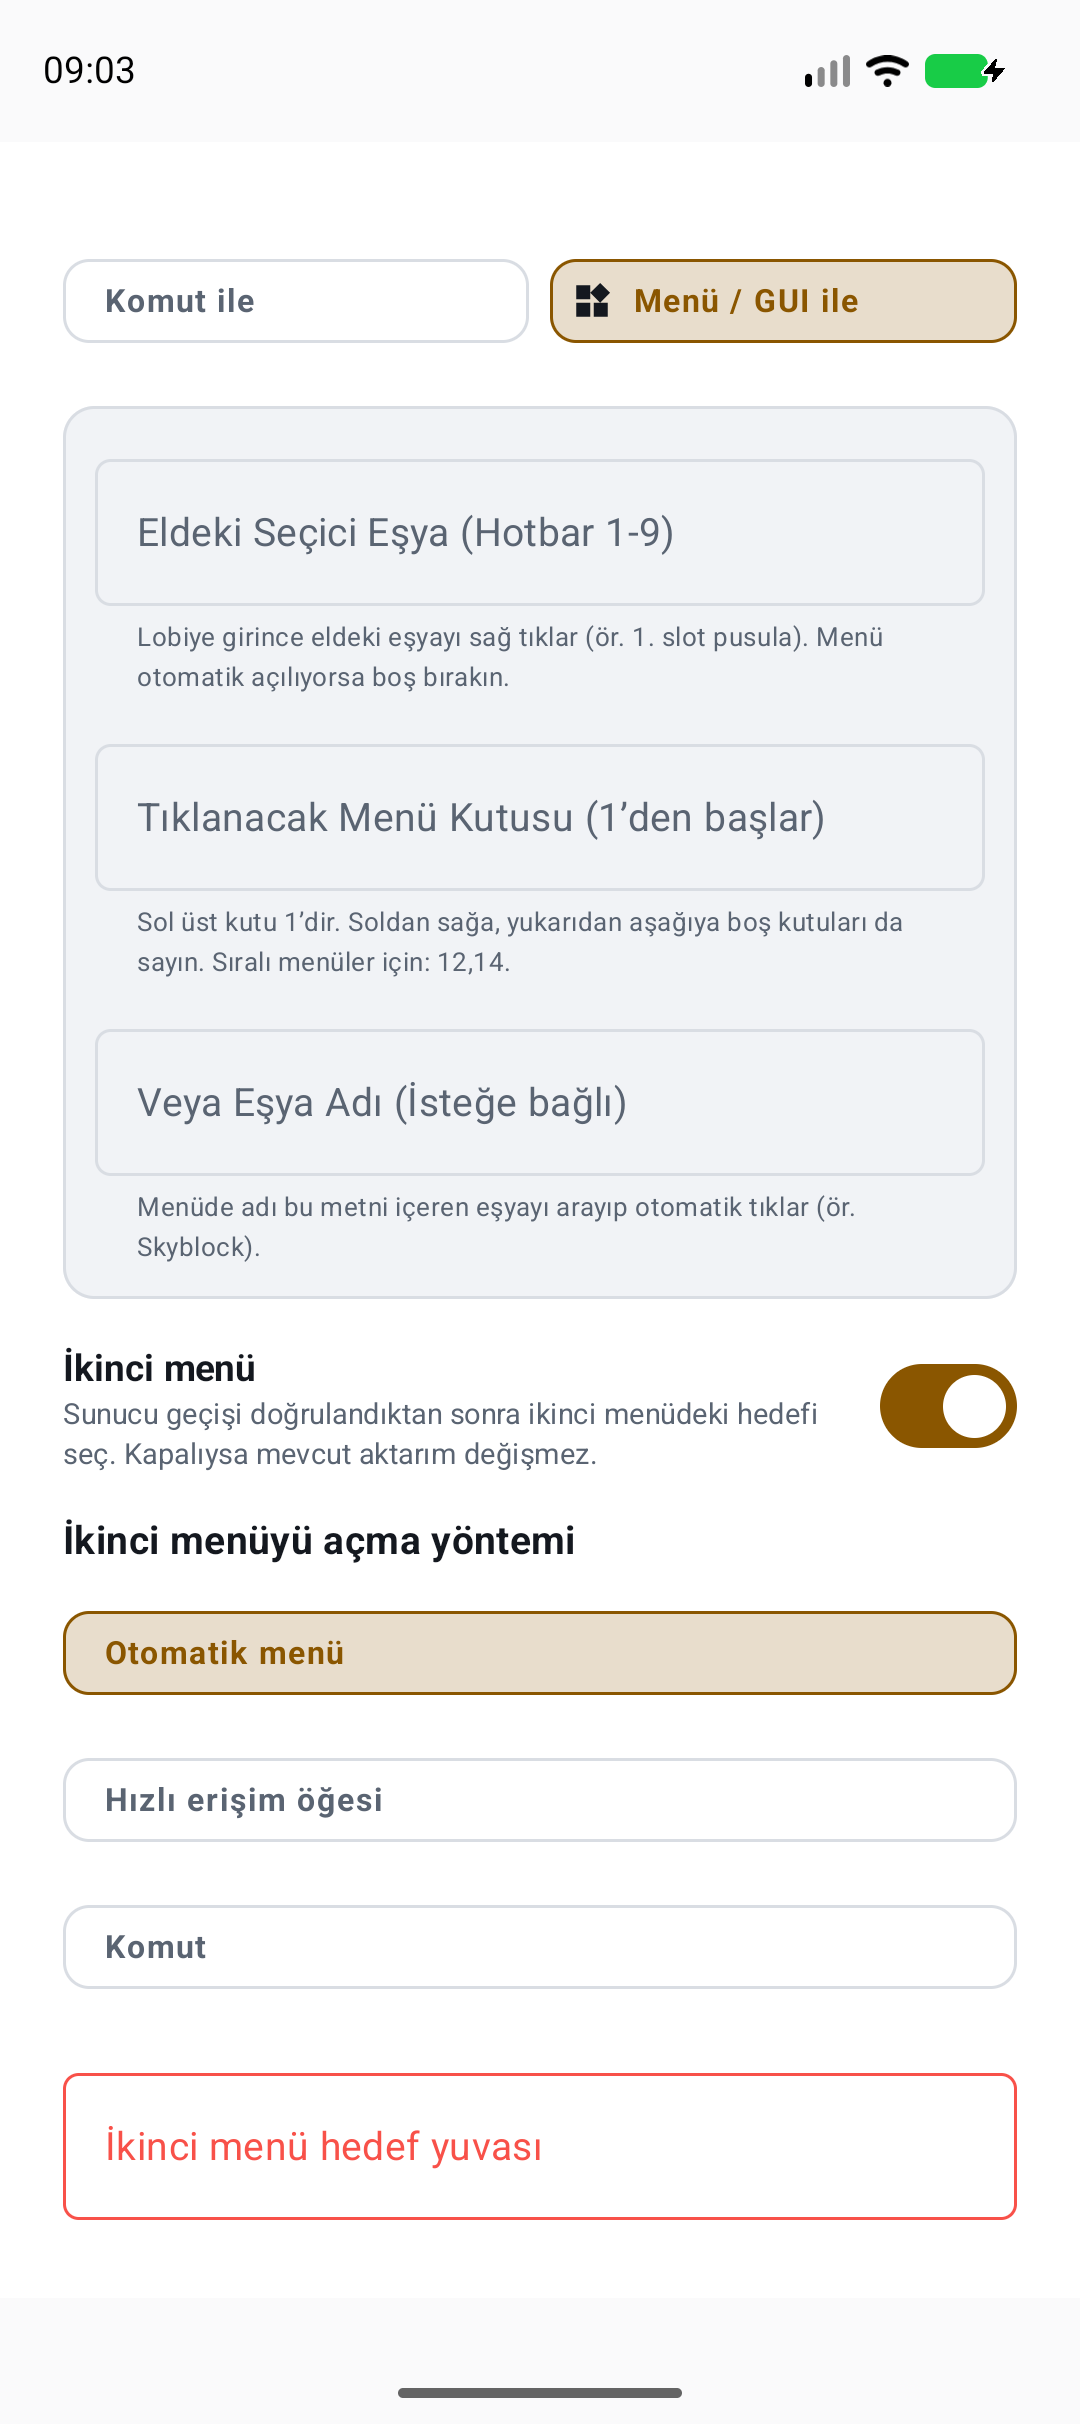
- If needed on Java, enable Second Menu. Select Automatic Menu, Hotbar Item or Command and its target slot/item name for the menu opened after the first transfer is confirmed. Save.
The first transfer is confirmed; a correctly configured second-menu automation runs afterward only if enabled.
If the menu opens but transfer fails, check the real slot/item name. Second Menu is off by default. A transfer-failed message means subsequent steps have not completed.
Second menu: an optional next step
- Enable Second Menu on a Java bot only if another selection is needed after the first server transfer.
- Automatic Menu waits for a window; Hotbar Item uses your selected hotbar item; Command sends your supplied menu-opening command.
- Enter the target slot or item-name filter and save. The second stage does not start if the first transfer fails.
The screenshot shows validation because no target is entered yet. Fill the actual server target; do not leave the red field empty.
Chat and quick tools
Android · Tools depend on the connection’s edition
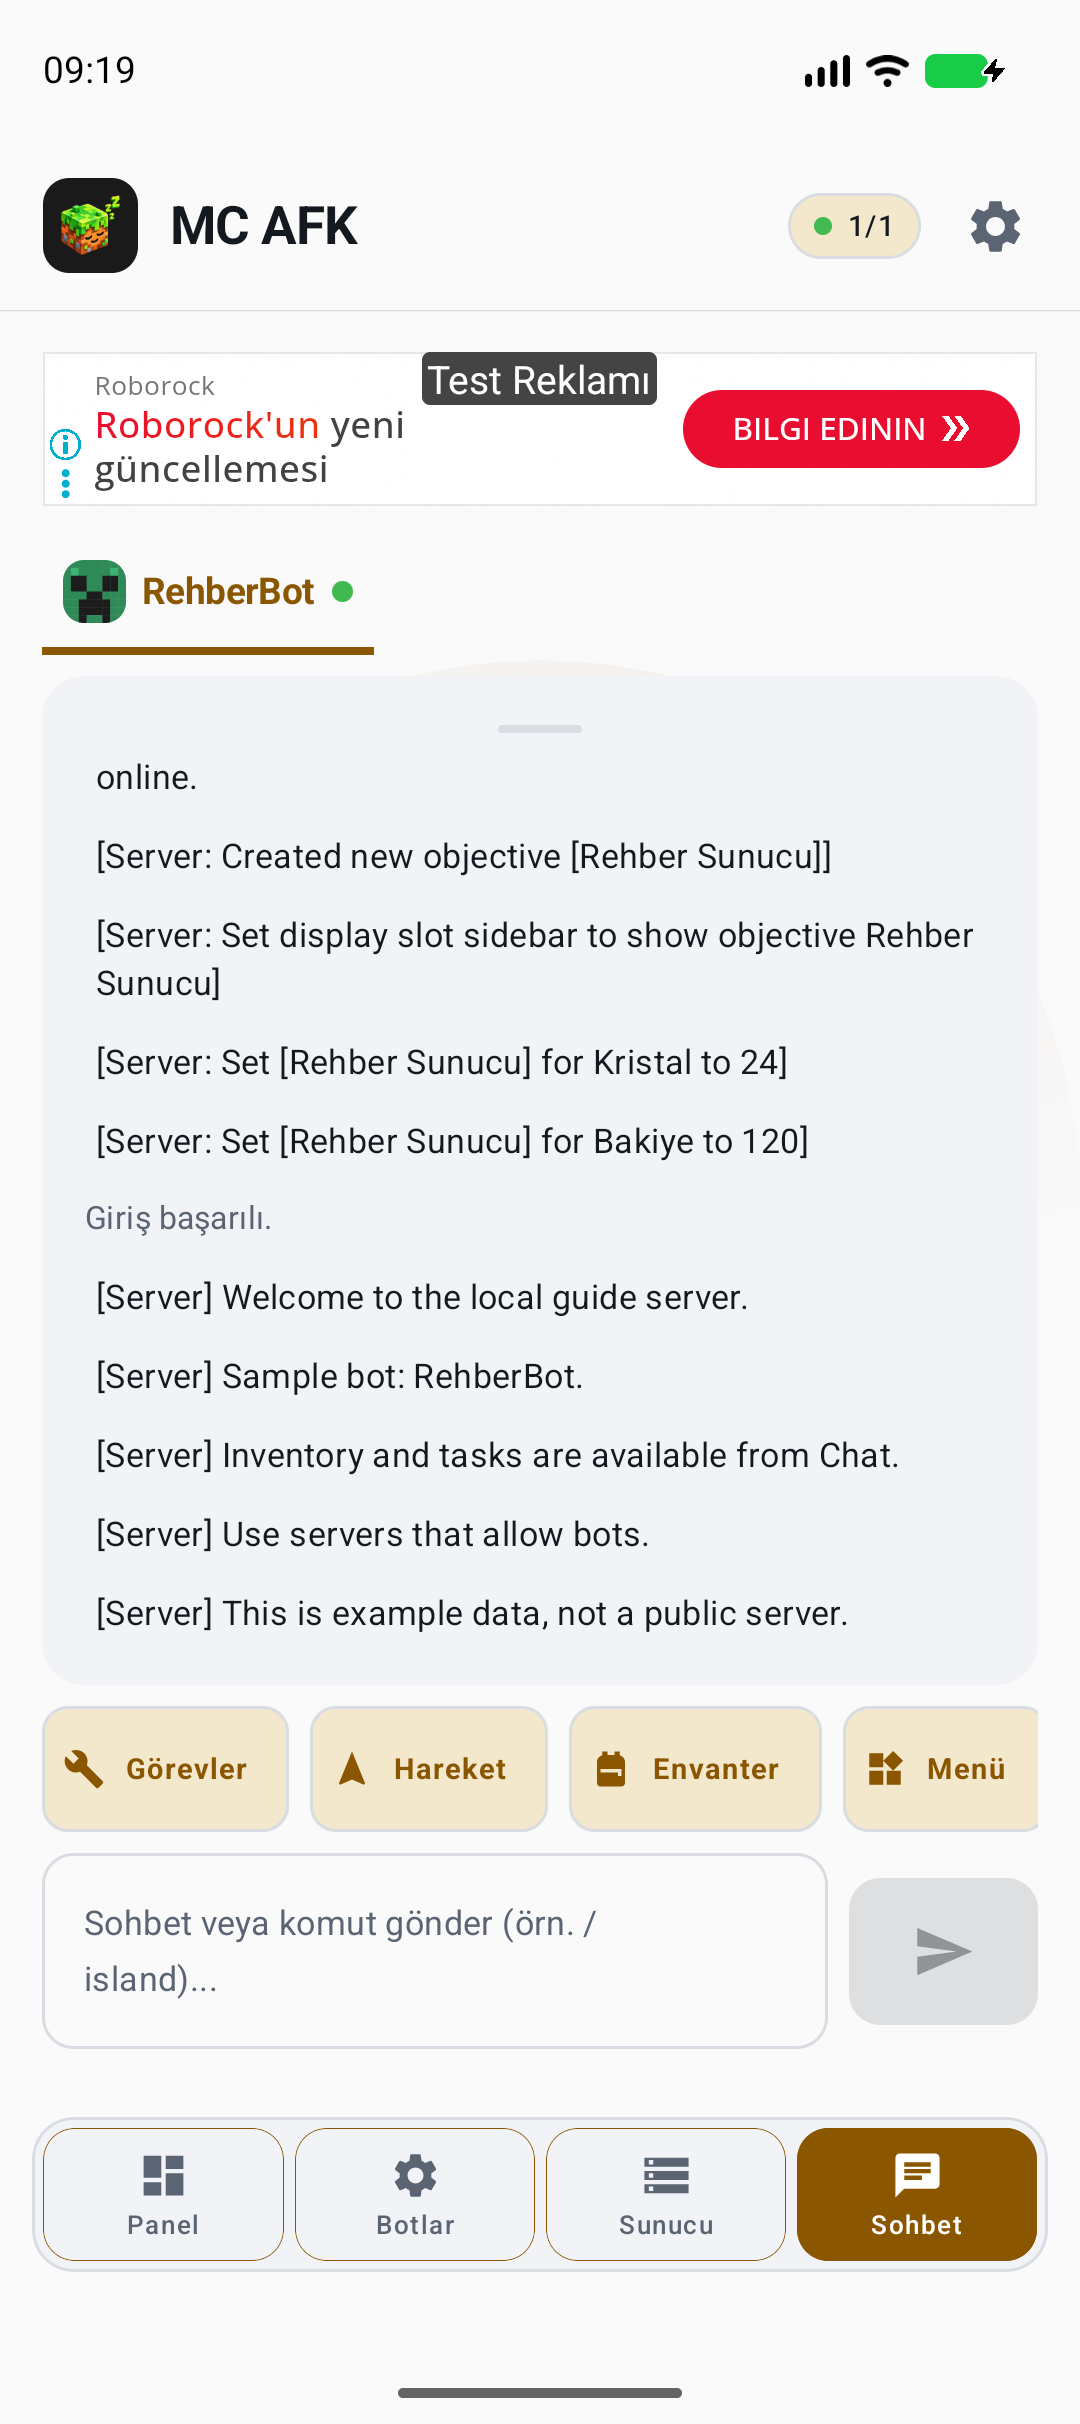
Select the correct bot in Chat first. The quick-tools row scrolls horizontally; it contains more than the first four visible buttons.
- Select the bot’s name at the top and send a message from the chat/command field. Start commands with /.
- Tap clickable TP/trade accept or decline text received from the server. This executes only the actual action sent by the server. Use chat search to find this bot’s messages.
- Scroll the tool row sideways to Players, Bulk Command and Sidebar. Select target bots carefully for bulk commands; do not broadcast a personal /login password.
Messages appear in the selected bot’s chat; command results come from the server.
Controls may be disabled while disconnected. Seeing Accept/Decline does not prove completion; check the resulting GUI or server response.
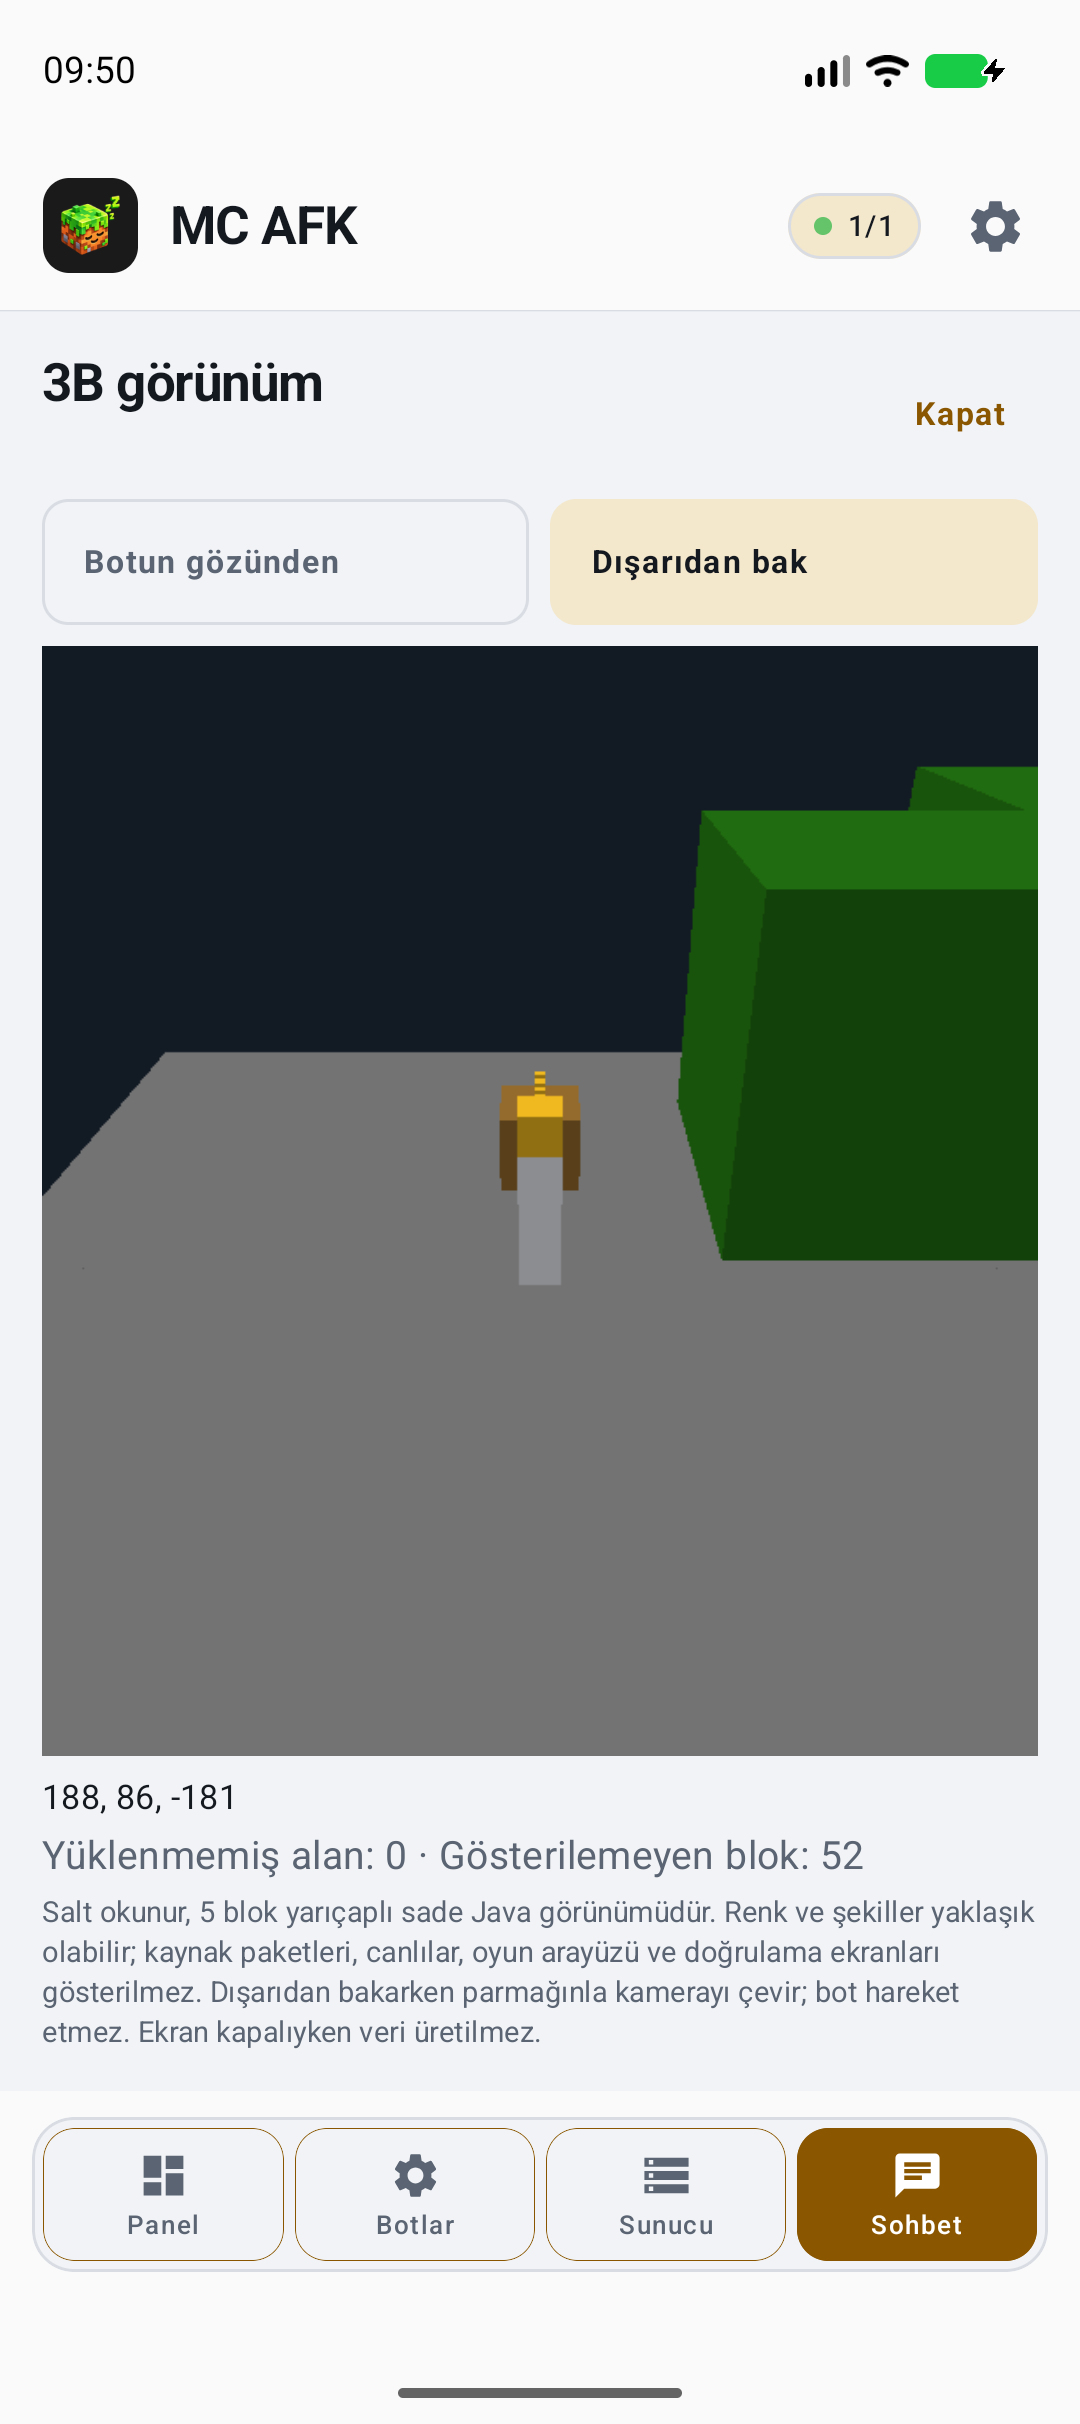
3D view: inspect the nearby area
- Select a connected Java bot, scroll Chat’s quick tools sideways and tap 3D View. Wait for loading to finish.
- Bot View shows the bot’s current perspective. In External View, drag to rotate only the camera; the bot does not move.
- Read Missing Area and Unsupported Block counts. Use Close to return; reopen after reconnecting if the bot is disconnected.
This is a read-only simplified Java view with a five-block radius; colors/shapes may be approximate. It does not show resource packs, entities, game UI or verification screens, and is not a Bedrock feature. The capture shows local rendering, not performance or full-world coverage on every device/server. Use the Movement minimap if WebGL fails.
Inventory and server GUI
Android · Inventory data must be received from the server
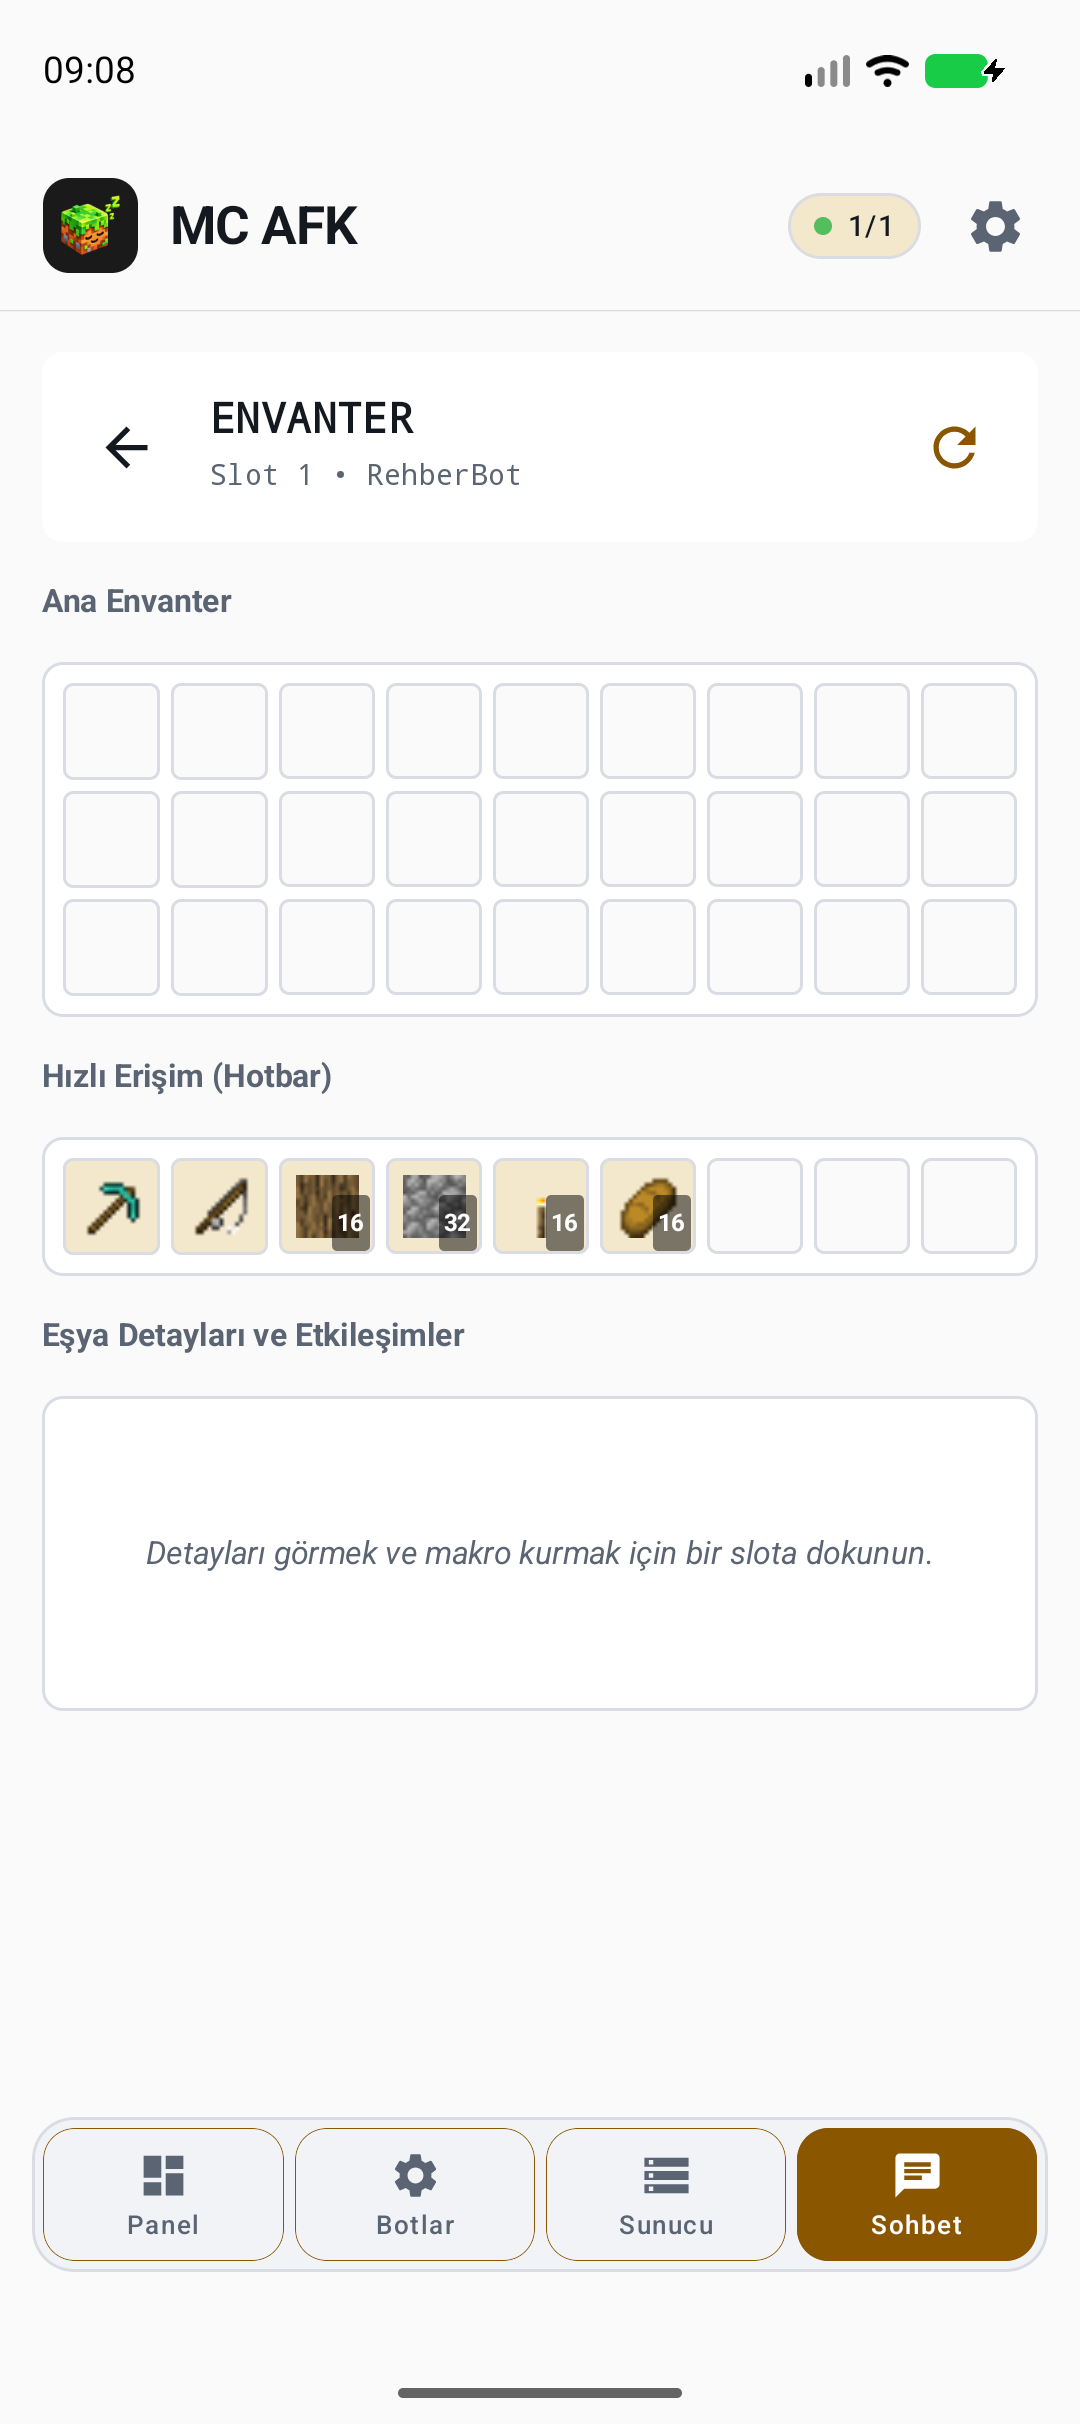
Main Inventory, Hotbar and an open server menu are separate areas. Seeing an item icon is not the same as the server confirming a move.
- Chat → Inventory. Tap a slot to open Item Details and Interactions.
- Choose the displayed left/right click, move or hotbar action appropriate to your goal. Count GUI slots from 1 at the top left; hotbar 1–9 is separate.
- After acting, refresh or wait for new inventory data. Open a menu via Chat → Menu or by using the correct hotbar item.
Confirmed changes appear in the updated inventory. Download a resource pack in settings if textures are missing.
Protected or custom menus may reject clicks under server rules. If an item did not move, check the connection and active menu before repeating the action.
Maps, sidebar and Bedrock forms
Android · Only data actually sent by the server
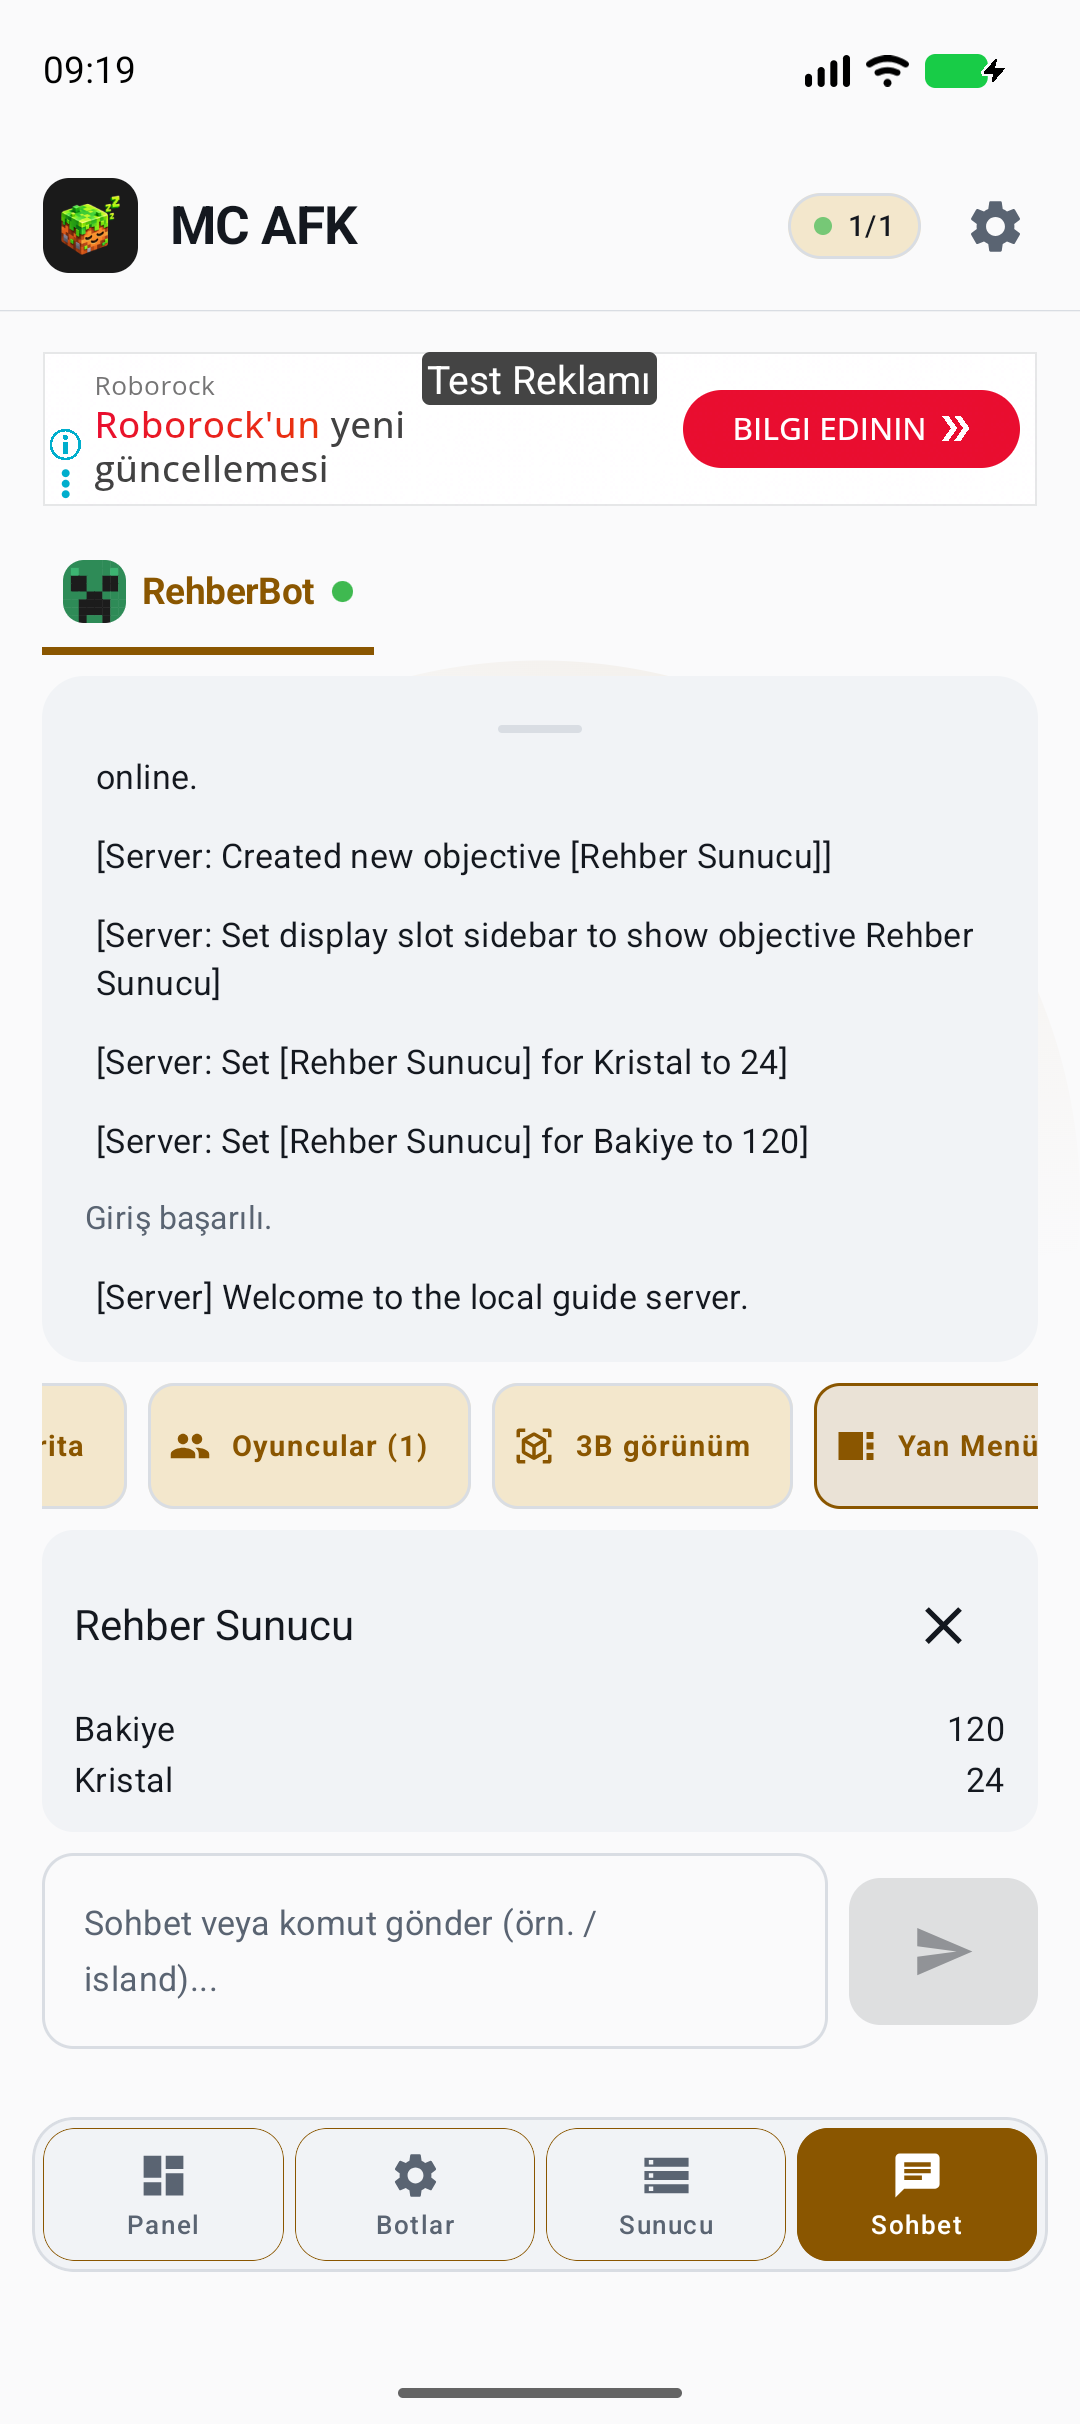
A server map/verification image is different from the live minimap in Movement. Sidebar is server scoreboard data, not inventory GUI. A Bedrock form opens only when a Bedrock server sends one.
- Scroll Chat’s tools sideways and open Map to view a server-sent map. “No map data yet” means none has been received.
- Use Sidebar to read server-sent crystal/balance values and close it with ×. Values in this screenshot are local examples, not a real server balance.
- For Bedrock, fill in and submit a received form, or close it using the top ×. The user supplies answers to map/form verification.
Only received map, scoreboard or form data is shown; the app does not generate verification answers.
An empty panel may mean that the server does not send that feature. There is no anti-bot/CAPTCHA bypass guarantee. Bedrock Microsoft authentication was not performed during these captures.
Movement and camera direction
Android · Connected bot; controls depend on edition
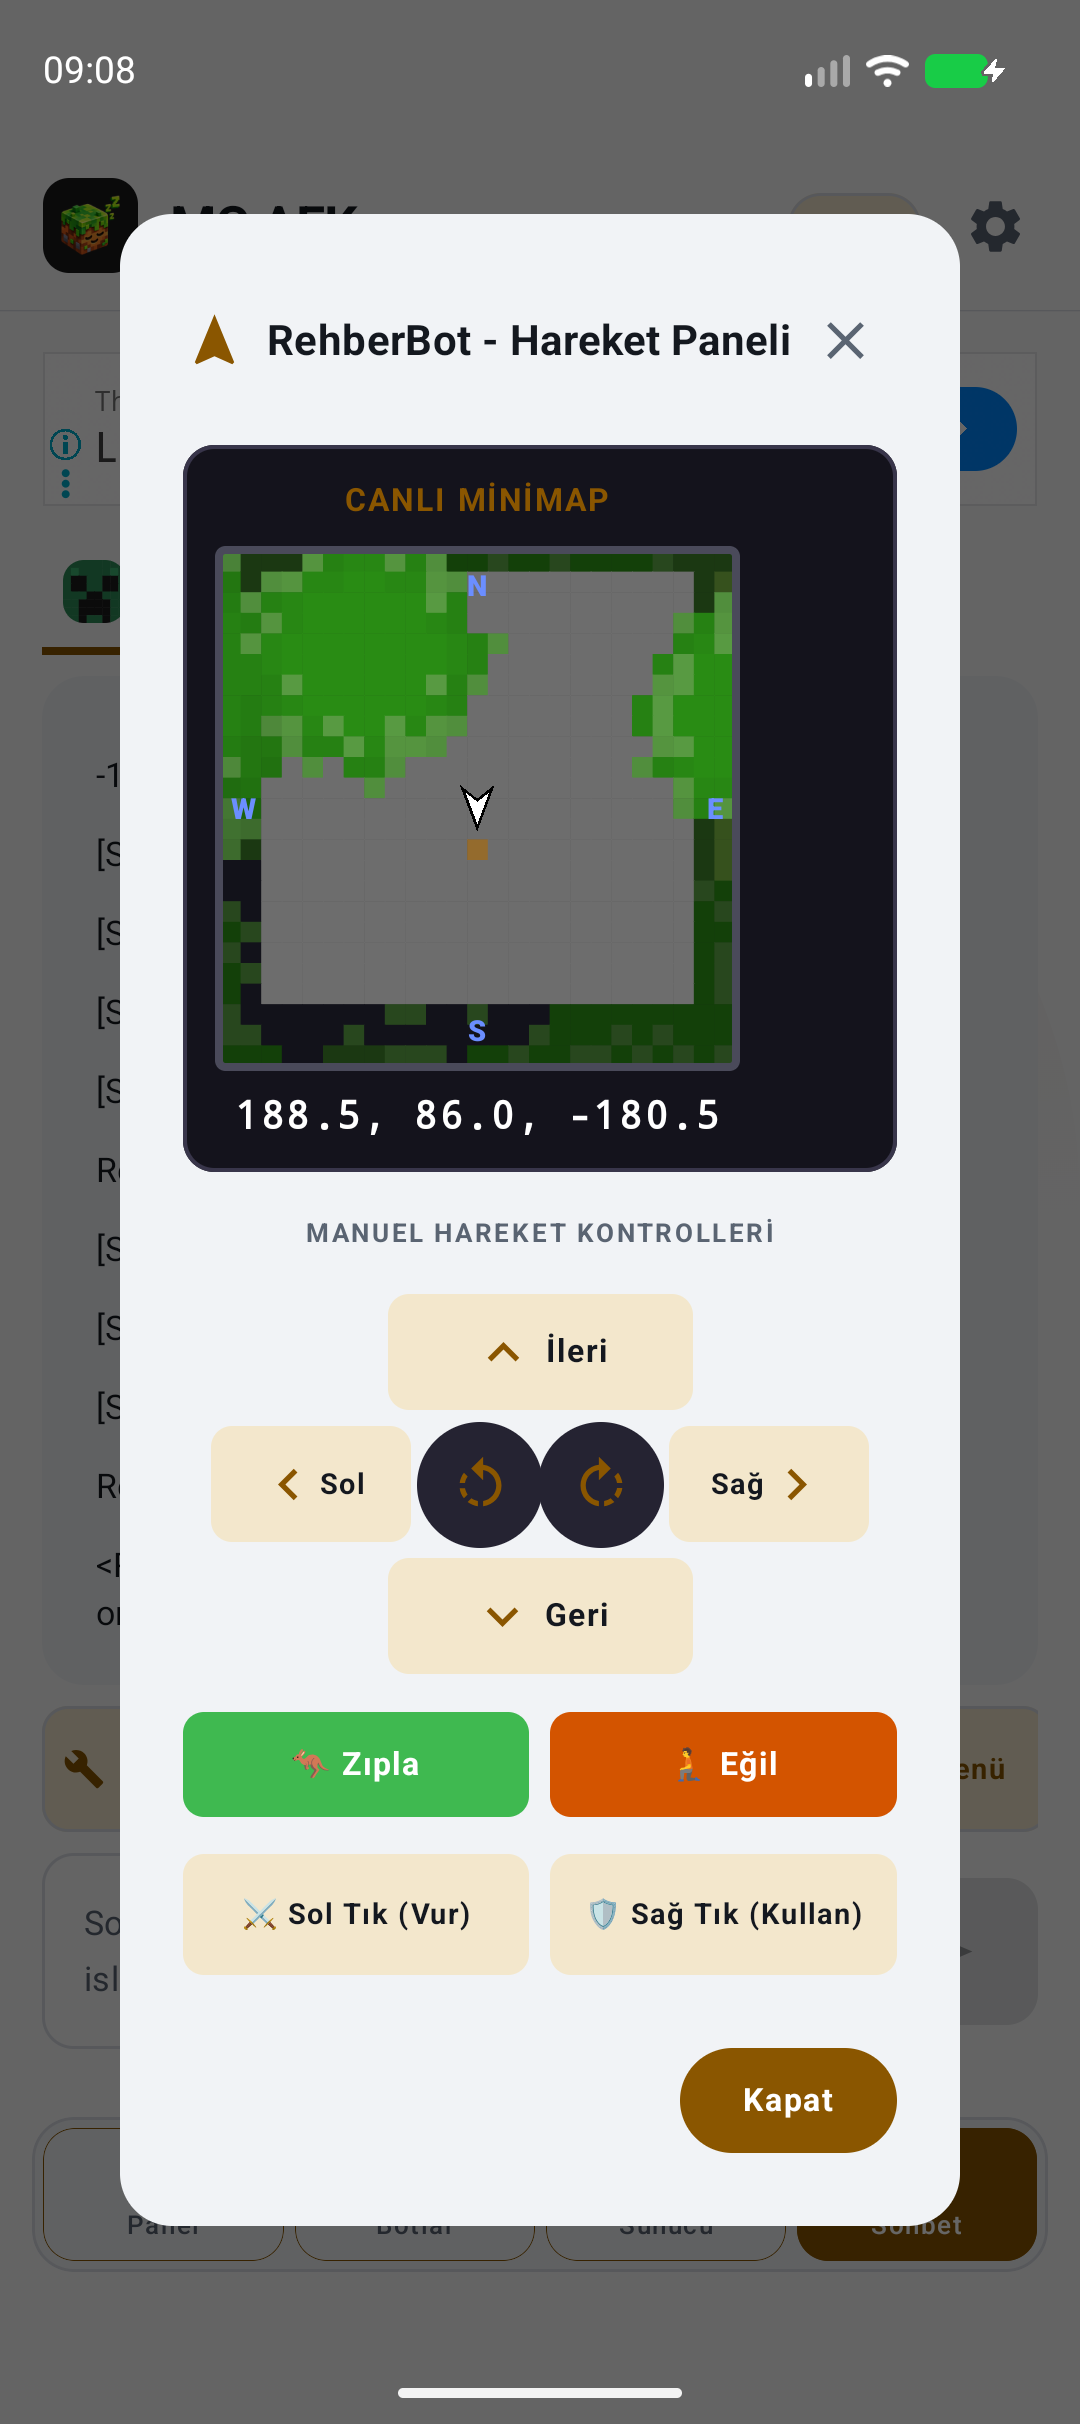
Movement provides manual direction and held-item controls. Its live minimap uses world data received by the bot, not knowledge of the whole unseen world.
- Chat → Movement. Check coordinates and direction. Make small, safe movements with Forward/Back/Left/Right.
- Adjust the view using Turn Left / Turn Right; use Jump or Sneak when needed.
- Left Click (Hit) is a single interaction. For continuous block breaking use Tasks → Mine in Looking Direction. Right Click (Use) uses the appropriate held item.
Position and direction update when accepted by the server. Use Java tasks for travel, following or patrol.
An empty minimap or reversed movement may be due to missing chunks or server restrictions. Do not start automation near drops, lava or protected areas.
Choose, save and run a task
Android · Java tasks · Allowed server and required tools
Tasks separates saved jobs from configuration. Selecting a preset or saving a task does not start it automatically. The tabs scroll horizontally.
- Chat → Tasks. Choose Patrol, Mine, Mine in Looking Direction, Fish or Collect and follow the task-specific instructions below.
- Review safety, chest, full-inventory, work/break and reconnection settings. Approve block breaking only on a server where it is allowed.
- To reuse it: Save Task → name → Save. To run it, use the bottom action/“Start as new task”, then review and approve its summary and permissions. Run saved tasks from the Tasks list.
- Monitor active-task status and Task Results. Cancel using Stop; do not restart a safe-stopped task before correcting its cause.
The task progresses through server-confirmed actions. A gray start button indicates missing requirements or permission.
A wrong dimension, missing tool, inaccessible target, protection, full inventory or invalid schedule may stop a task. Read the reported reason. These screenshots show configuration, not proof of success on every server.
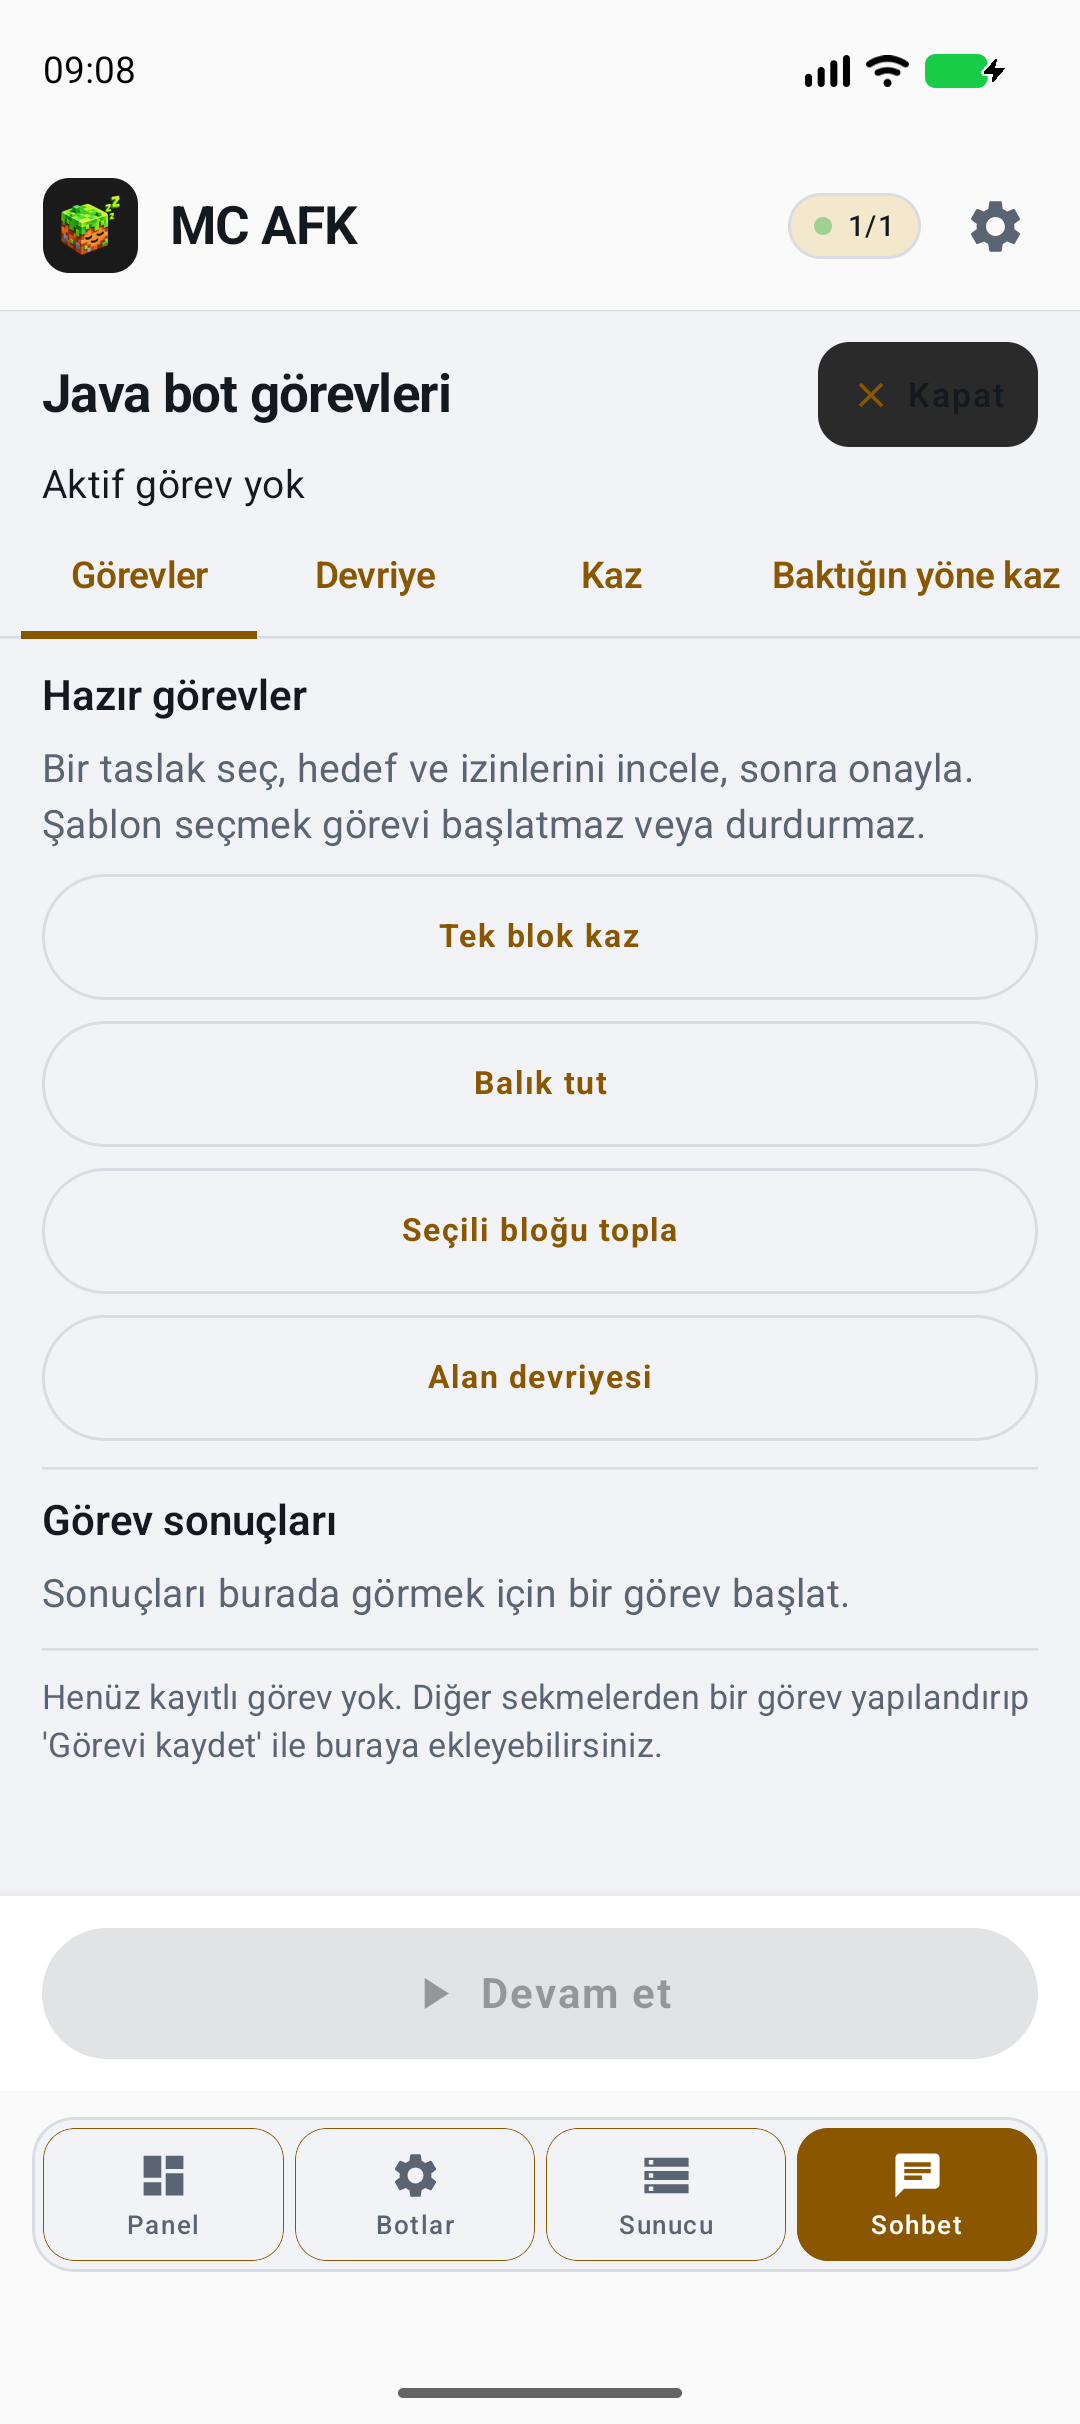
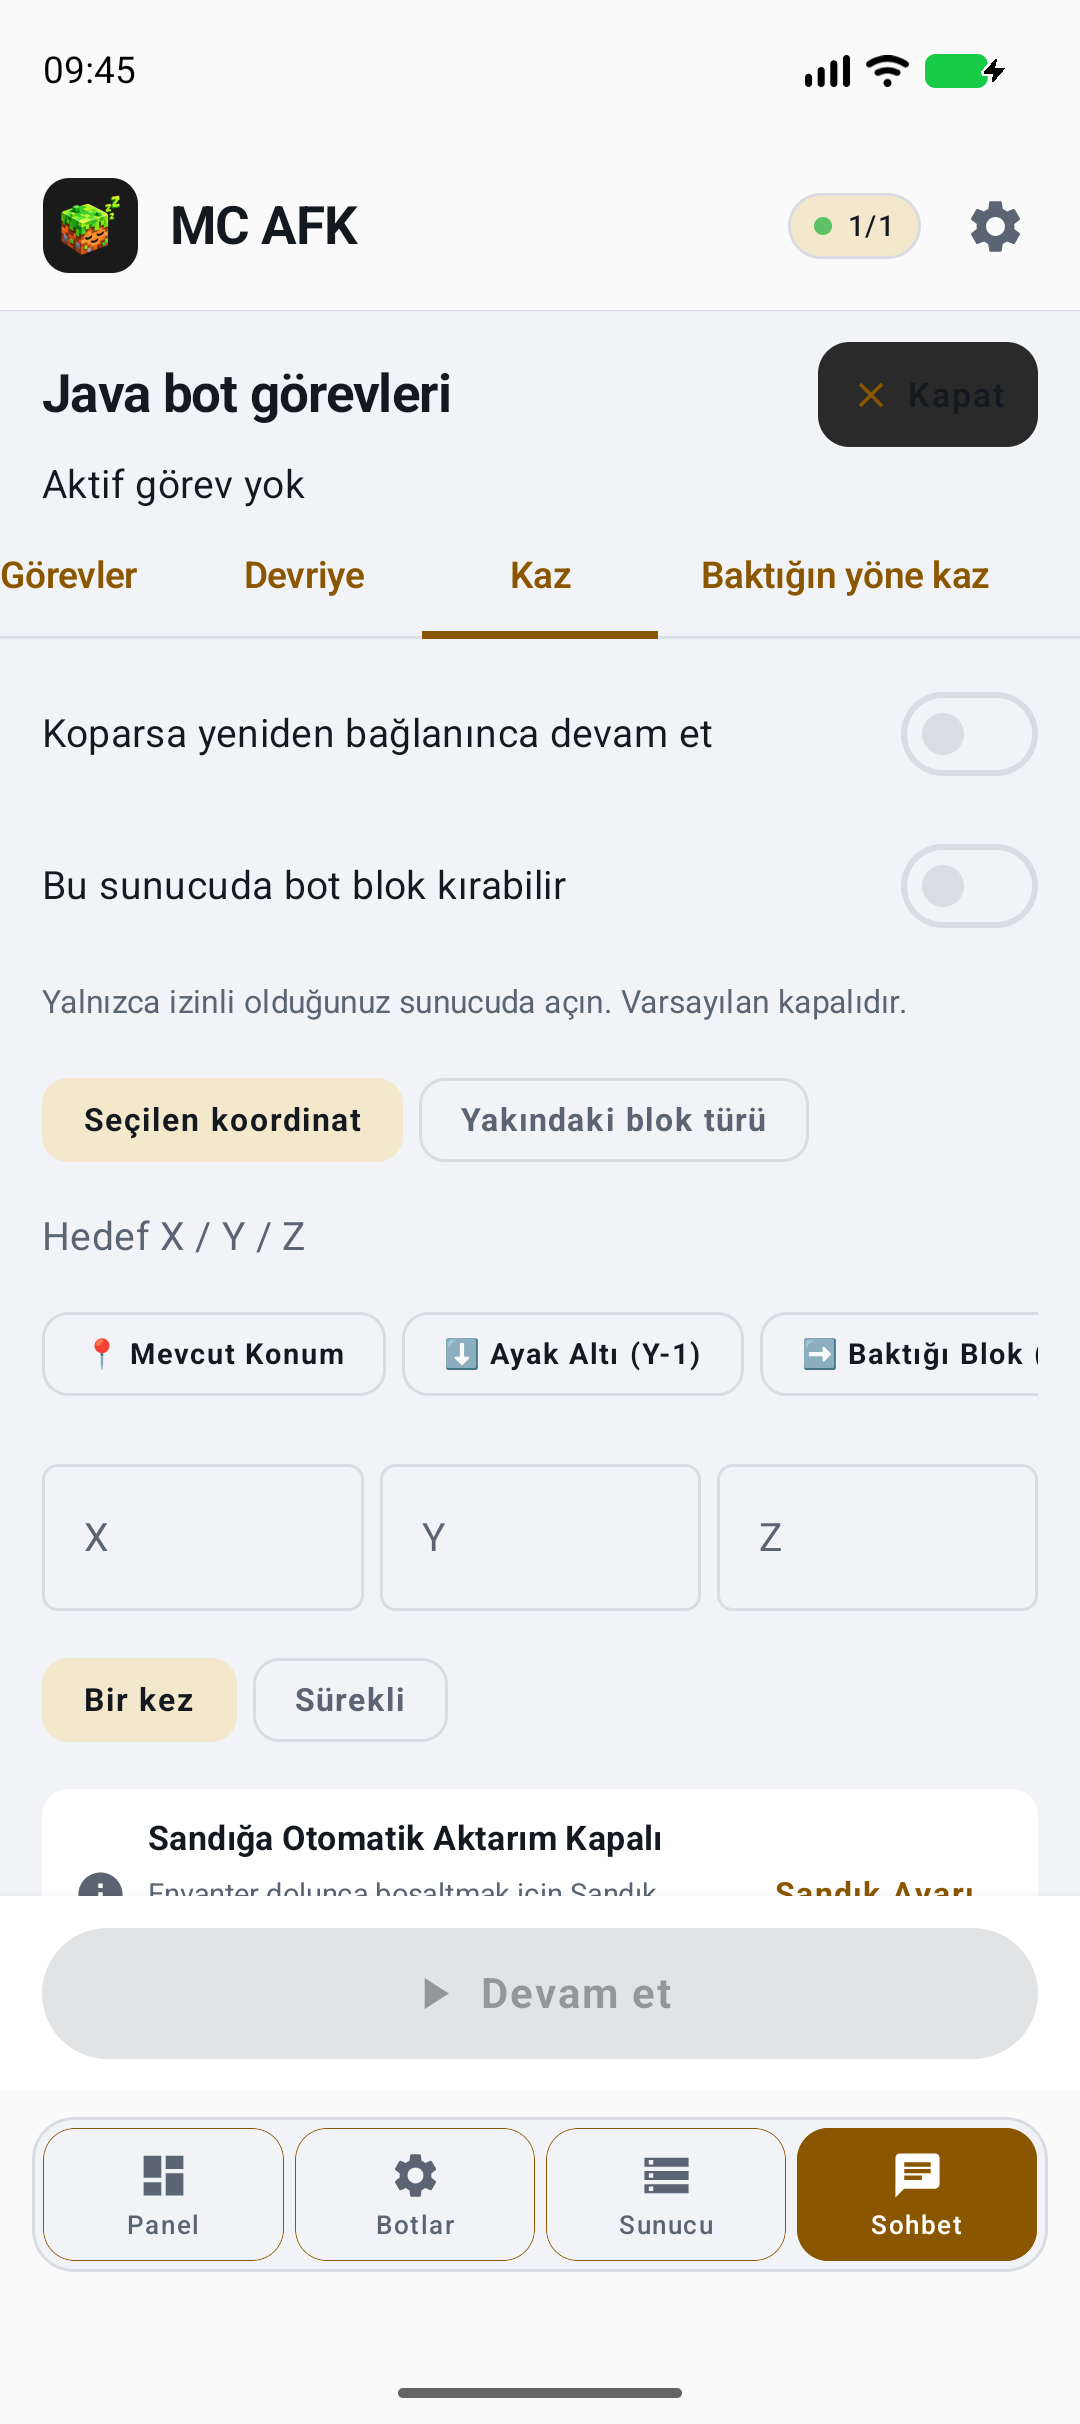
Mine: break one target block
- Chat → Tasks → Mine. Enable “This bot may break blocks on this server” only where allowed; check the tool and safety rules.
- Use Selected Coordinates to enter X/Y/Z, or carefully choose Current Position, Underfoot (Y−1) or Looking Block. For Nearby Block Type, choose the target type. One coordinate target is different from collecting throughout an area.
- Once is for one breaking operation; Repeat is for repeating when the target reappears. Select chest/capacity settings, start with the bottom action and approve the summary.
- Expected result: the target updates after server-confirmed breaking; Repeat waits for the next target. Cancel with Stop. If it stalls on the target, check safety, range, tool and server permission.
The bottom action is disabled in the screenshot because permission and target are not set yet. Consider fall risk before breaking the block underfoot. Mine in Looking Direction is a separate continuous-view task.
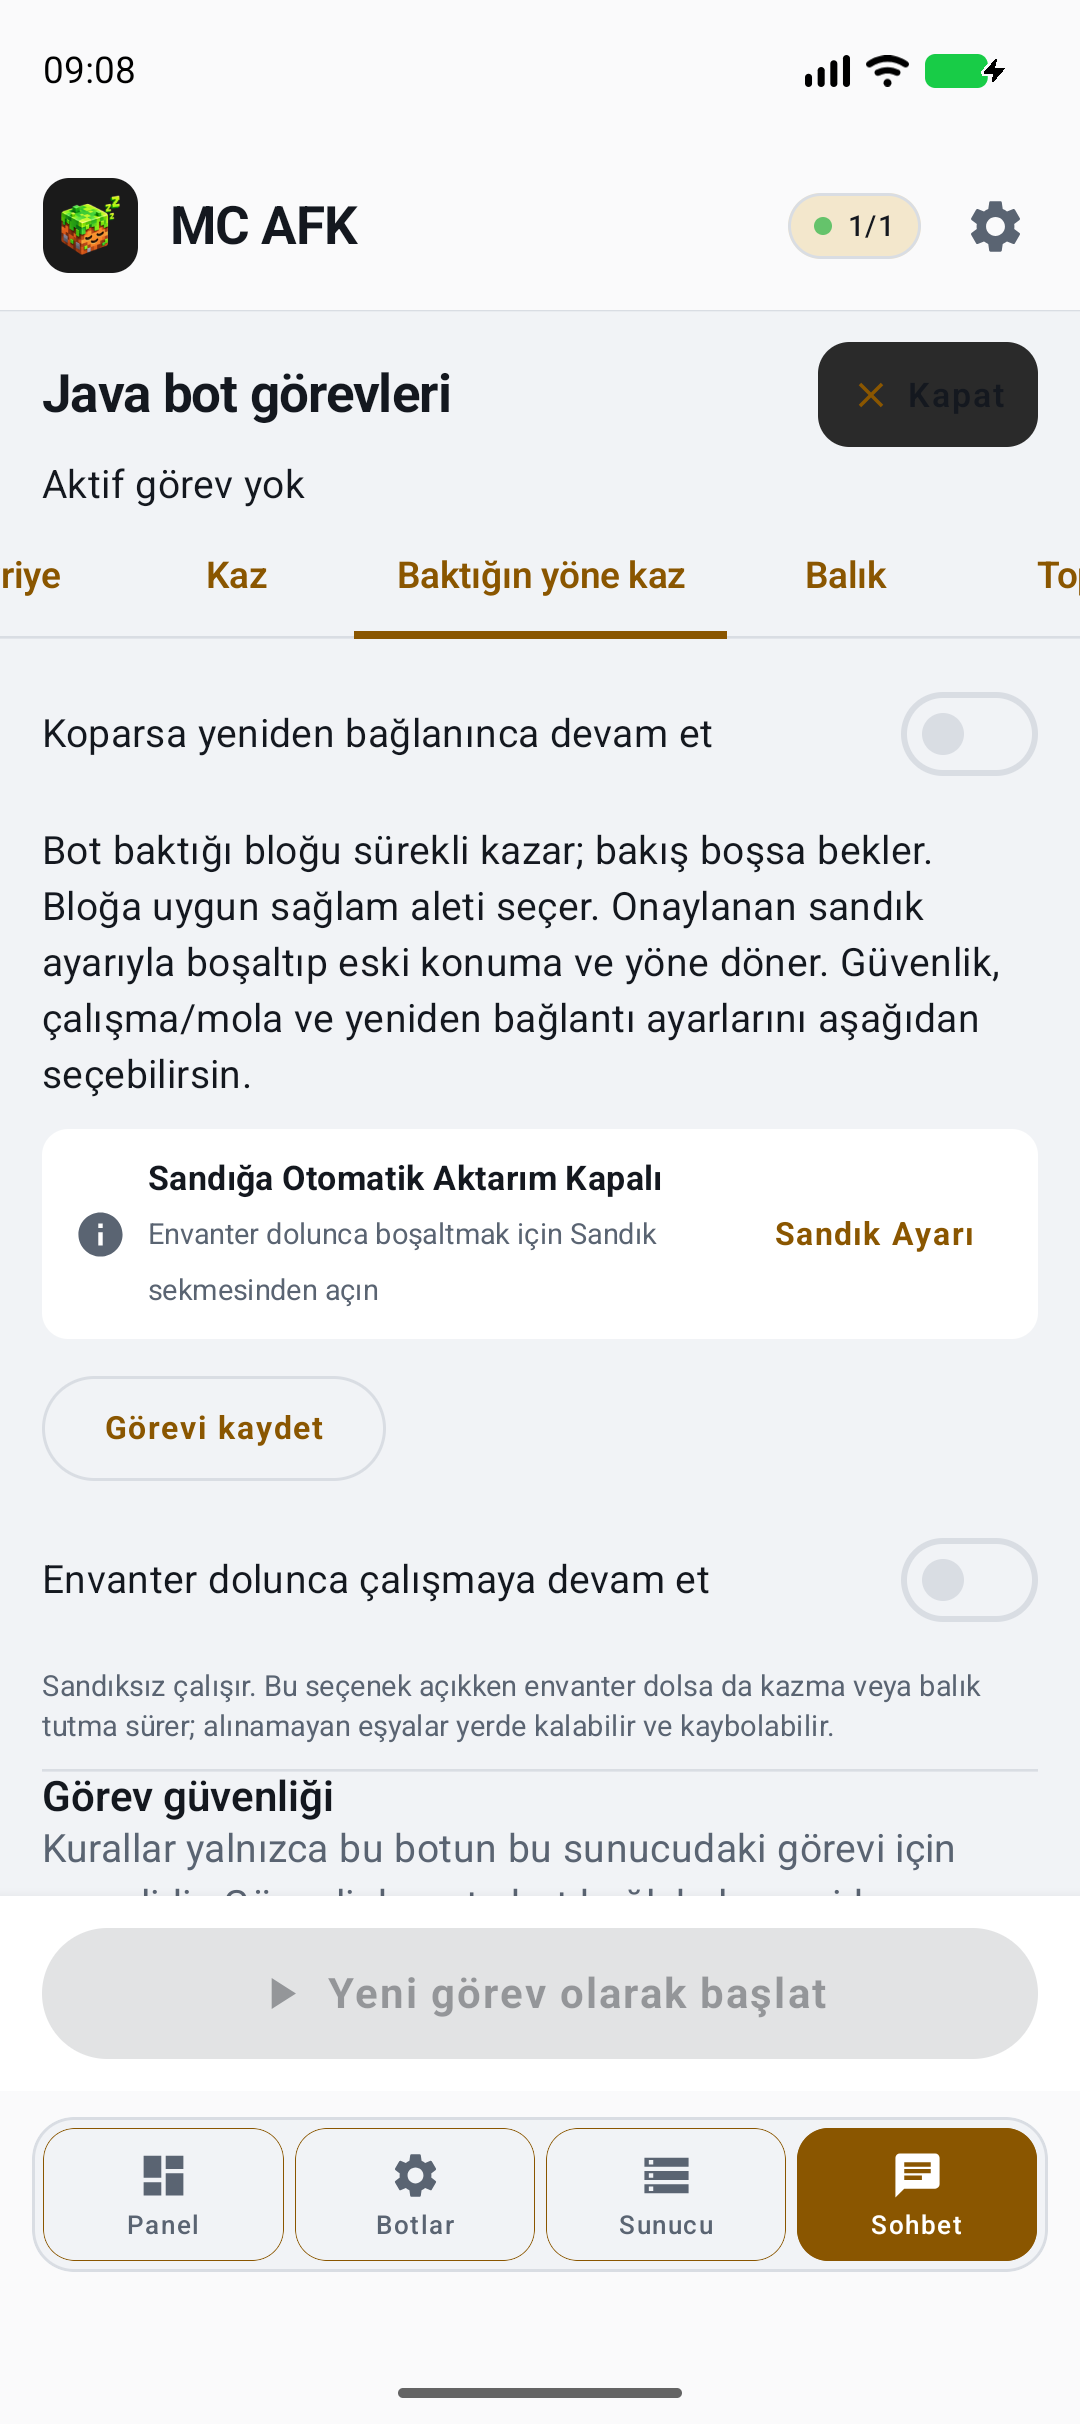
Continuously mine in the looking direction
- Aim the bot at a reachable target block. Tasks → Mine in Looking Direction. On an allowed server, check breaking permission and safety settings.
- Have an appropriate usable tool in inventory. Tool selection and break time depend on the block.
- Choose chest/full-inventory behavior and approve using Start as New Task/the bottom action. After a block breaks it continues with the next block in view; it waits if no target is present.
“Holding left click” means continuous mining of an eligible target, not bypassing protected/unbreakable blocks or safety stops. Stop, capacity and safety rules remain active.
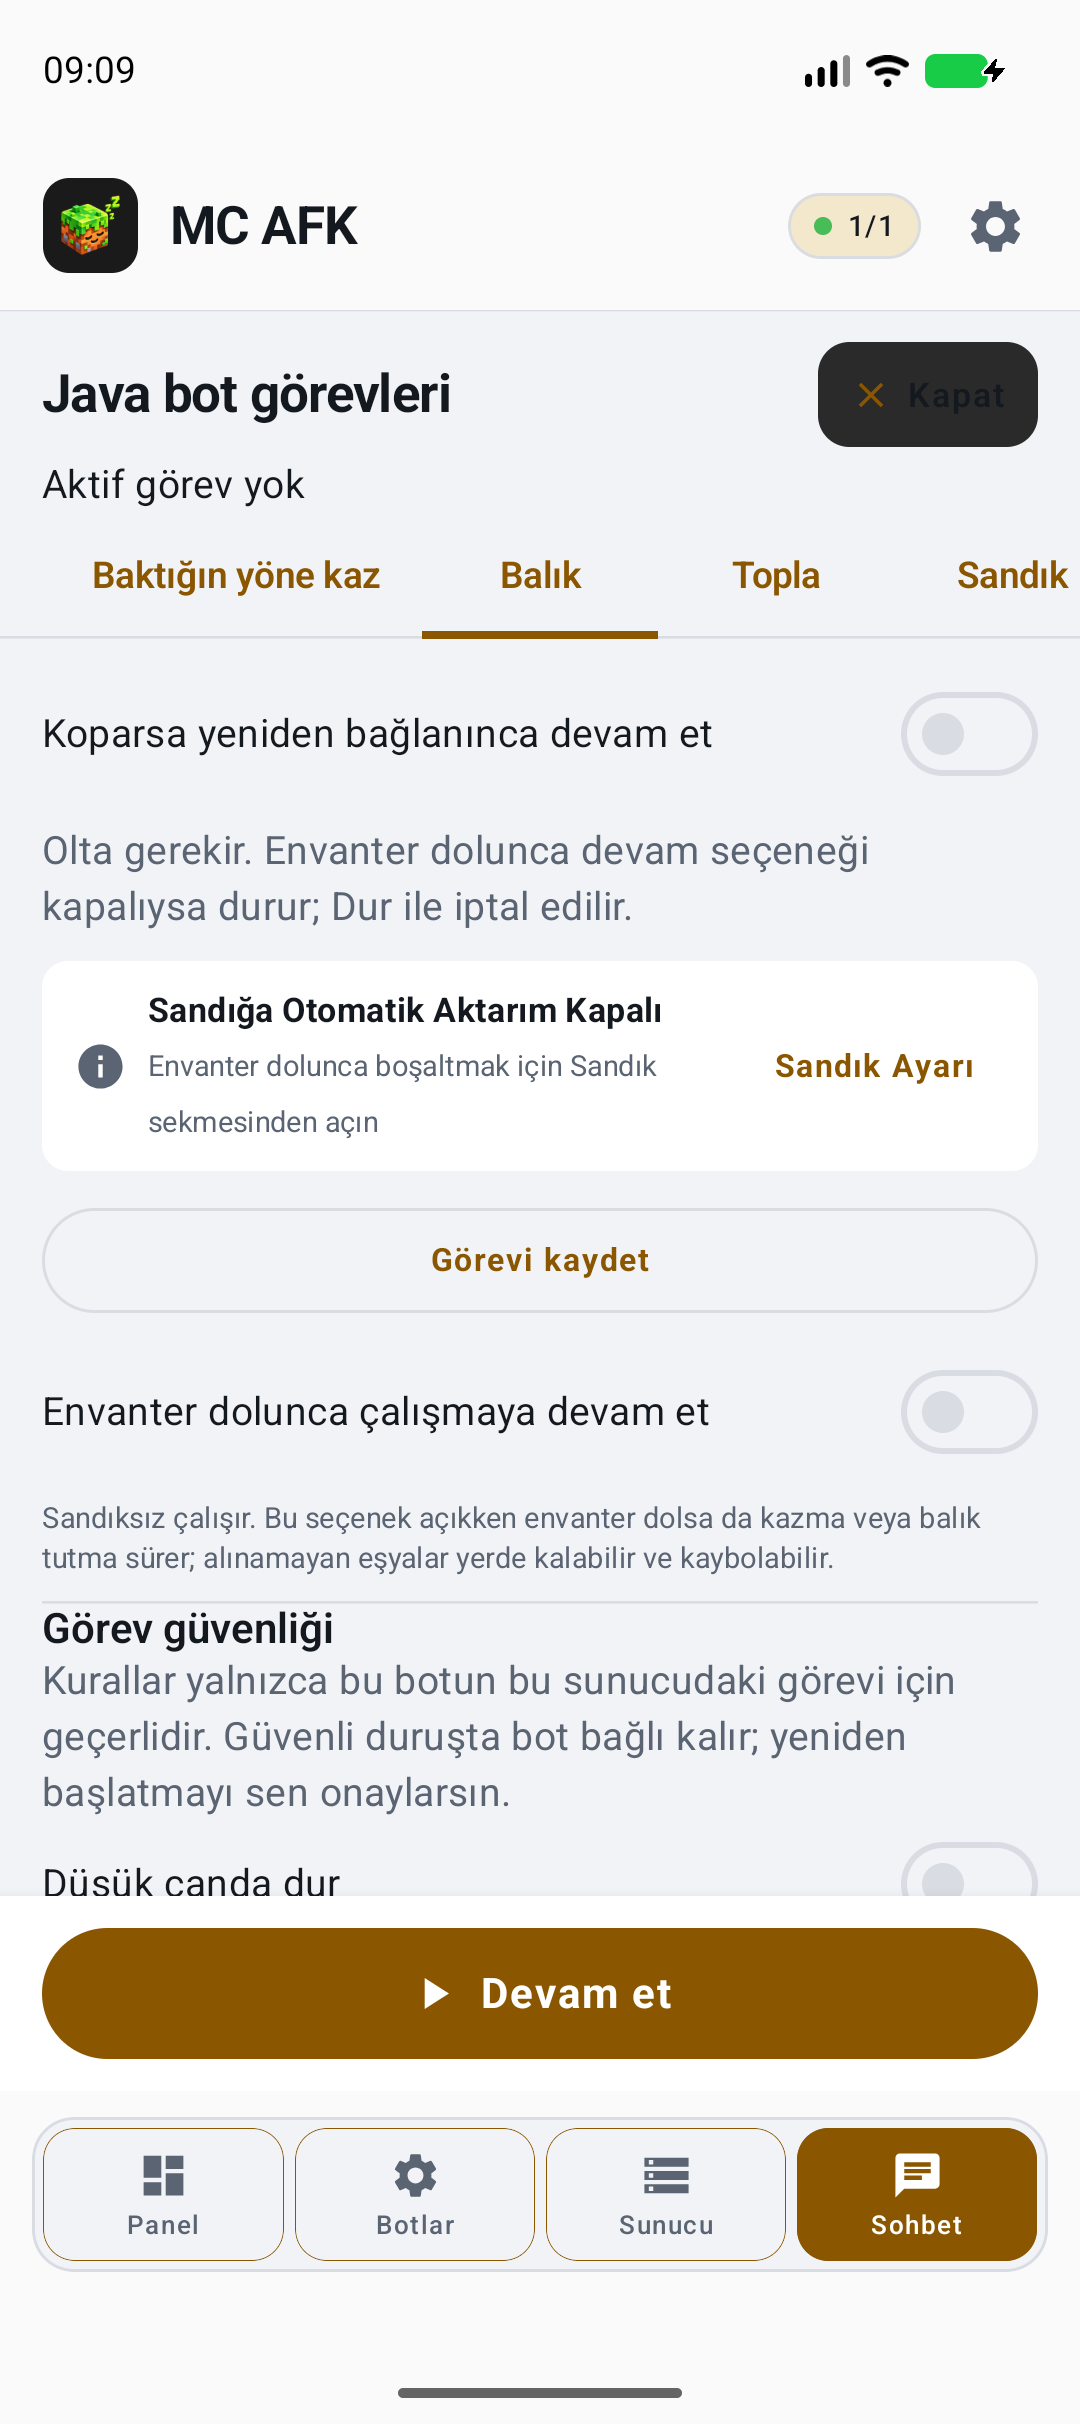
Fish
- Keep a usable fishing rod in inventory and aim toward reachable water. Tasks → Fish.
- Select chest/capacity and safety settings. Start with the bottom action, approve the summary when requested and monitor status.
- The bot manages casting and the server’s bite signal. Use Stop to finish; it stops or continues at full inventory according to your selected policy.
If it does not cast, check connection, rod, water/range, direction and server permission. Report the last task error if casts are rejected or it reels in immediately.
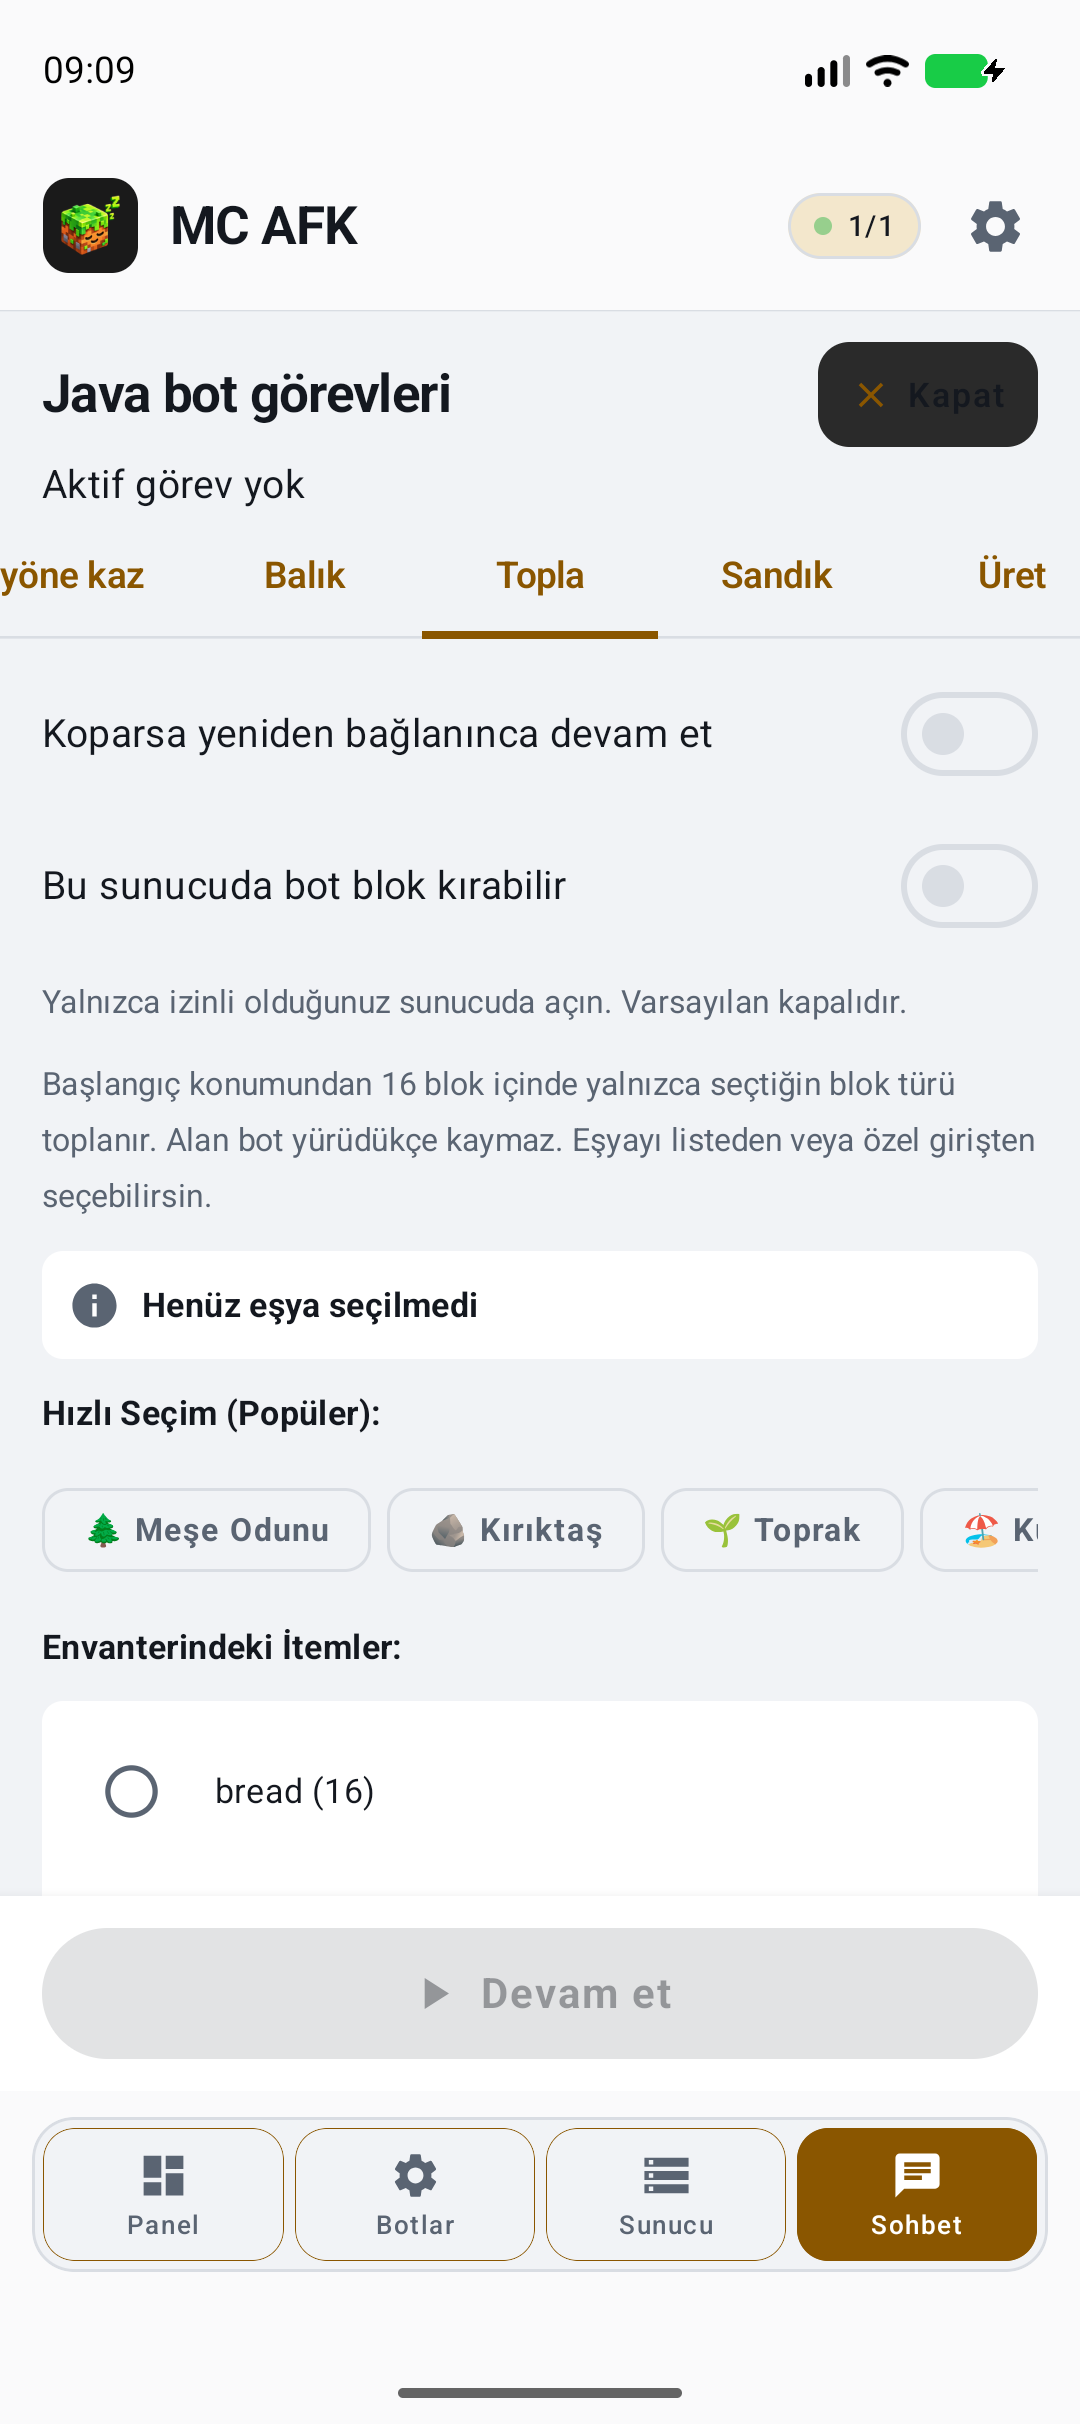
Collect a selected block
- In Collect, check permitted block breaking and choose only the desired block type.
- The selected type is sought within 16 blocks of the start position; the area does not move with the bot. Link a chest beforehand if needed.
- Review safety and quantity/work limits, then approve and start using the bottom action.
The Mine one block preset in Tasks targets a single block using coordinates X/Y/Z or type selection and Once/Repeat. It is not the same operation as Collect.
Travel, follow and patrol
- In Patrol, save the current position with a name; use Go for a saved location in the current dimension.
- For following, choose the player name/list and desired distance. The target must be discoverable from data received from the server.
- For area patrol, choose a small safe area and review the start summary. Re-evaluate the target if obstacles, allowed-area or safety checks stop it.
The image shows manual Movement controls; automatic travel/follow settings are under Tasks → Patrol.
Chest deposits and safety
Android · Java · An accessible chest you are allowed to use
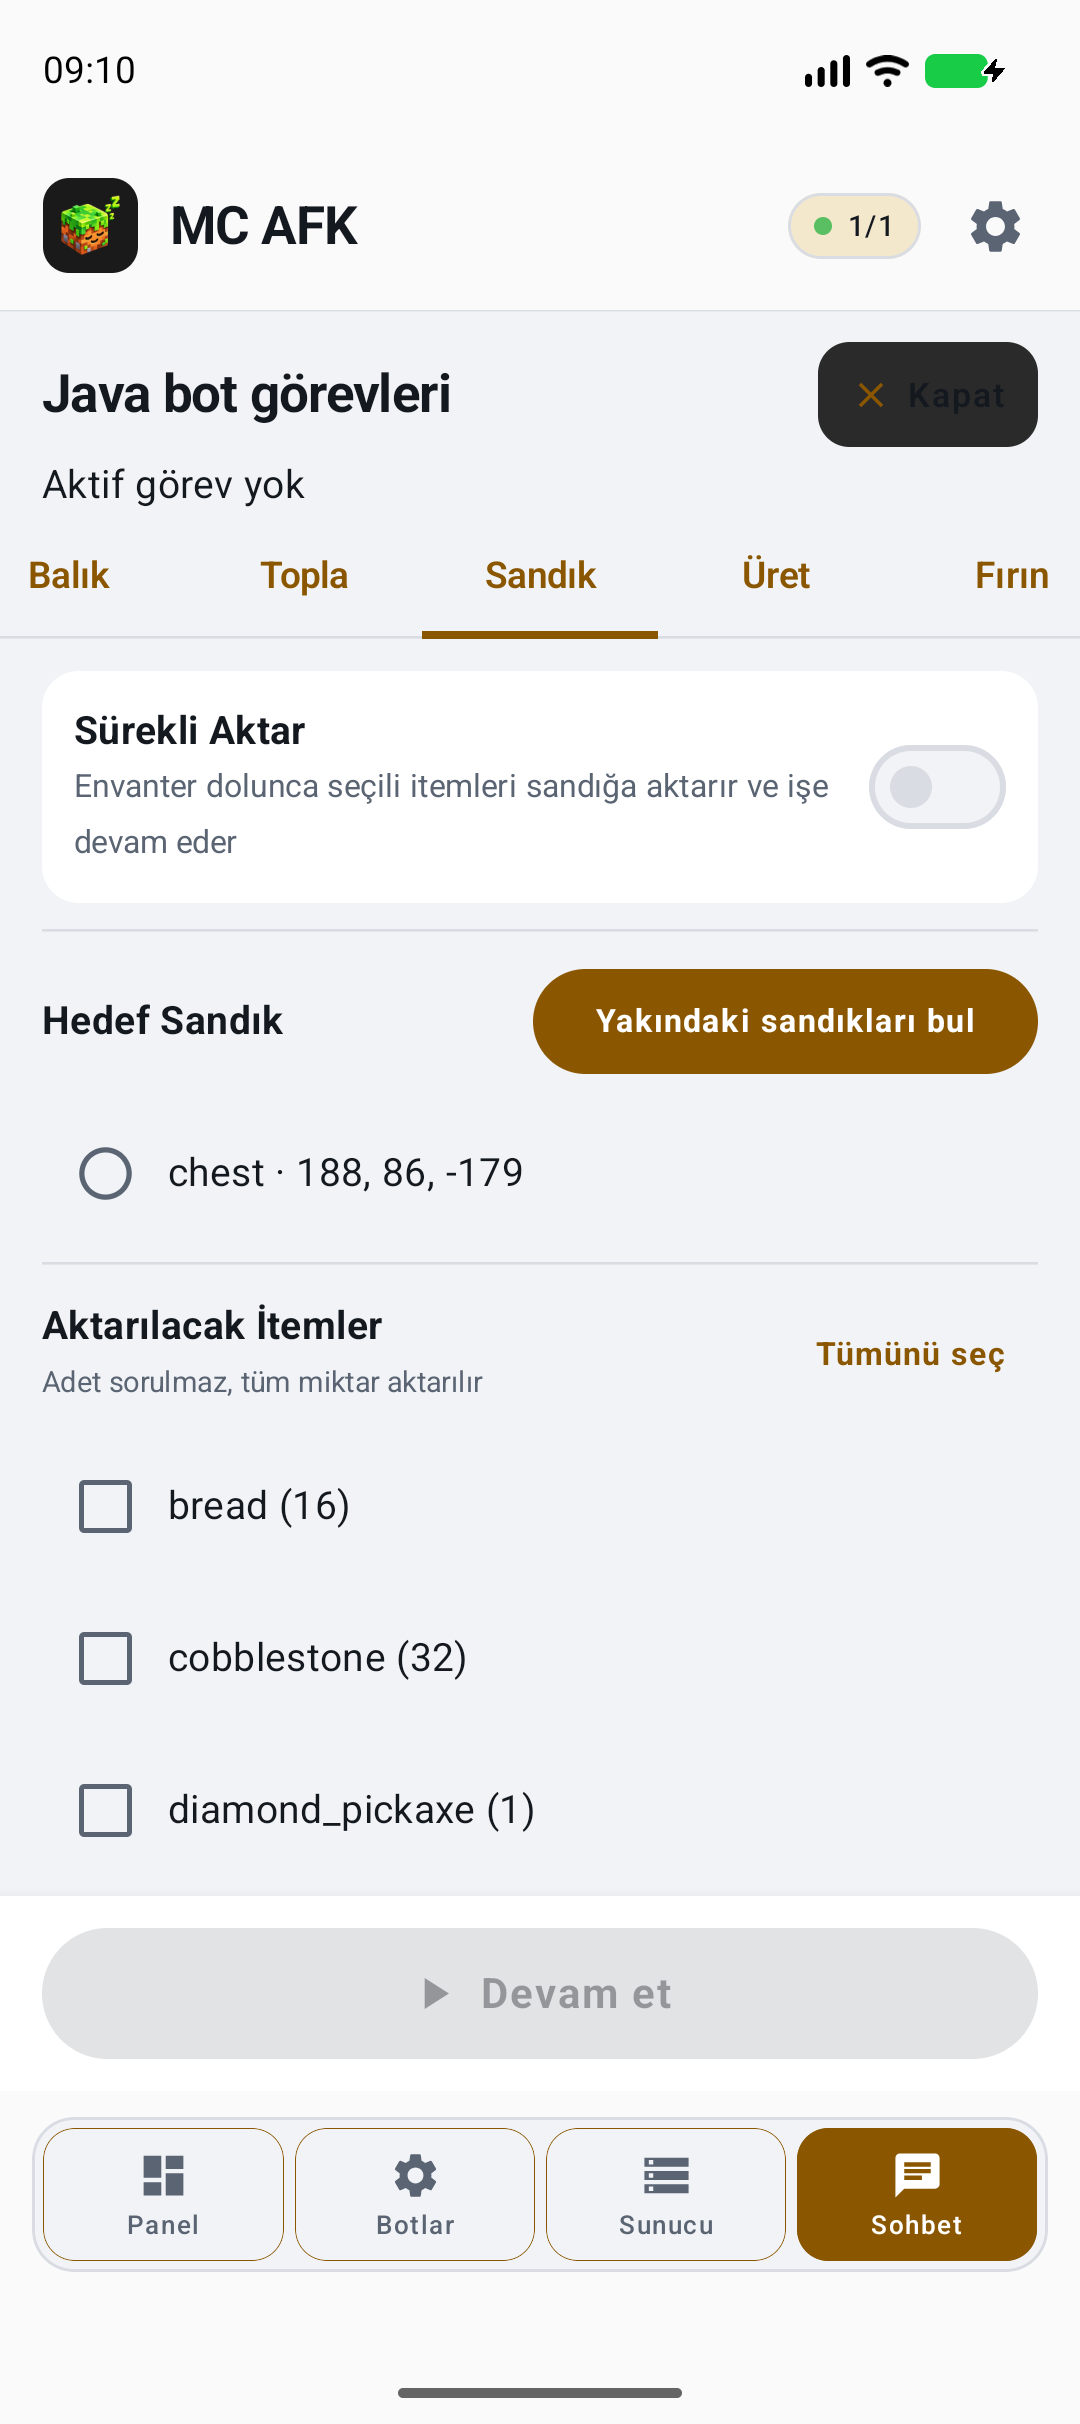
Link a chest rule to deposit products when inventory fills and return to work. Transfer only selected products; do not accidentally include tools, rods, food or valuables.
- Tasks → Chest → Find Nearby Chests. Check the coordinates before choosing Target Chest.
- Select products in Items to Transfer. Select All may include every item, so inspect the list. Enable Continuous Transfer for full-inventory deposits and complete the required confirmation.
- Return to mining/fishing and confirm the chest rule is linked. Configure low health, damage, allowed area and nearby-player safety rules.
- If you need replacement tools, enable Take Spare Pickaxe from Chest, select the product chest or a separate supply chest and allowed pickaxe types. It takes one tool and returns; it does not discard the old tool.
After confirmed deposits, mining attempts to return to its previous position and direction. A full or inaccessible chest produces a safe-stop reason.
Chest space, inventory space, correct filters, permission and an accessible path are required. Nearby-player safe-stop/notification settings also appear in Bots → bot → Notifications.
Safety, schedule and resuming
- Review Task Safety lower in the task form: low health, damage, tools, nearby players and allowed areas. Do not confuse the bot-wide proximity stop with task safety.
- Keep work/break schedule durations within valid ranges. Select Resume After Reconnect only if you want automatic recovery.
- The bot may stay connected after a safe stop. Resolve the reported cause and approve restarting; do not force it to continue while danger remains.
This image shows bot-level notification/proximity settings. Task-level rules are lower in each task form.
Crafting, furnace, harvest and villager trading
Android · Java · Preview and explicit operation approval
These tasks consume materials. Read the real input/output summary before approving; opening the form does not execute it. Special or enchanted items are not treated as ordinary crafting ingredients.
- Scroll the Tasks tabs sideways to Craft, Furnace, Harvest or Trade. Enter the task-specific targets and limits below.
- Prepare materials in the bot’s inventory. Ensure the required crafting table, furnace, crop area or villager is reachable and permitted.
- Preview the recipe/summary to check consumption, approve safety and quantity limits, then start. Monitor status; check inventory before repeating an uncertain result.
Progress follows server confirmation. The actual screens below document configuration; not all production tasks were executed for this guide.
Missing materials, wrong coordinates, full output space, protected items or server rejection can cause a safe stop. Resolve the cause before restarting.
Craft: preview the recipe first
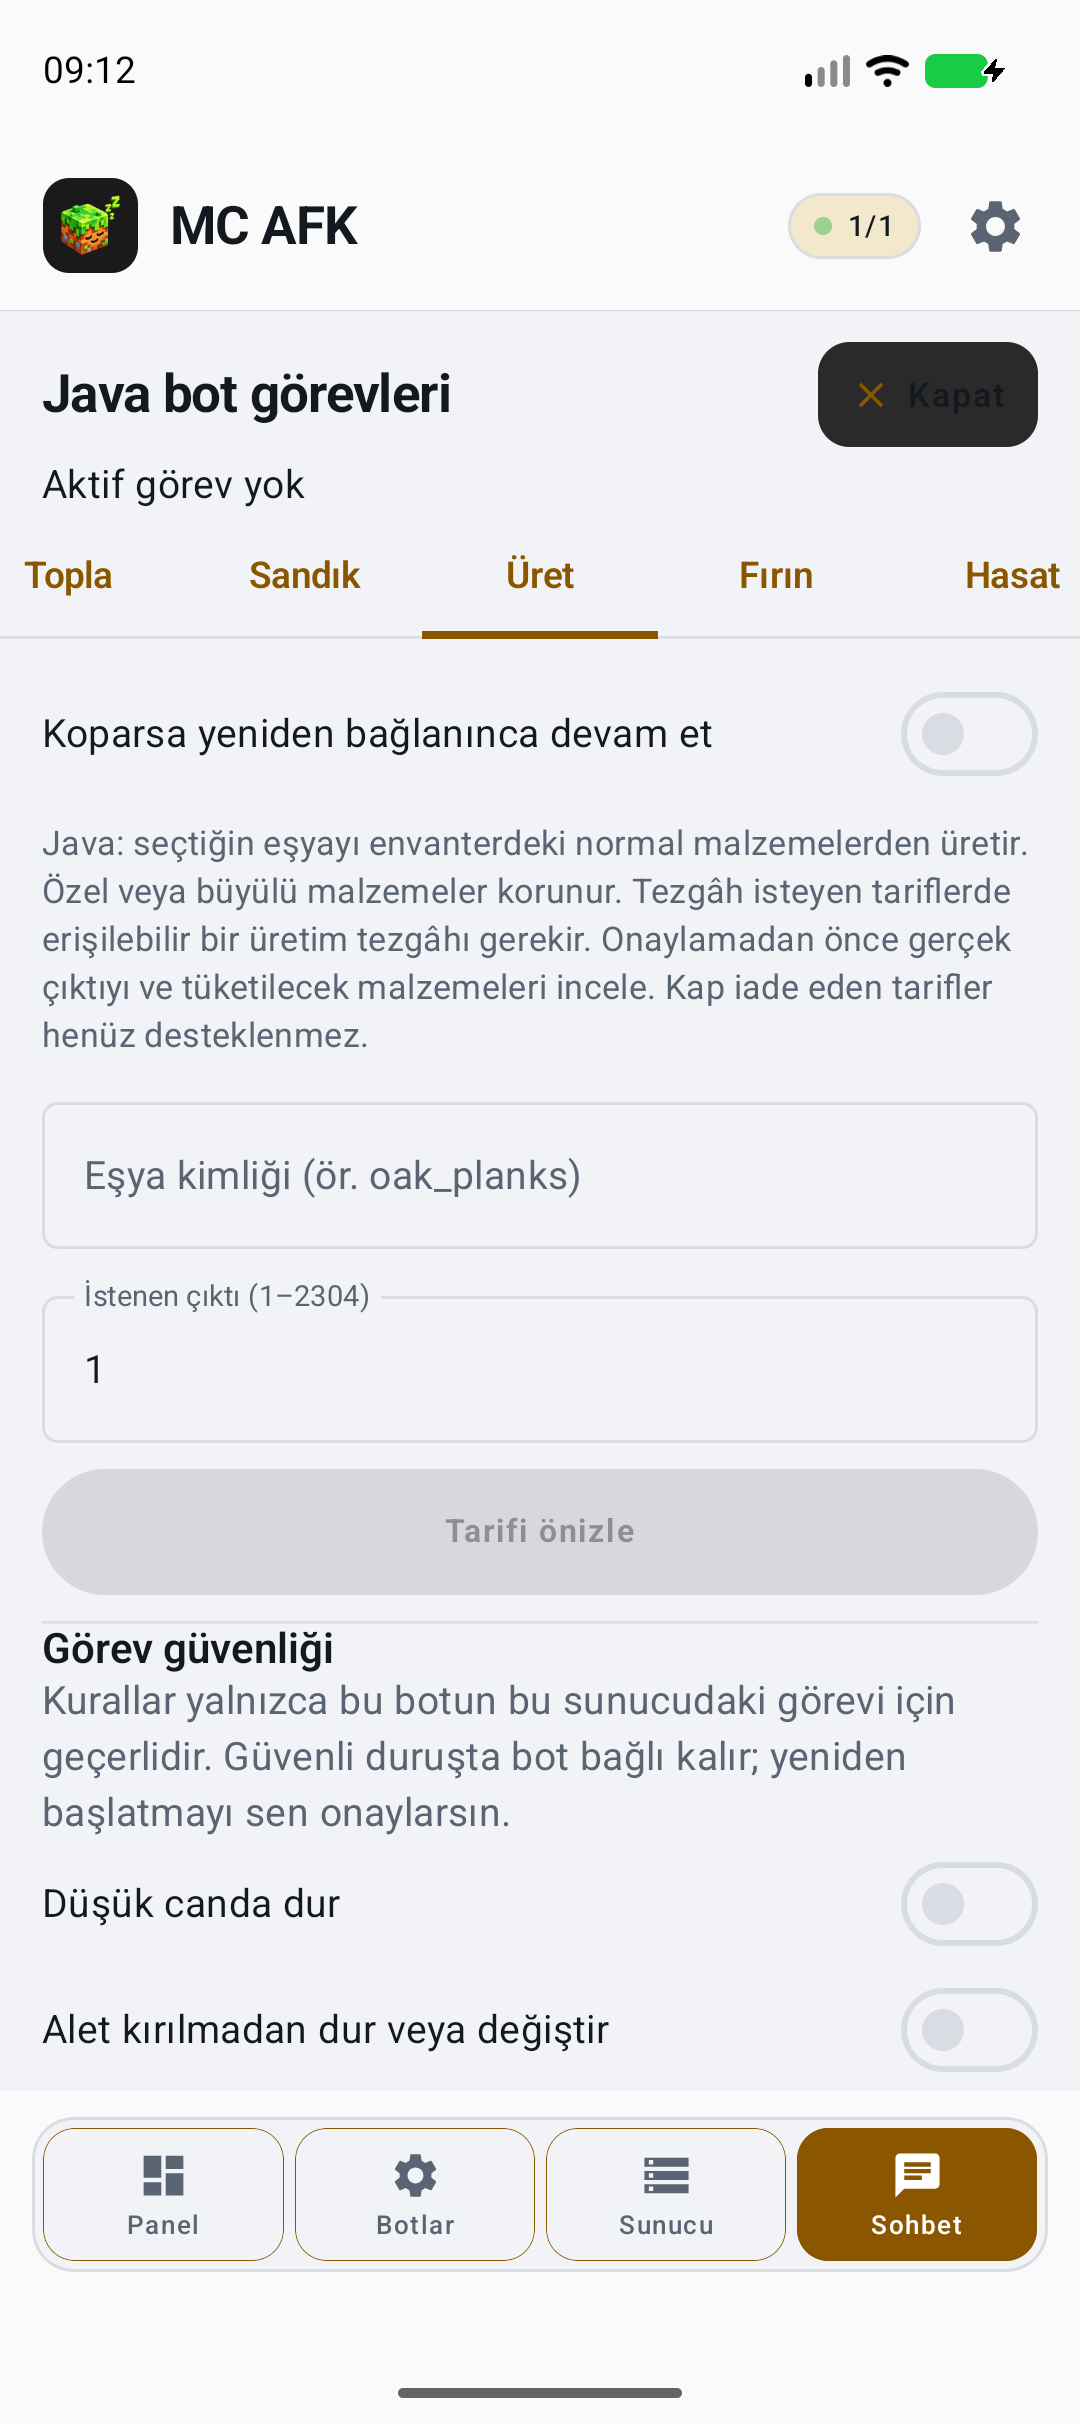
- In Craft, enter the item ID and desired output, for example oak_planks. The displayed output limit is 1–2304.
- Use Preview Recipe to check inputs/output. Have a reachable crafting table for recipes that require one and enough ordinary materials.
- Approve the summary and monitor the task and inventory result.
Special/enchanted materials are protected; recipes returning containers are not supported in this package.
Furnace: target, input and fuel
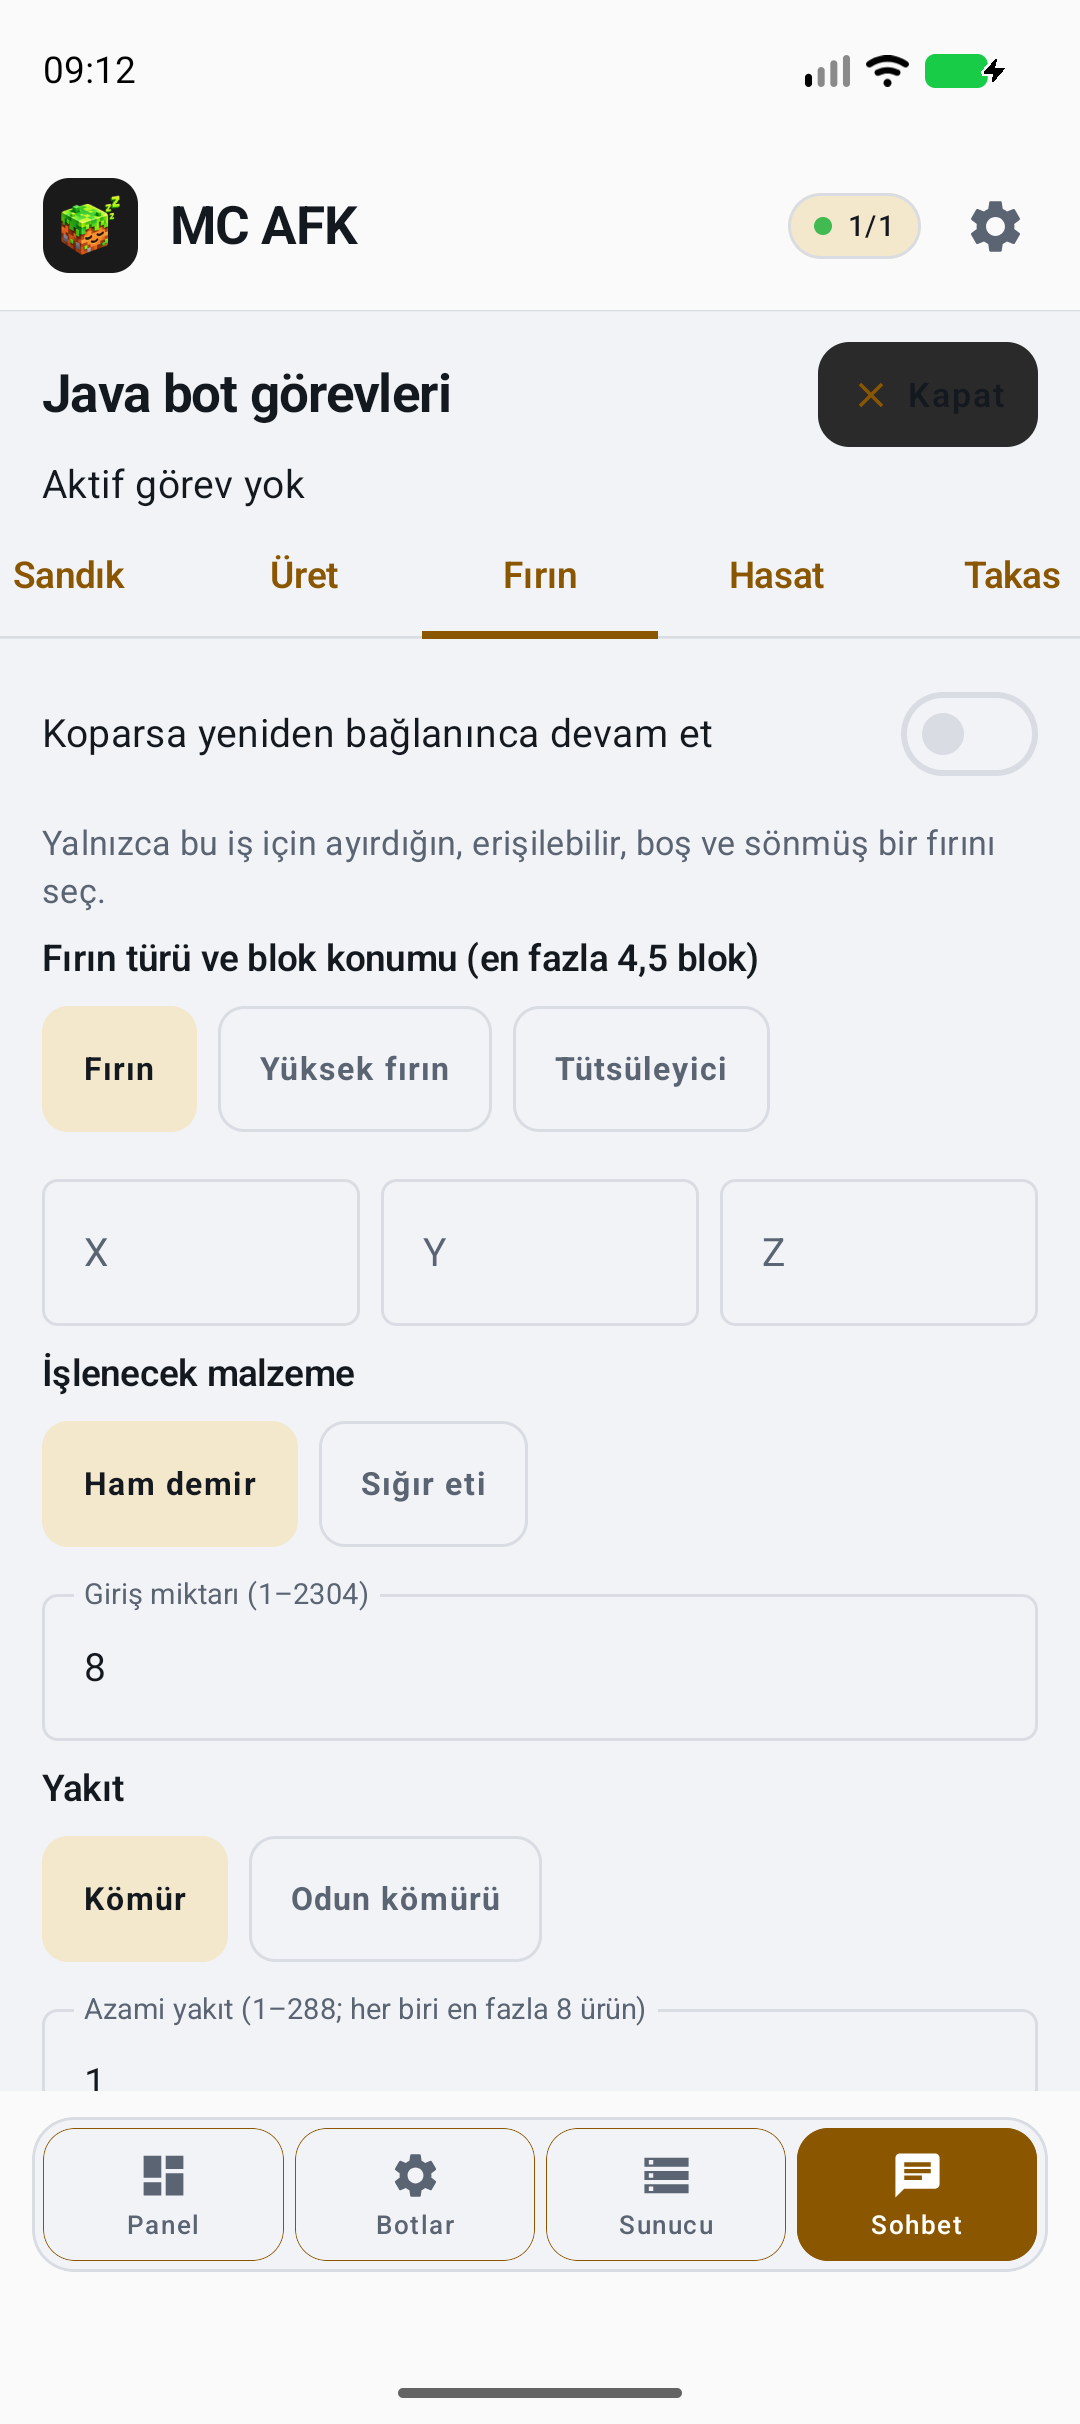
- Choose a dedicated, accessible, empty and unlit furnace. Enter its type and X/Y/Z coordinates; it must be within 4.5 blocks.
- Set input material/quantity, fuel and the maximum fuel budget without exceeding the displayed limits.
- Review the materials/output summary and approvals, start and monitor results. Do not interfere with a shared furnace already in use.
Furnace type, recipe, empty output space and fuel must be compatible. After an uncertain interruption, check furnace and inventory before restarting.
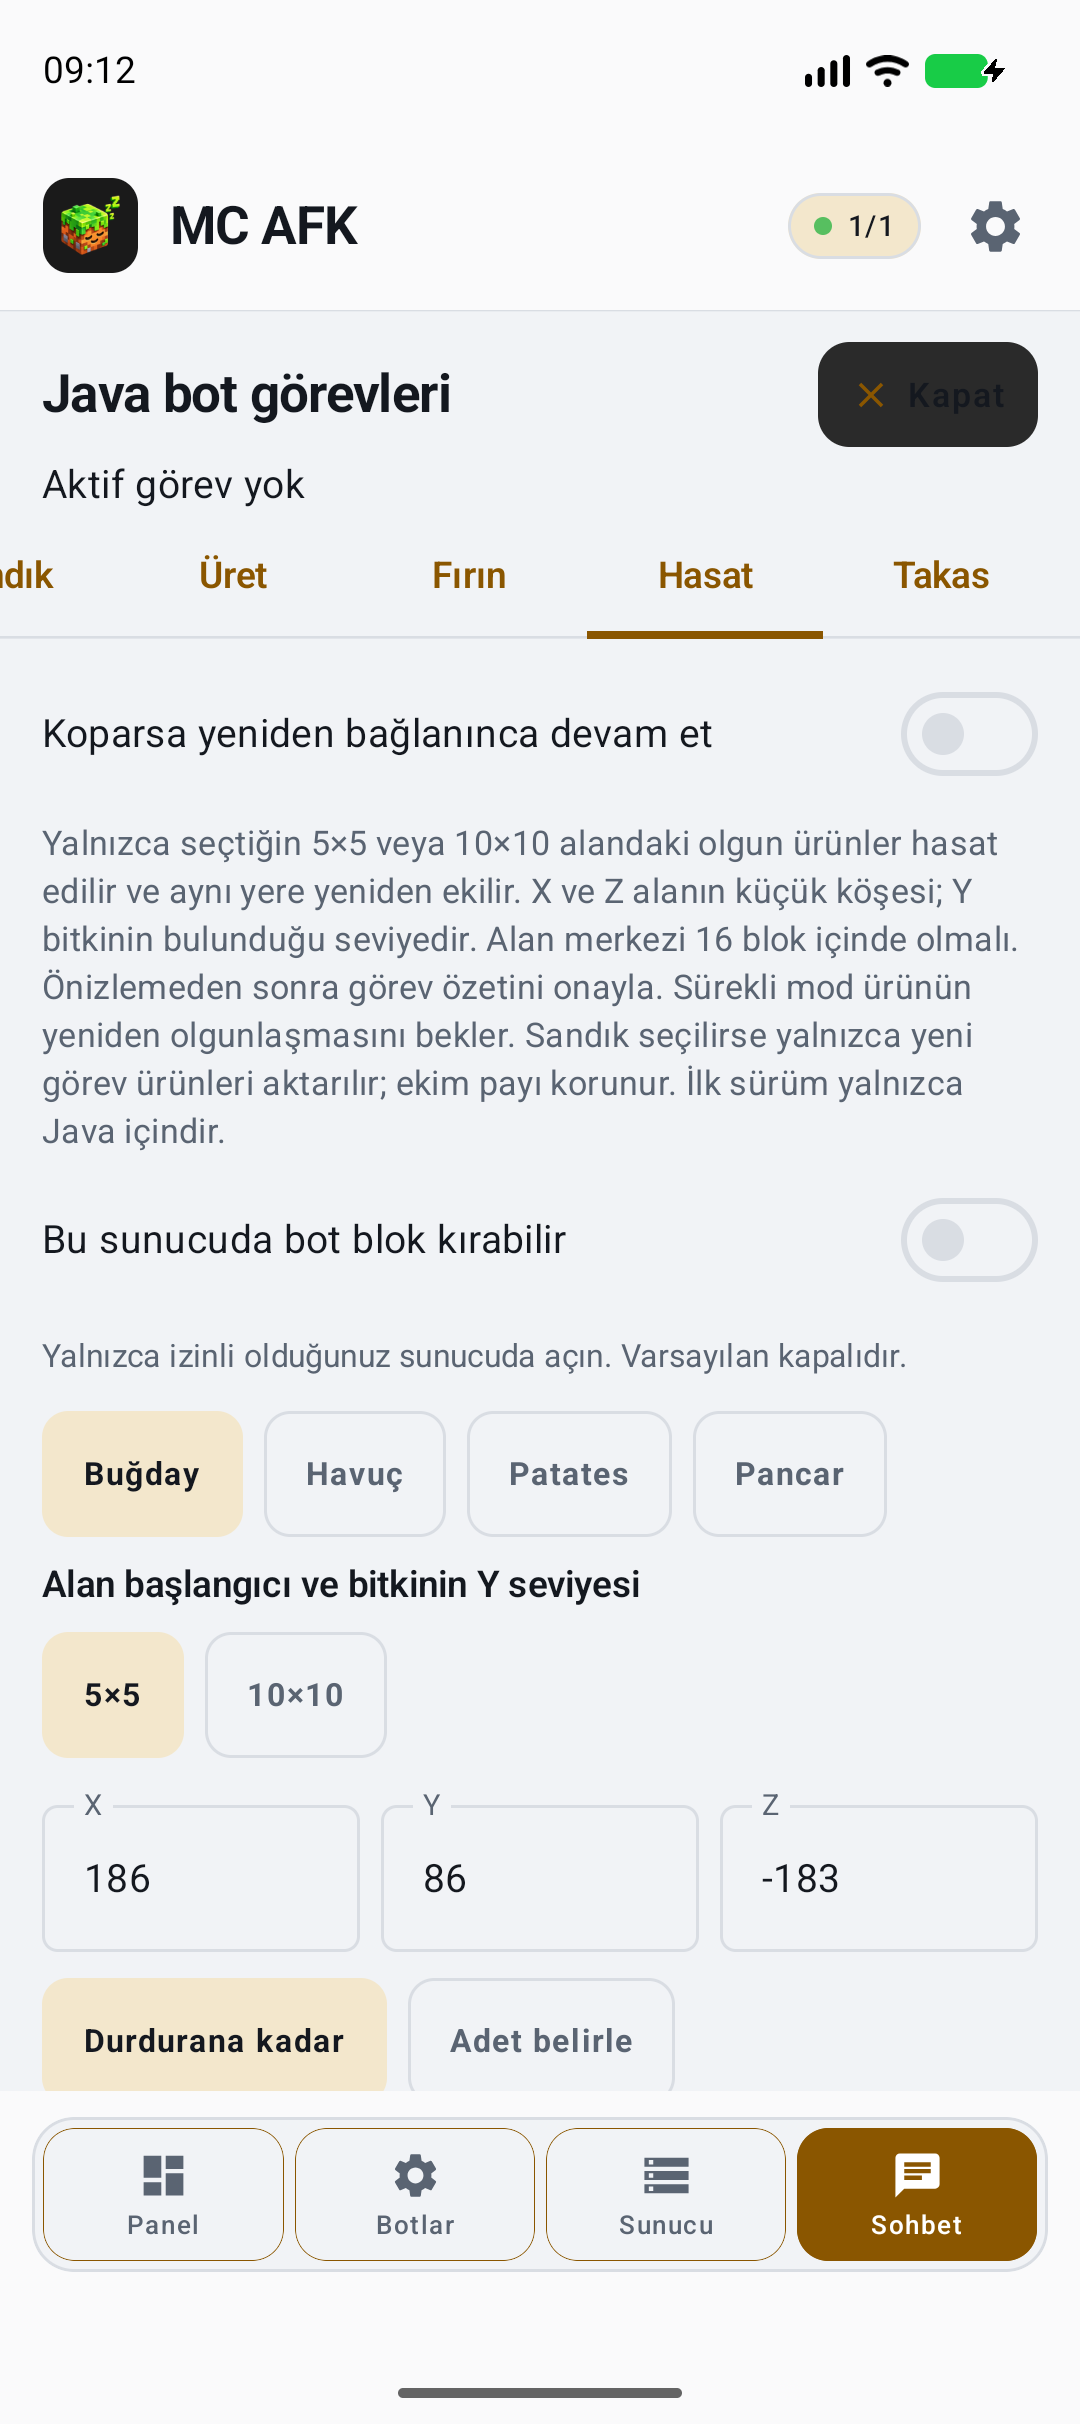
Harvest: collect mature crops and replant
- In Harvest, choose wheat/carrot/potato/beetroot and check permitted breaking approval.
- Choose a 5×5 or 10×10 area. X/Z identify the smaller corner; Y is plant height. The area center must be within 16 blocks of the start.
- Choose until stopped or a quantity limit, then approve the preview/task summary. Continuous mode waits for crops to mature again.
Only mature crops are harvested and replanted in place. With a chest, new task products are deposited while replanting materials are reserved.
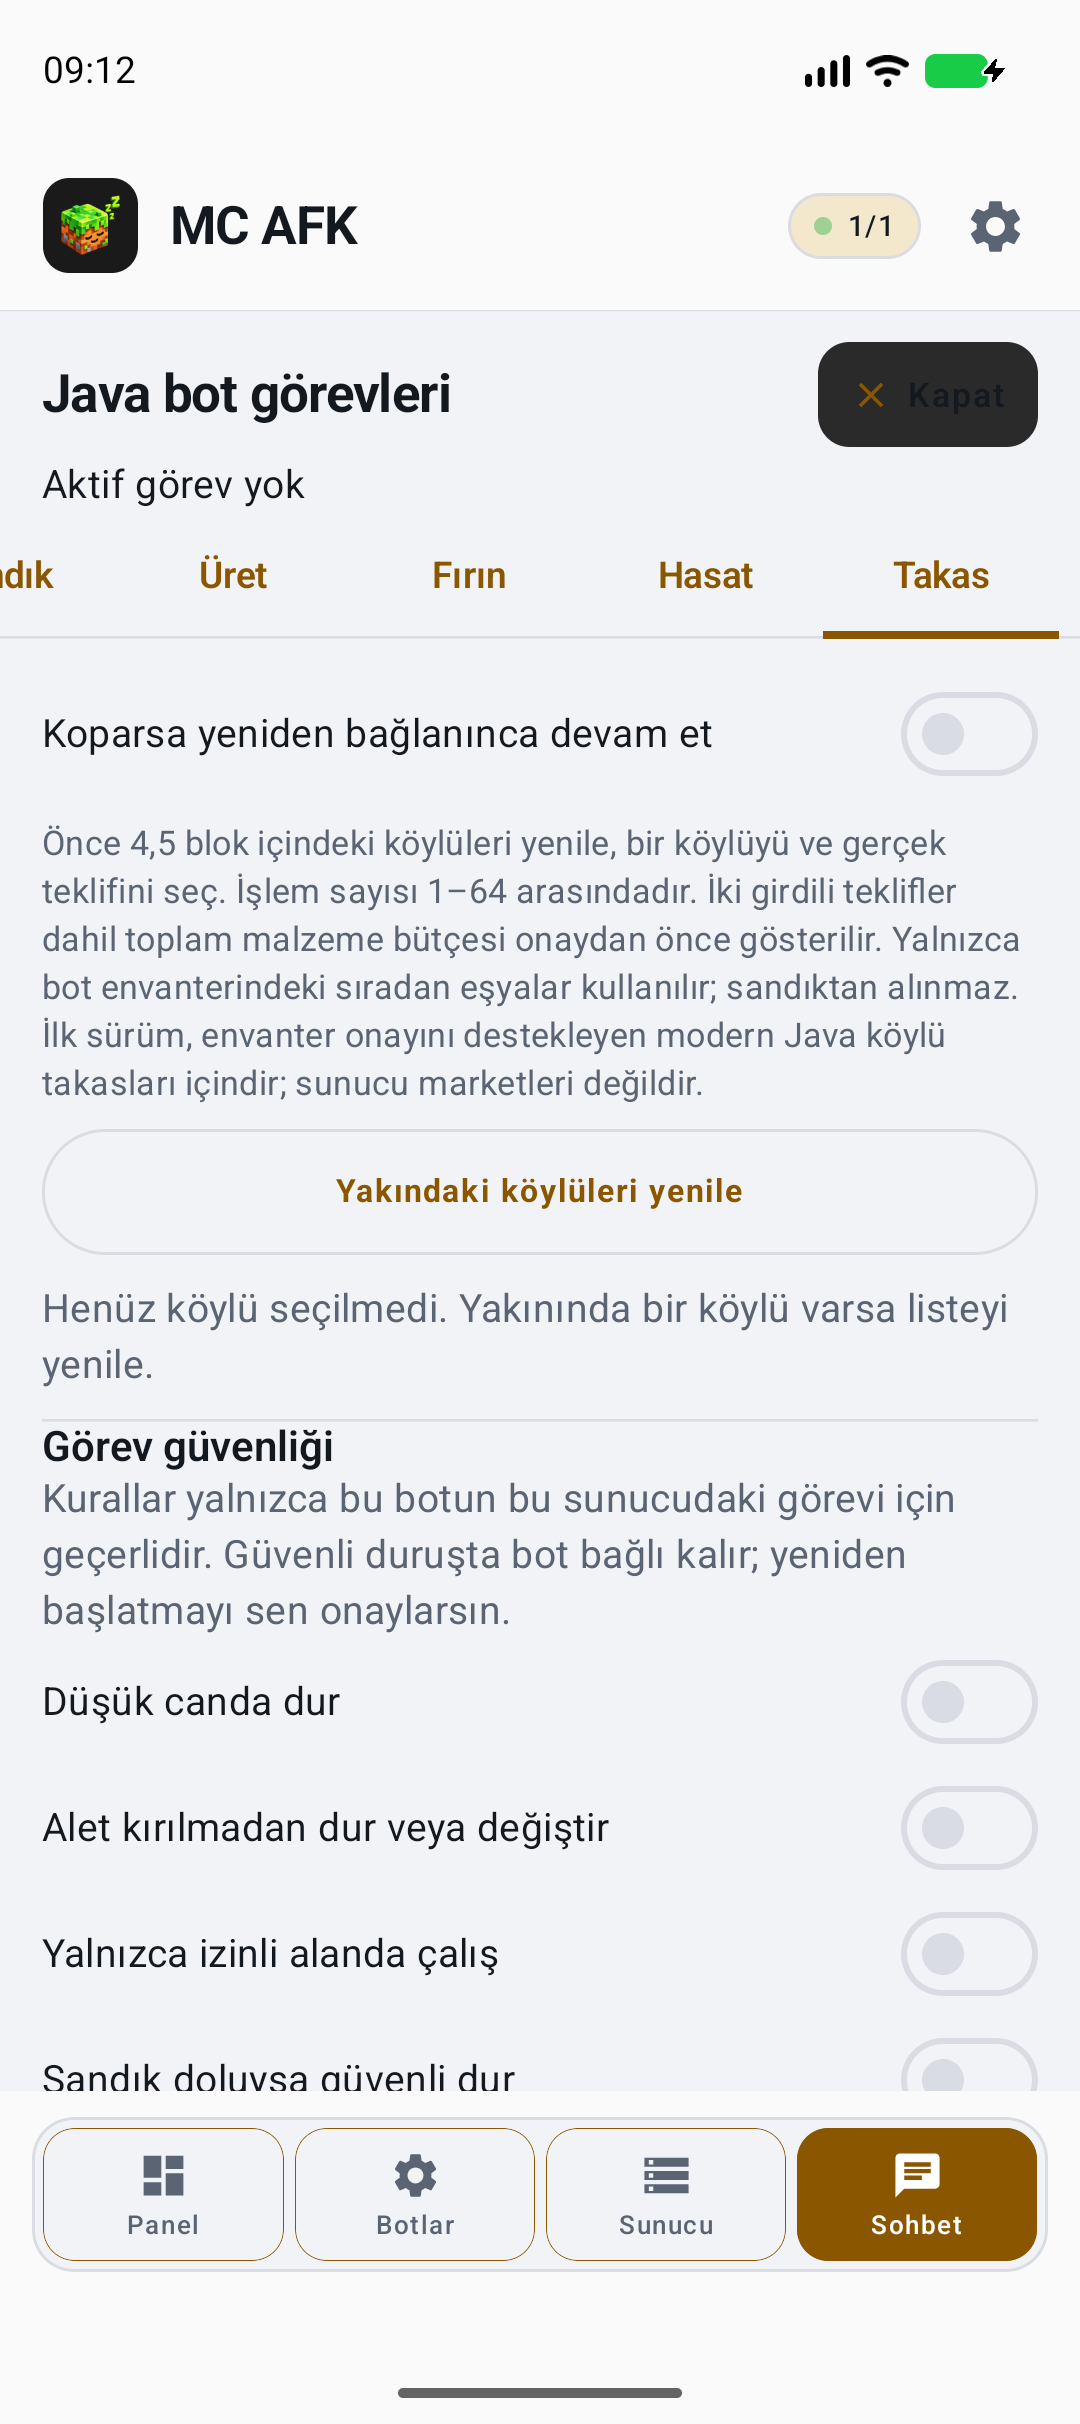
Villager trade: approve a real offer
- Trade → Refresh Nearby Villagers. Select a villager within 4.5 blocks and an offer actually received from it.
- Set 1–64 trades and inspect the total input budget, including both inputs for two-input offers.
- Only ordinary items in the bot inventory are used; materials are not fetched from chests. Approve the summary, start and check the server result.
Modern Java villager trading and inventory confirmation are required. This is not automatic purchasing from a custom server shop GUI.
What happens when inventory is full?
Android · Java mining/fishing; behavior varies by task
Choose deliberately: stop, deposit in an approved chest or continue without a chest. Chestless work is possible, but you accept the risk of lost products.
- In Mine, Mine in Looking Direction or Fish, locate “Continue working when inventory is full”.
- Leave it off and configure an approved Chest transfer to preserve products. Without a chest, the task stops when inventory fills.
- Enable it for continuous chestless work, then check the saved/start summary. Uncollected drops may remain on the ground and despawn.
When enabled, inventory capacity does not stop mining/fishing; safety, tool, connection and server-permission rules still apply.
This does not disable server protection, unbreakable blocks or task safety. Use chest deposits if you do not want item loss.
Settings, textures and notifications
Android · Appearance settings and device permissions are separate
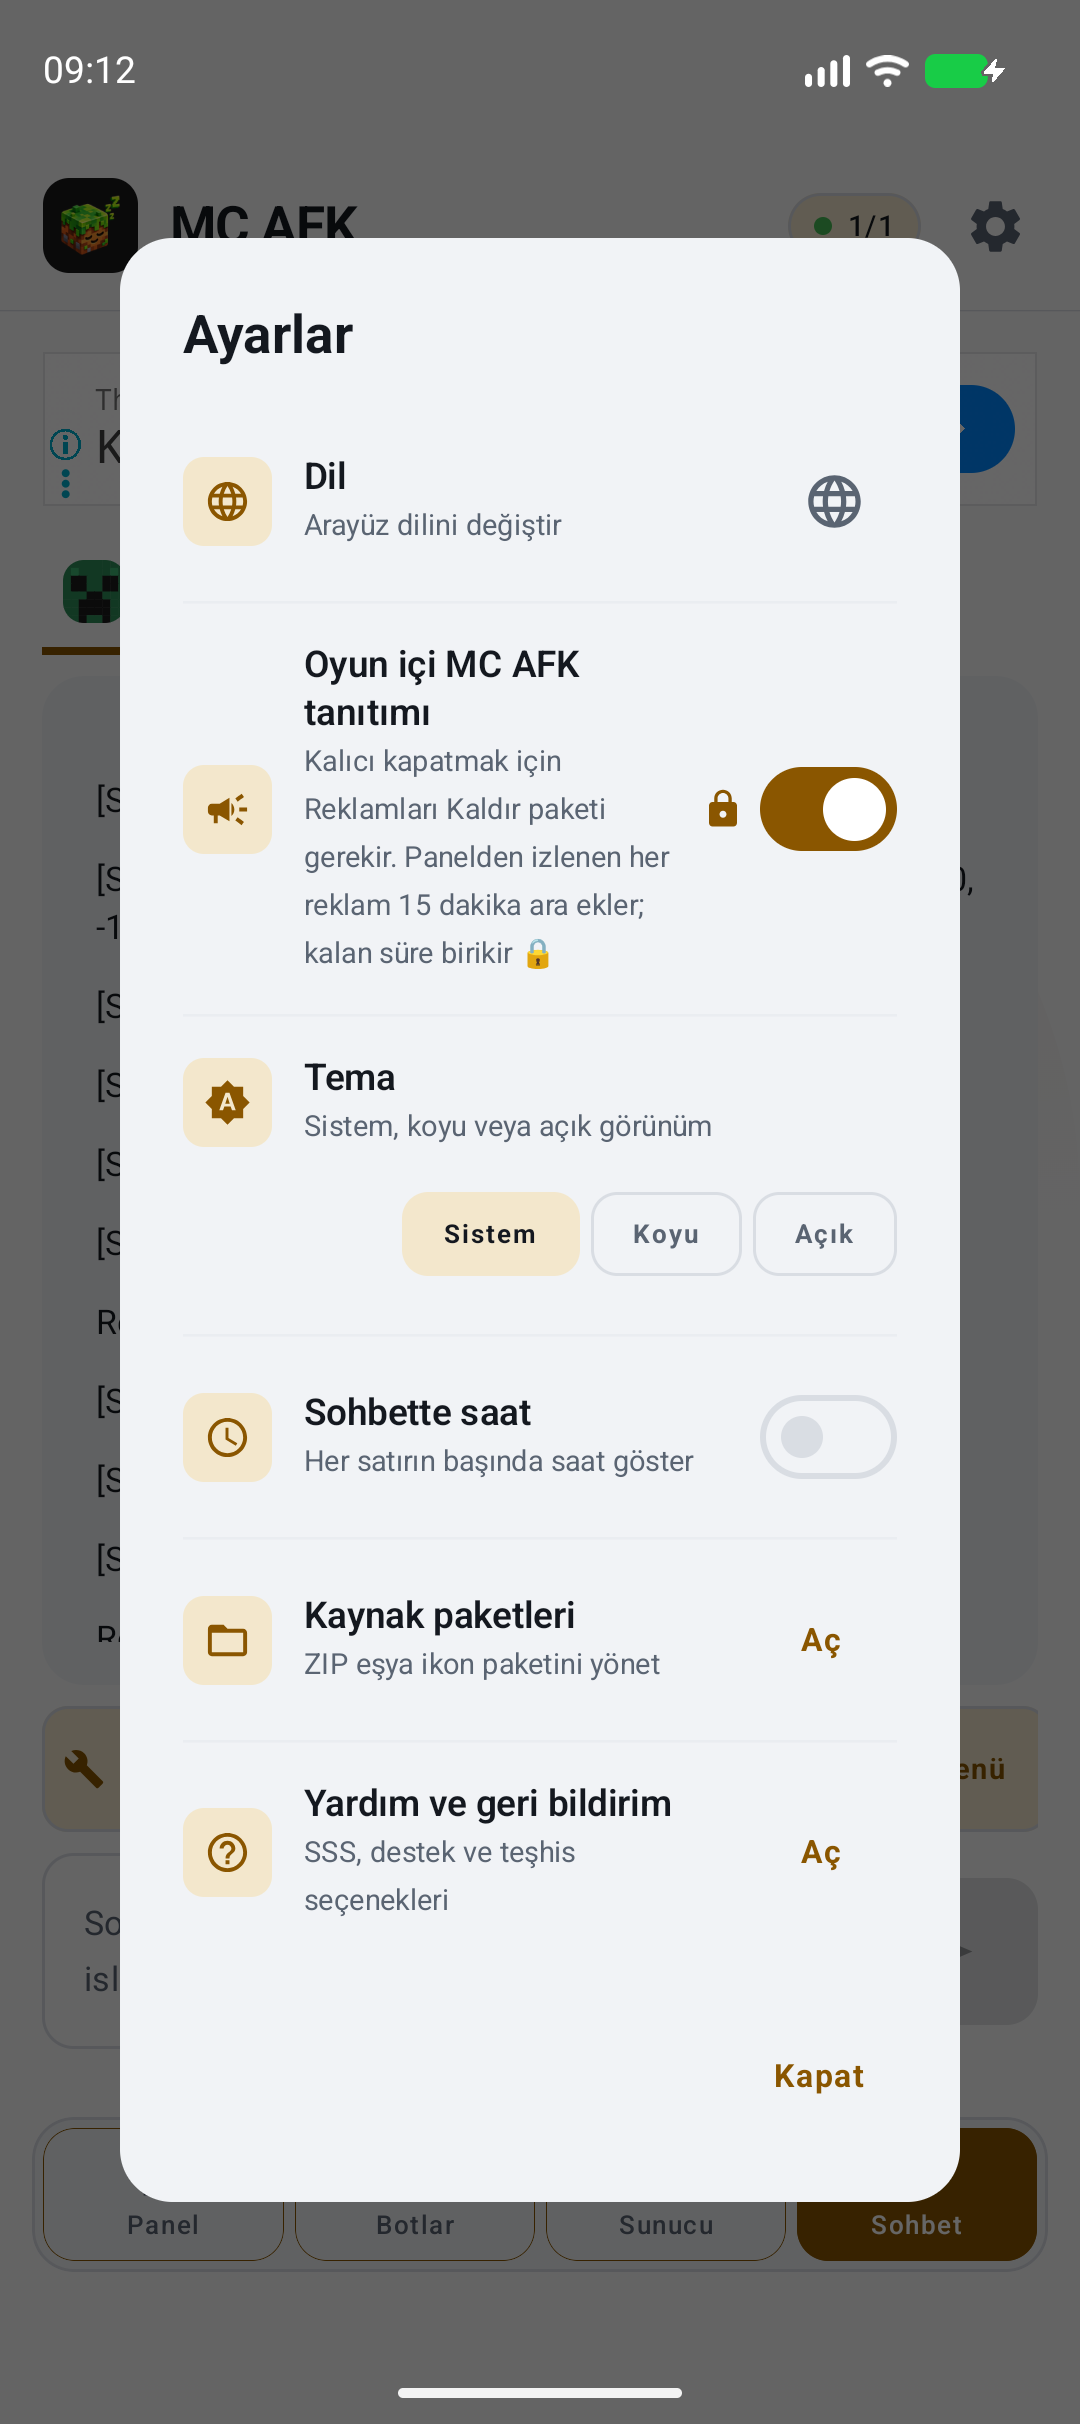
Settings at the top right includes language, theme, chat timestamps, resource packs and help. Notification rules are in bot settings; Android notification permission is in phone settings.
- Top-right Settings → Language changes app language; Theme selects System/Dark/Light. Enable chat timestamps if desired.
- Use Resource Packs → Open or the pack card in Inventory → Download (detected version). With Auto, the version is taken from the real connection. Wait for download/icon preparation to finish.
- Use Load Your Pack for a suitable ZIP containing item/block PNG textures. In Bots → bot → Notifications, configure disconnect, low-health and Java nearby-player/private-message rules, then save.
Textures change item icons, not the connection protocol or Microsoft account.
If downloading fails, check the network and detected version; use a trusted pack. If notifications do not appear, check Android permission too. Help and Feedback includes diagnostic options.
Background operation and disconnects
Android · Phone battery/vendor restrictions apply
While enabled, the service attempts to maintain connections in the background. Android power management, network changes and server rules may interrupt them; uninterrupted operation is not guaranteed.
- Confirm the service and bot are enabled and actually connected in Panel. Allow Android notifications for MC AFK and check the service notification.
- Check whether MC AFK’s background activity is restricted in phone app/battery settings. Option names vary by manufacturer; you do not need to disable all device battery protection.
- Check Auto Reconnect and a reasonable delay in bot settings. If the server disconnects idle clients with Low Power Mode enabled, compare with that option disabled.
- Background the app and later check Panel/Chat status. For support, share phone model, Android version, bot edition and the last disconnect message, but never passwords/tokens.
Check the service notification and connected state. Auto Reconnect cannot force a connection that the server refuses.
Force-stopping the app stops its service too. “Timed out” may indicate network/server issues, not automatically a version error. The official Android Doze/App Standby explanation is linked below.
Android: Doze and App Standby (official documentation)Shared time pool for extra bots
Android · Rewarded ads and purchase exceptions
The first two bots are free. Ad-funded extra bots share a pool; each bot does not receive its own 24 hours. Only extra bots actually connected consume pooled time.
- Panel → Extra-Bot Time Pool. Read remaining time and consumption status. If a purchase benefit applies, use the current package terms shown in the app.
- The first completed rewarded ad adds 24 hours; subsequent completed ads add 12 hours. Opening an ad or closing it early does not earn a reward.
- Each connected extra bot consumes one pool hour per hour. If the third and fourth bots both stay connected for one hour, two pool hours are used. Stopped/disconnected extra bots consume none; the first two are excluded.
The pool increases after the reward is confirmed; consumption reflects the number of connected extra bots.
If an ad is unavailable, check the connection, use Retry on screen or return later. Do not confuse bot-ad removal with removal of all ads; read the purchase screen’s scope.
Get started with Windows 0.1.9
Windows · Trial · Java 1.8.8–26.1 only
Windows is a separate portable application. Android’s Java 26.3 / Bedrock support, advanced tasks and shared ad-time pool are not features of this Windows package.
- Download the official v0.1.9 package using Download for Windows (.exe). The package is unsigned; verify the publisher/file if Windows warns, without disabling security protections.
- My Accounts → Add New Account. Enter server address/port, account type and automatic version selection. Complete official Microsoft authentication if needed; never enter its password in Server Login Password.
- Save the account and connect it. Select the correct account in Chat and Maps and check server messages/maps.
- Review AFK Settings and App Settings. Minimizing to the system tray differs from quitting the app; connections are not guaranteed while the computer sleeps.
The connected account’s status and chat are shown. Use Windows 0.1.9 only within its own supported version range.
Do not select this Windows package for 26.3 or Bedrock servers; use the Android support information. Check the version and last error for account/download problems.